


[BR] Appointment Queue
Document Status | READY TO DEVELOP APPROVED BY MOE |
|---|---|
Last updated | |
Document Owner | |
Designer | |
Developer |
|
QA |
|
Technology |
|
Sprint | Accounting Clean Up 1.0 |
Design | https://zuum.invisionapp.com/console/share/EP1FVS4QMJ/480212466 |
Context
When the accounting team either builds a shipment or receives a shipment through EDI, they need to make a pickup and dropoff appointment.
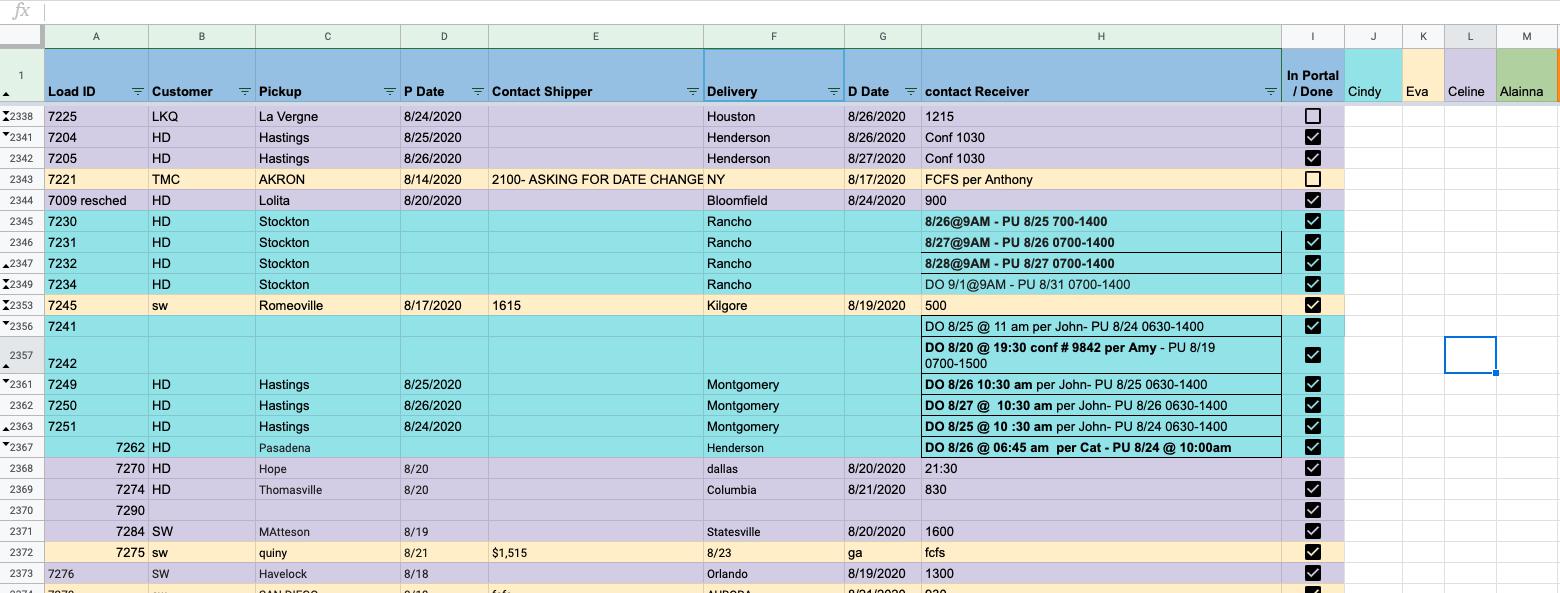
Currently, the accounting team or service team (Eva, Celine, Cindy, and Alainna) copy that shipment information into a separate google sheet to manage and track their appointment tasks like below:
Problem
The process is too manual and disjointed from our system
Solution
Integrate this process to Zuum admin so this can be part of the zuum workflow
There are 6 areas that need to be updated to make this possible
Build Shipment page
Update EDI tenders Accept page
Update shipment list
Update Load Detail - Stops tab
Update the location page
Build an appointment page
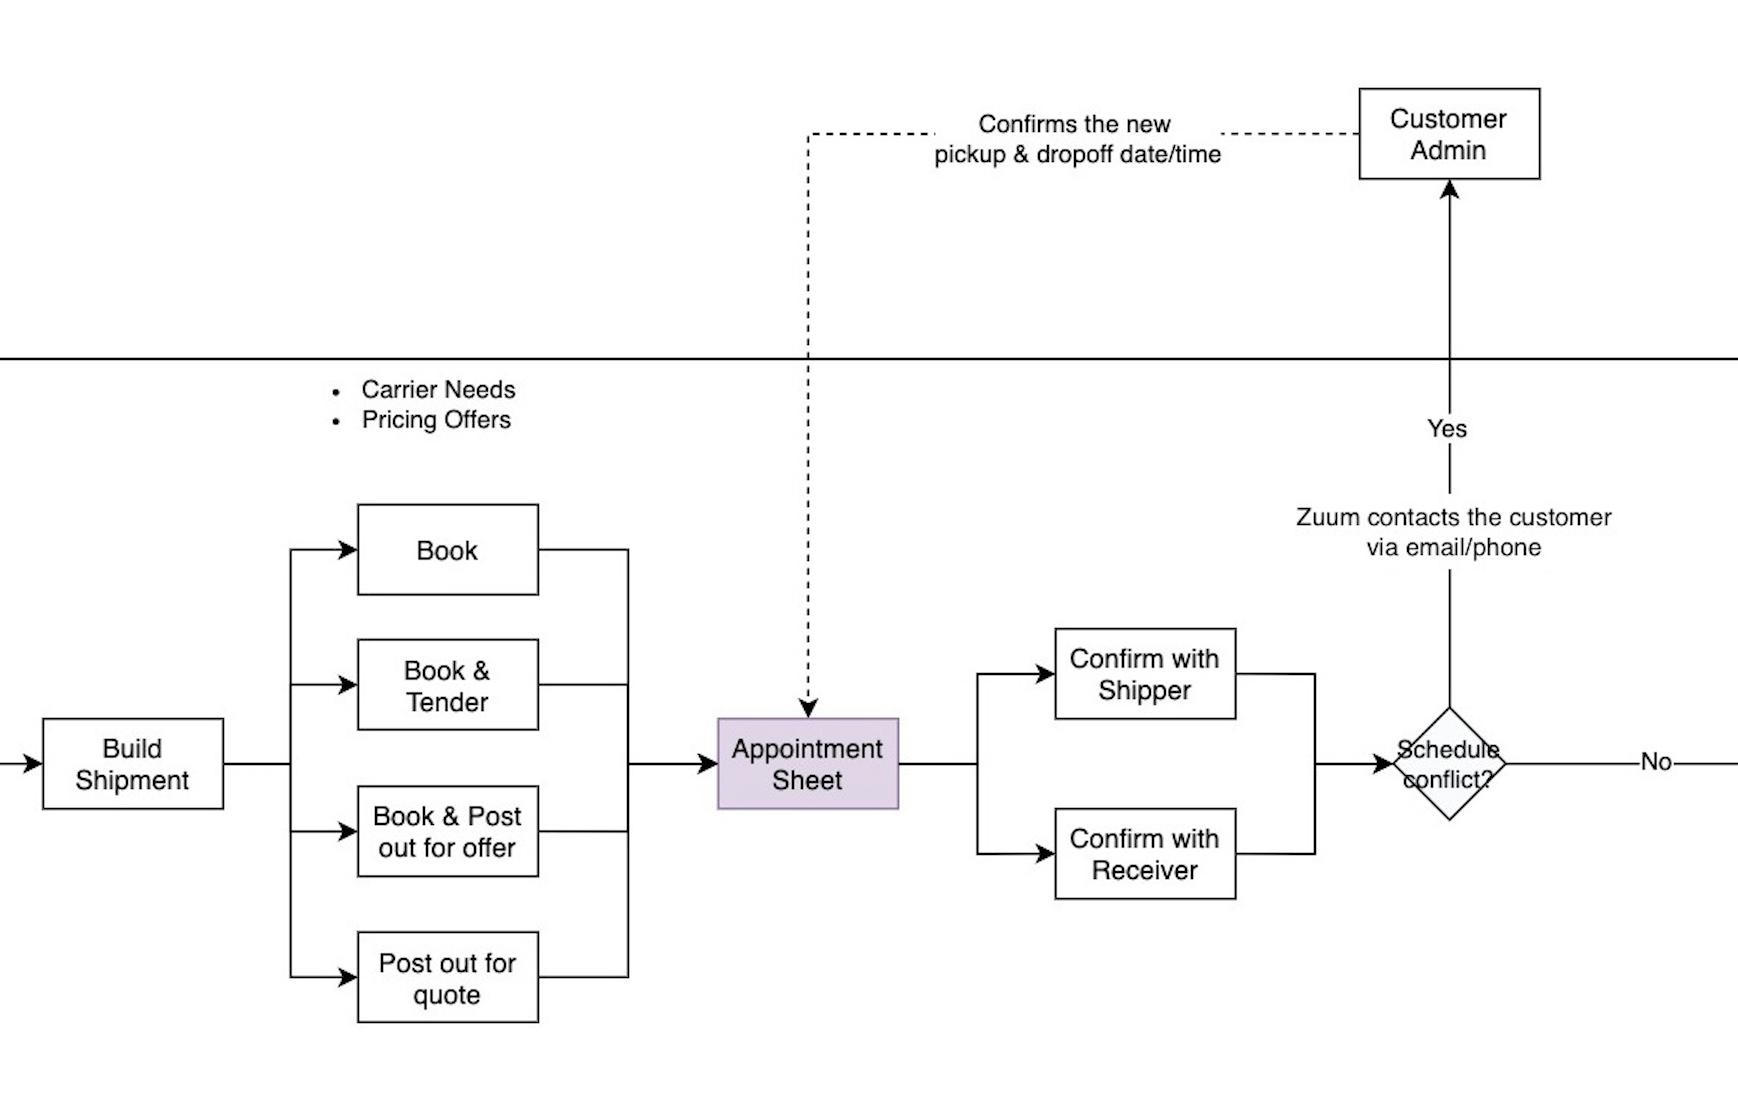
The three triggers for a load to appear in the appointment page
Trigger #1: Changing appointment type to “Appointment Pending” when building a shipment
When you change the appointment type to “Appointment Pending” when building a shipment, this load will appear on the appointment page.
Important: we are NOT taking this load out of the shipment list and put it onto the appointment page. We are just mirroring the load to the appointment page so the user can manage the appointment task. The load status will be unchanged (Needs Carrier/Pricing Offers)

Trigger #2: When the user “ACCEPTS” the EDI tenders
Since the pickup (PU) and delivery(DL) date/time shown in EDI tenders are NOT confirmed with the facility, this needs to be reflected in the appointment page ONLY when we accept the EDI tenders.
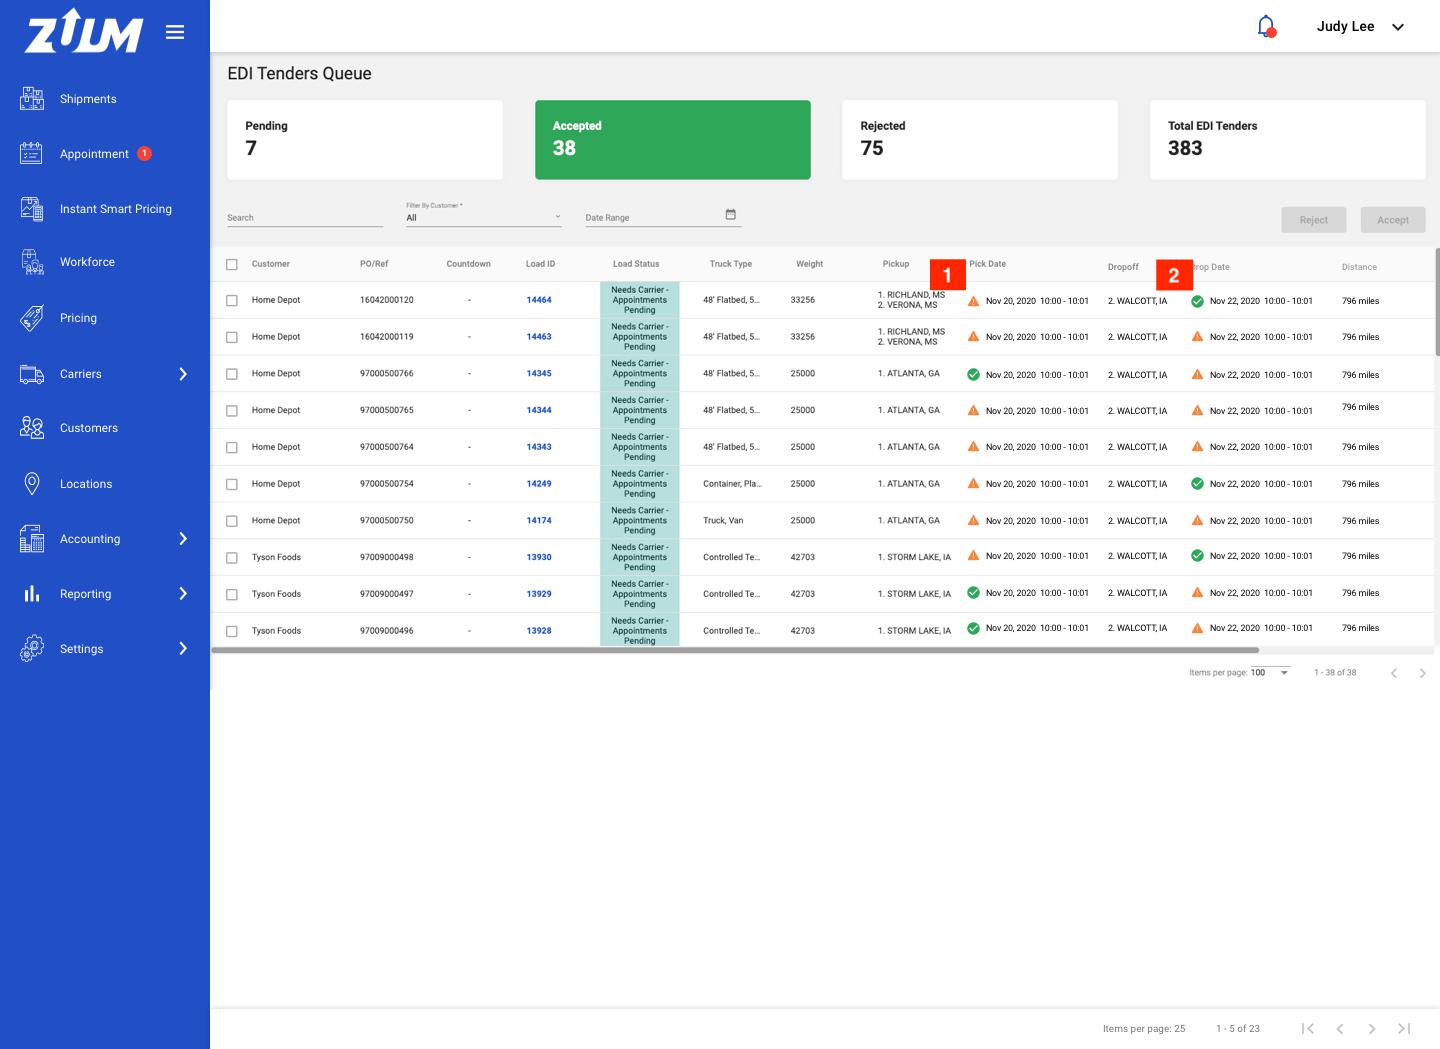
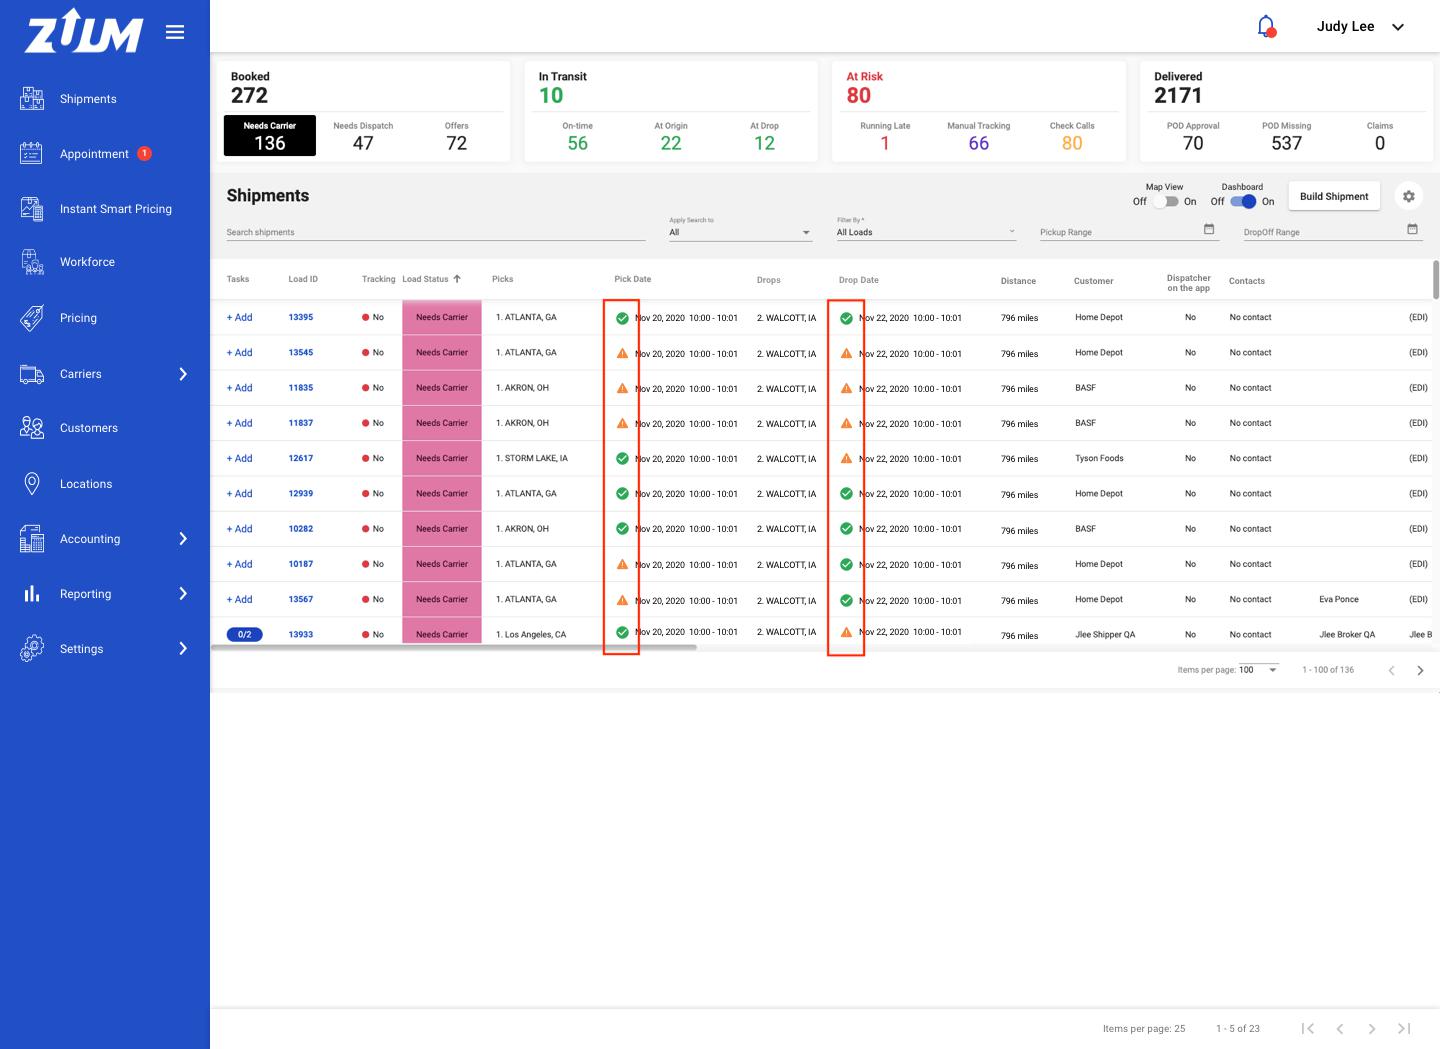
Pending Status
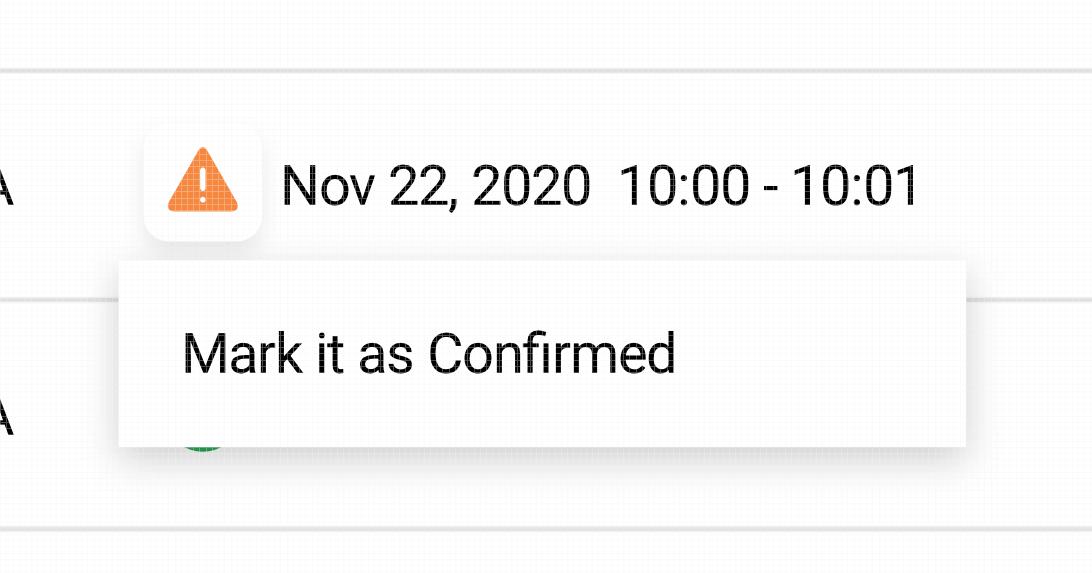
Orange Triangle: This indicates that the date/time shown here is NOT confirmed yet.
This load will appear in the appointment page
If you want to change the status to “Confirmed,” you can click the icon and it will give you an option to “Mark it as confirmed”
But if you want to change the date/time value, either you need to go to the appointment page or click into the load details which you will see it later.
Confirmed Status
Green Checkmark: This indicates that the date/time shown here is confirmed.
Both PU and DL date/time need to be confirmed for the load to disappear on the appointment page.
If you want to change the status to “Pending,” you can click the icon and it will give you an option to “Move into Appointment Queue”
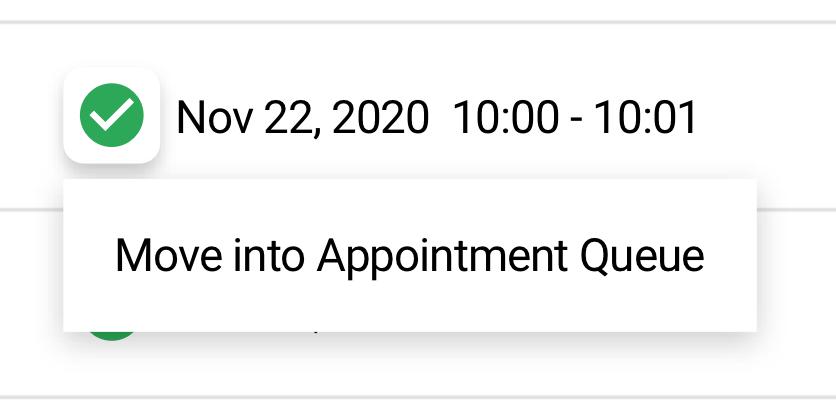
But if you want to change the date/time value, either you need to go to the appointment page or click into the load details which you will see it later.
Trigger #3: Whenever we change the confirmed PU/DL date and time or the appointment status to “Pending”
This refers to item #3 (Shipment List) and #4 (Stops tab) in the solution section.
We need to add the appointment status next to the pickup and delivery date/time
Solution #3: Shipment List
The interaction when you click on the status will be the same as described above
Solution #4: Stops
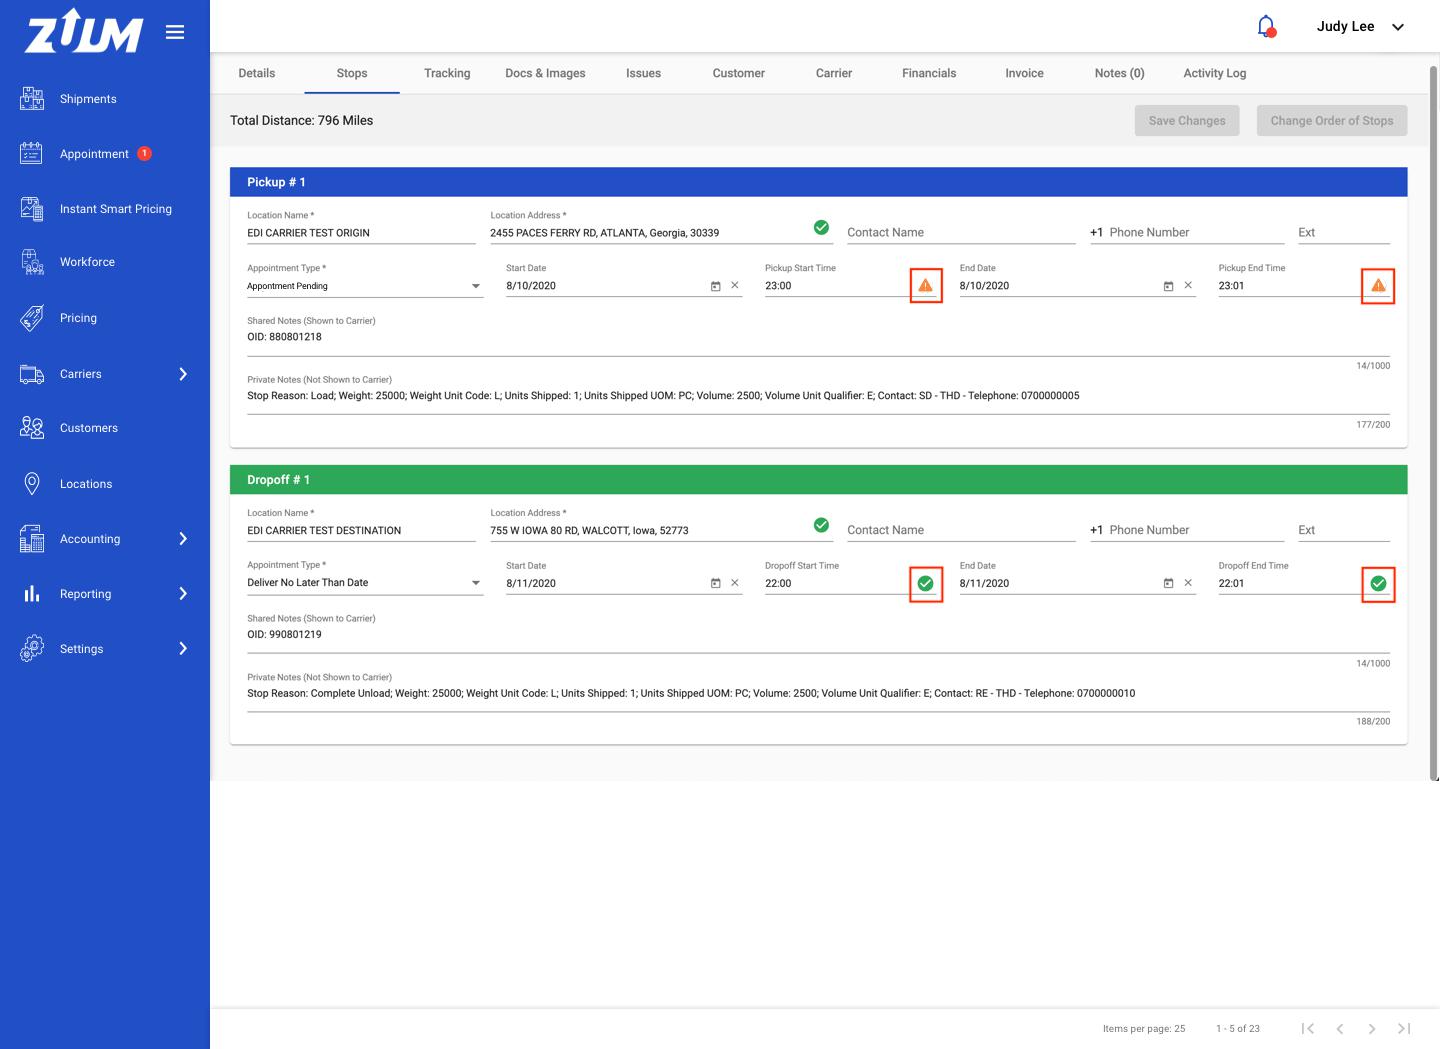
The interaction when you click on the status will be the same as described above
Appointment Queue
Design: Here
The objective of the page is to manage and track the loads that need an appointment confirmation from the pickup and dropoff location. The new flowchart for making appointment is:
1. Assign the load > 2. Send an email to the facility > 3. Get confirmed > 4. Change the date/time > 5. Mark the load as confirmed > 6. Complete the load
Assign the load
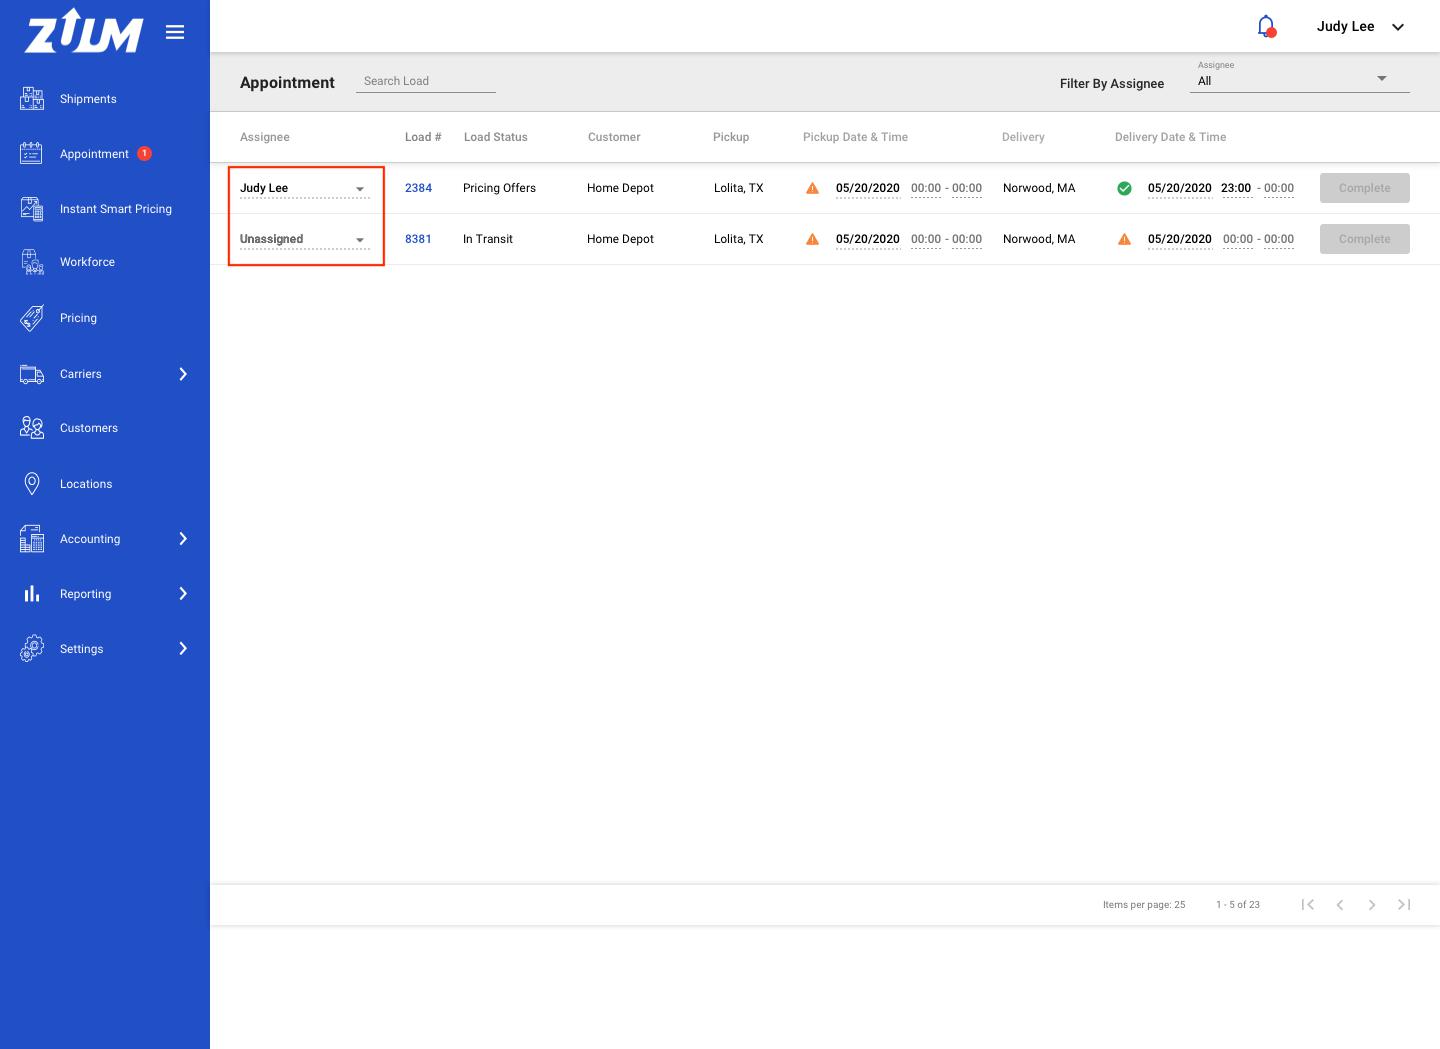
Assignee
As a default, it will be “unassigned”
As a user, you can assign the load to yourself, or as a manager, you can assign the loads to your teammate.
In the future, when you are assigned to an appointment task, you will be notified through email or notification center.
Send an email to the facility (PART 1)
Design: here
Hover and clicked state
This is when you hover and/or clicked on the appointment status button.
This would be the same as the confirmed status.
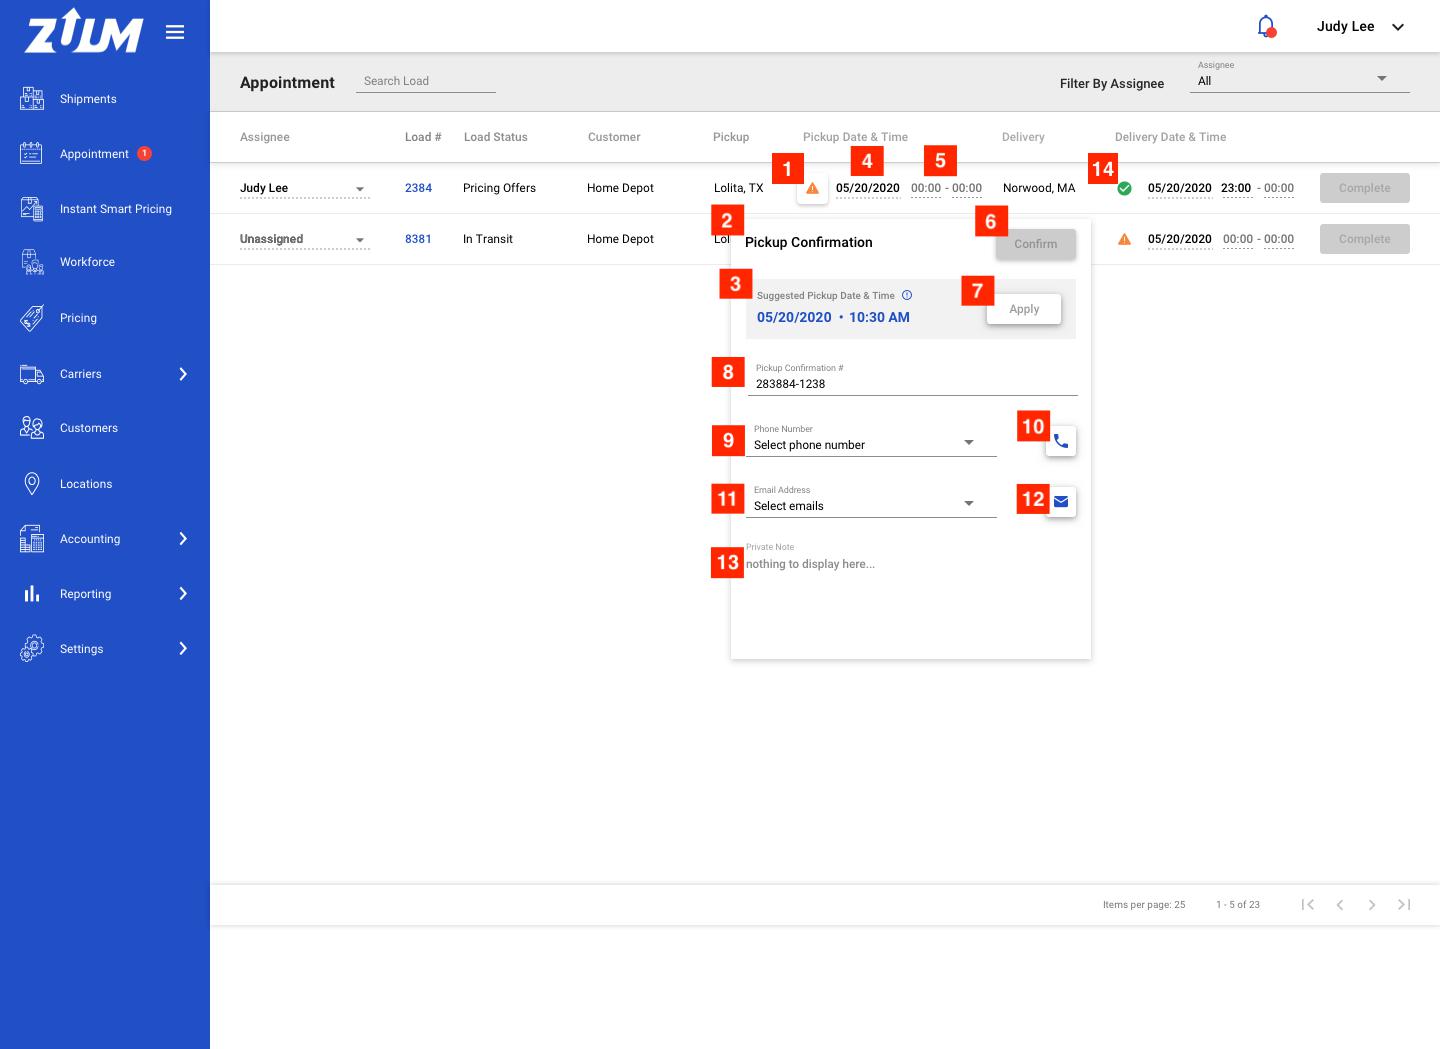
Pickup Confirmation Popup modal
The title would be changed to “Delivery Confirmation” when you click on the status button in the delivery section.
Suggested Date & Time
We want to give users a suggested date and time for the pickup and dropoff.
Here are the rules on how we display the suggestion:
According Mo: “For now, we don’t have to think about appointment times. We just need a general guide”
Description | |
|---|---|
Rule #1 | Assume drivers drive 650 miles per 24 hours |
Rule #2 | Every 3 days (1950 miles) transit, we have to add 18 hours for the driver to restart |
Rule #3 | Round up the numbers. For example:
|
For example:
Total transit distance | Suggested Date/Suggested # of transit days | Equation |
|---|---|---|
700 miles | 1.5 Days | 700miles/650miles = 1.1 = 1.5 days (rule#3) |
650 miles | 1 day | 650miles/650miles = 1 day |
2400 miles | 5 days | 2400/650 = 3.6 = 4 days = 96 hrs (rule #3)
(96 hrs + 18 hrs)/24hrs = 4.75 = 5 days (rule#3) |
1500 miles | 2.5 days | 1500/650 = 2.3 days = 2.5 days (rule #3) |
4. Pickup Date
a. This can be editable
b. This value will come from the load or EDI data
5. Pickup Time
a. The can be editable
b. This value will come from the load or EDI data
6. Confirmed Button
a. This button will be “inactive” state when the pickup date and time is blank
b. It will become “active” state when the date & time is entered
c. Once it’s clicked, the appointment status will be changed from “pending” to “confirmed”
7. Apply
a. The suggested date will be applied to the field when you click the “Apply” button
8. Pickup Confirmation
a. Field to enter pickup confirmation # if we have it
9. Phone number
a. We will display contact people’s names and phone numbers that are entered in the new location page below
b. Single select dropdown
10. Call button
a. Now that we incorporated a way to make a phone call via computer, we want to do it here as well
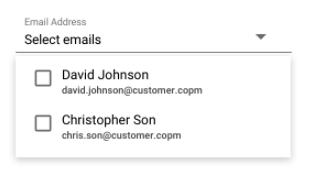
11. Email Address - Design Here
a. We will display contact people’s names and email addresses that are entered in the new location page below
b. Multiselect dropdown with checkboxes
12. Send an email button - Design Here
a. This will give a pop-up modal to send the email to the facility
b. You will be able to see the details in PART 2 below
13. Private Note
a. There are two scenarios for which private notes to display here.
1.Manual Shipment: Private Note from the location page
2. EDI Shipment: EDI notes coming from the customer
14. Confirmed Status
a. This button will display if you enter both date and time and click on the “confirmed button” (#6)
Send an email to the facility (PART 2)
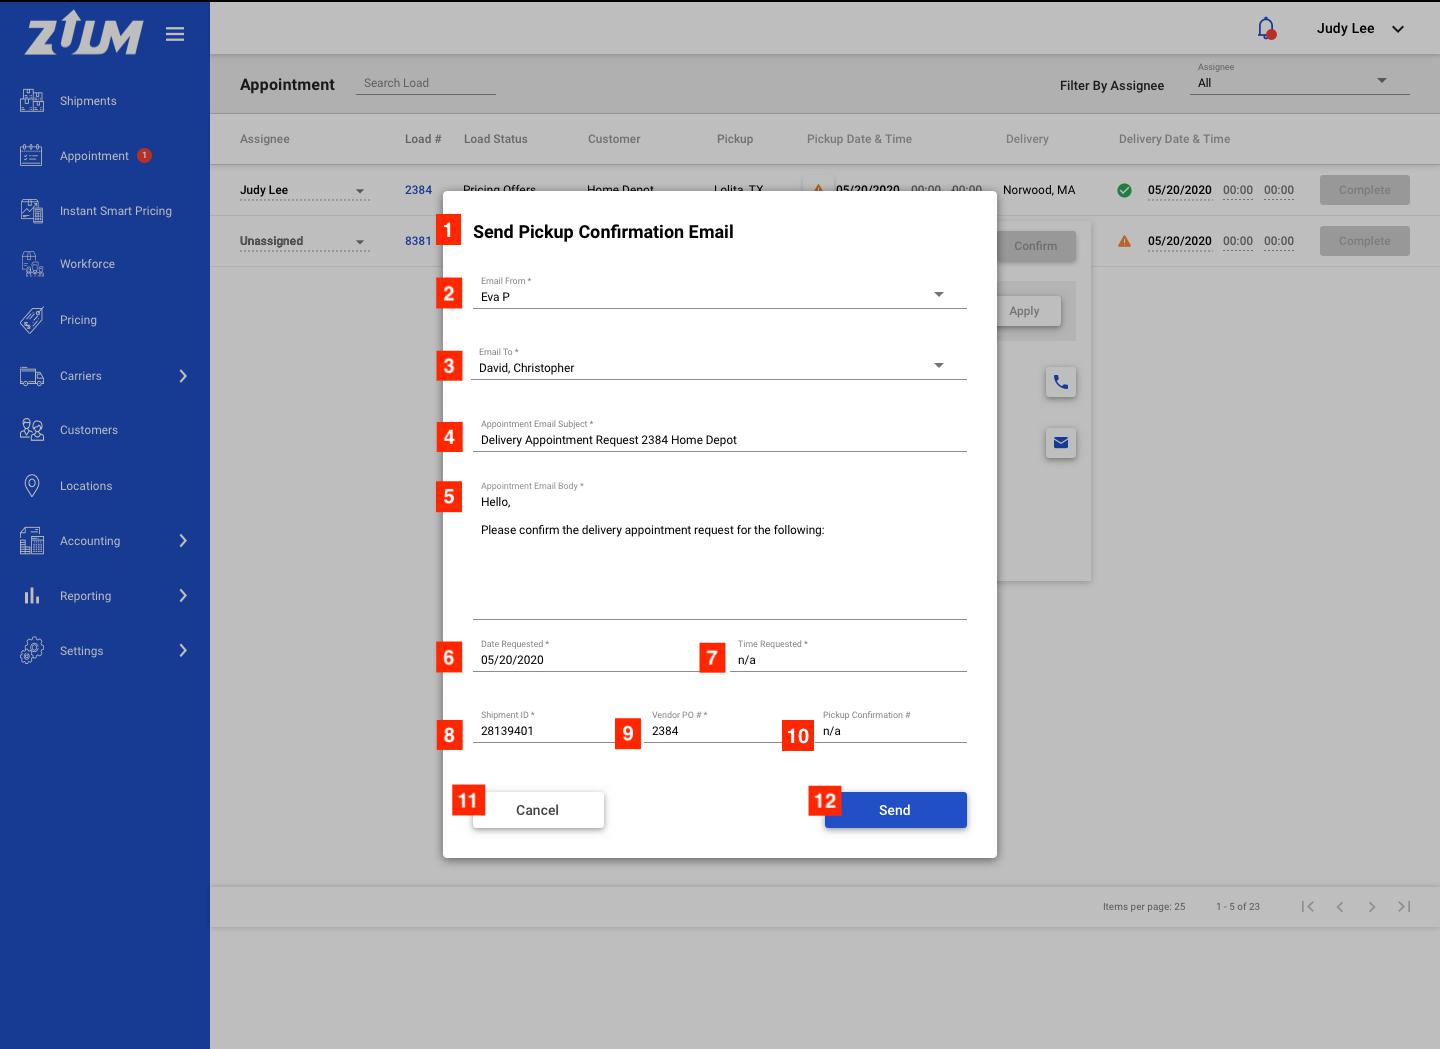
Title
This will be changed to “Send Delivery Confirmation Email” if you are sending email for delivery
Email From
Performer’s name will be shown here
This email will be sent from the accounting zuum email and this performer will be CC’ed in the email
If the performer wants to add more people in the CC list, they can click the dropdown and select more people
Email To:
This is whoever was selected in the previous page
Also can be edited if you click it and select/deselect people from the contact list.
Appointment Email Subject
This is templated subject
Delivery Appointment Request [####] Customer Name
#### = Load number
Customer Name = Customer name here
Appointment Email Body
This is templated body text
Date Requested
This date will come from PART 1 (item #4)
Time Requested
This time will come from PART 1 (item #5)
Display n/a if it’s not entered
Shipment ID
This will come from the load or EDI data
Display n/a if it’s not entered
Vendor PO #
This will come from the load or EDI data
Display n/a if it’s not entered
Pickup Confirmation #
This will come from the load or EDI data
Display n/a if it’s not entered
Cancel
Send
Complete the Appointment Task
Design: Here
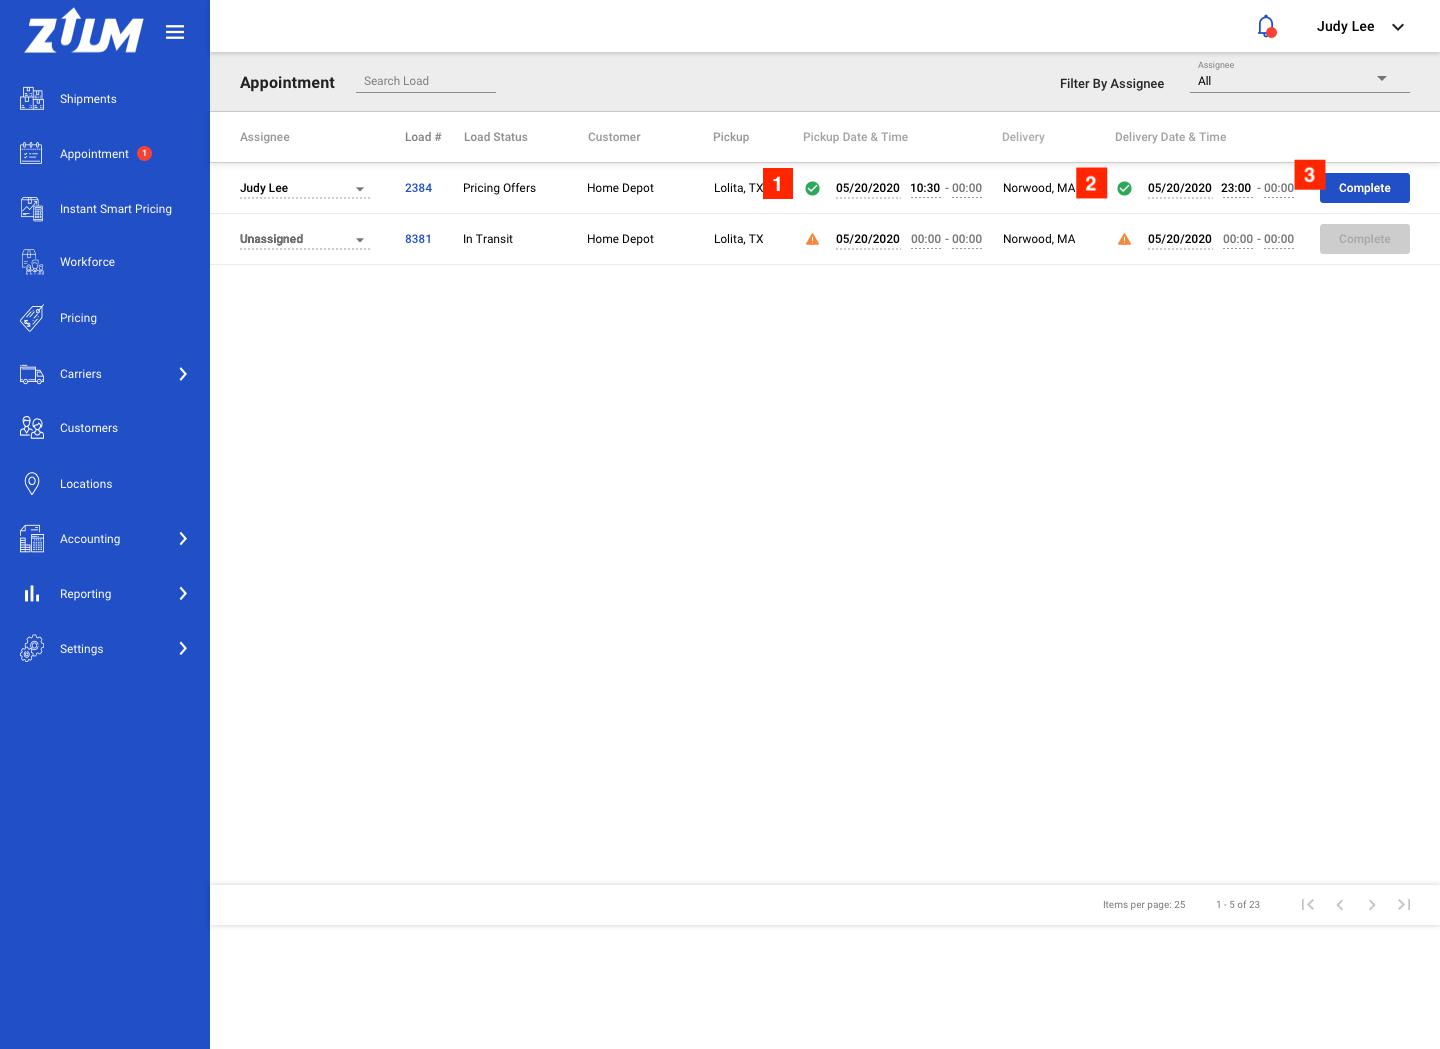
Pickup Confirmed Status
Delivery Confirmed Status
Complete Button
This button will become “Active” only when both #1 and #2 is confirmed
Once you click the “Complete” button, this load will disappear and these appointment statuses will be updated to the load.