


[BR] Factoring Company Database
Document status | IN PROGRESS |
|---|---|
Last Updated | // |
Document owner | |
Designer | |
Developers |
|
QA |
|
Technology |
|
Related Documents | |
Version | V1: // |
Overview
When Zuum hires a Carrier to deliver a load, the Carrier sends Zuum an invoice with the total amount that Zuum needs to pay the Carrier. Zuum then has to pay the Carrier within 30 days of receiving the invoice from the Carrier. Many Carriers want to get paid faster, so they use a “Factoring Company”.
How this works:
Carrier delivers load →
Carrier sends invoice to Zuum AND to Factoring Company →
Factoring company pays Carrier the invoice amount immediately (and keeps a % of the amount) →
Zuum pays the factoring company 30 days after receiving the Carrier invoice.
The Carrier tells Zuum to pay the Factoring Company instead of the Carrier directly, by submitting a document called a “Notice of Assignment.” This document usually includes information about how to pay the Factoring Company (like bank information for ACH payments, or where to send checks).
As a Platform, Zuum needs to maintain a global database of Factoring companies, so that
carriers can easily be “linked” to a factoring company
Factoring company data is consistent and accurate
Outgoing payments to multiple carriers who are linked to the same factoring company can be grouped into batches for accounting purposes
Requirements
Global Database
Factoring Company Data should be stored in a Global Database that can be accessed by other apps on the Zuum Platform (Zuum’s Boker Admin App, Broker SaaS Accounts, Fleet Manager SaaS accounts, PaaS, etc.).
Initially, only the Zuum Broker app and Zuum Super Admin should have access to this database.
Factoring Company Data
Each factoring company record should have the following properties:
Factoring Company Name
Contact Email (type = email)
Contact Phone # (type = Phone Number)
Ext. (type = Number)
Business Address
Address 2
Bank Name
Bank Account #
Routing #
Remittance Email
Checks Payable To
Payment Address
Payment Address 2
Linked Carriers []
“Linked Carriers” is a list of all carriers that asked Zuum to pay the factoring companies instead of the carriers directly.
Accessing the Factoring Company DB through Broker App
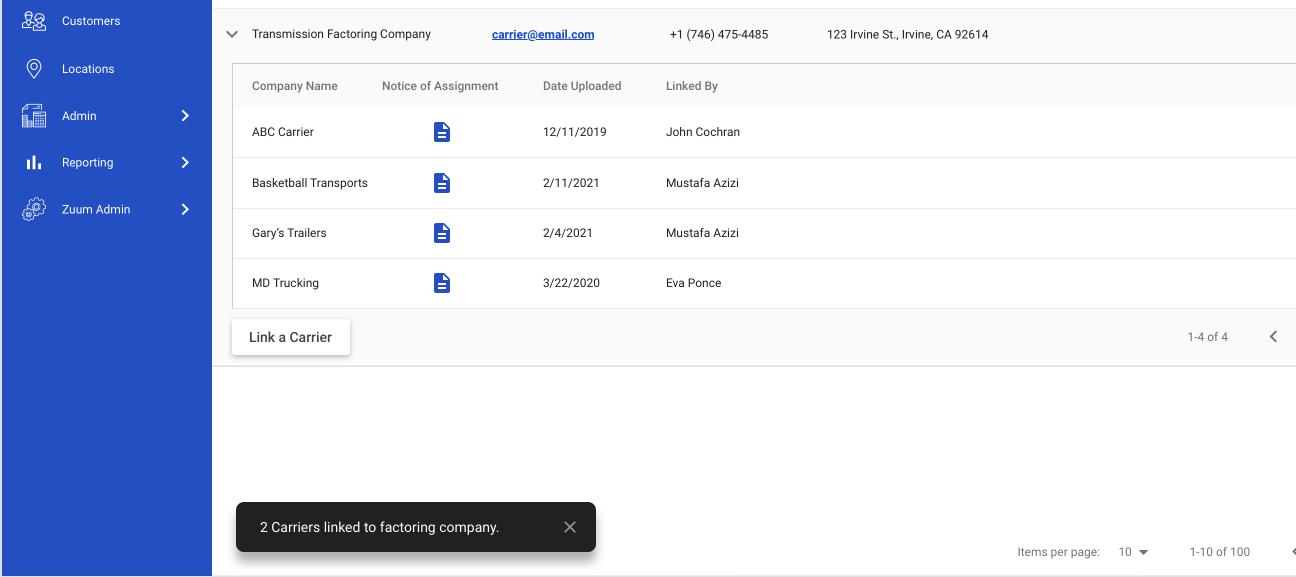
The Broker App should have a new section under the “Carriers” group in the side navigation menu, called “Factoring Companies”.
The Factoring Companies main page has the following elements
Factoring companies list (data table)
With Pagination
a filter search, and
This allows the user to search for a factoring company
a button to “Add Factoring Company”

Data Table
The Factoring Companies list data table has the following columns:
Factoring Company Name
Email
Phone
Address
Edit Button
This data table has expandable rows.
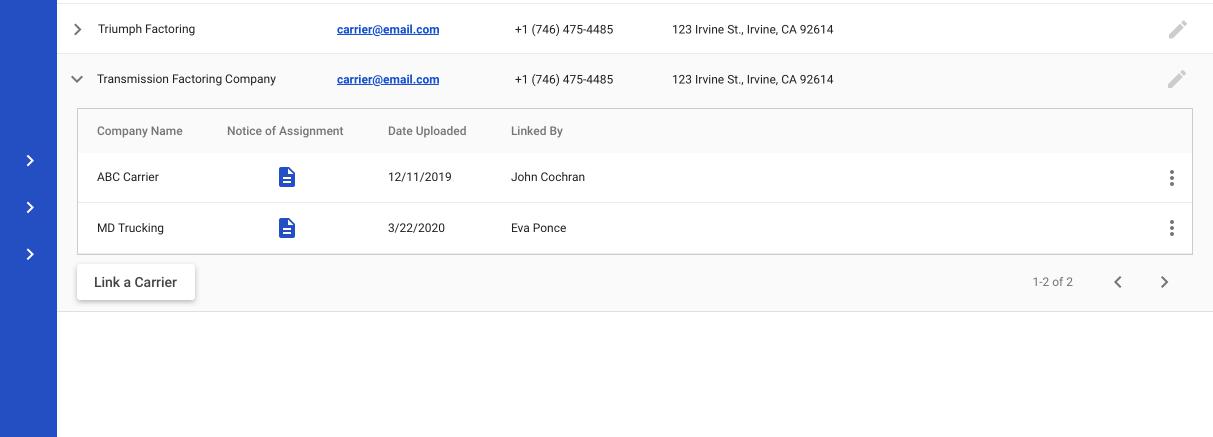
When the user expands a row, there is a sub-data table that displays all of the carriers who are “linked” to that factoring company. This data table has the following columns:
Company Name
This is the name of the Carrier
Notice of Assignment
This allows the user to preview the Notice of Assignment that was submitted by the Carrier. This is the document that the Carrier must submit to Zuum in order to have Zuum issue payments to the Factoring company
This document is stored in the Carrier’s profile, in the documents section
Date Uploaded
This is the date that the Notice of Assignment document was uploaded
Linked by
This is the user who “linked” the carrier to the Factoring Company
Options Icon (3 dots)
With a dropdown that allows the user to
Go to that carrier’s profile in a new tab
Unlink that carrier from the factoring company
Note that this sub-table also has pagination. This table should list up to 10 linked carriers per page.
Below the sub-table, there is a button to “Link a Carrier” within the Factoring Company’s expanded row.
Adding a New Factoring Company
To add a new factoring company to the list, the user must click on the “Add Factoring Company” button.

This brings up a modal where the user can enter the Factoring company’s information:
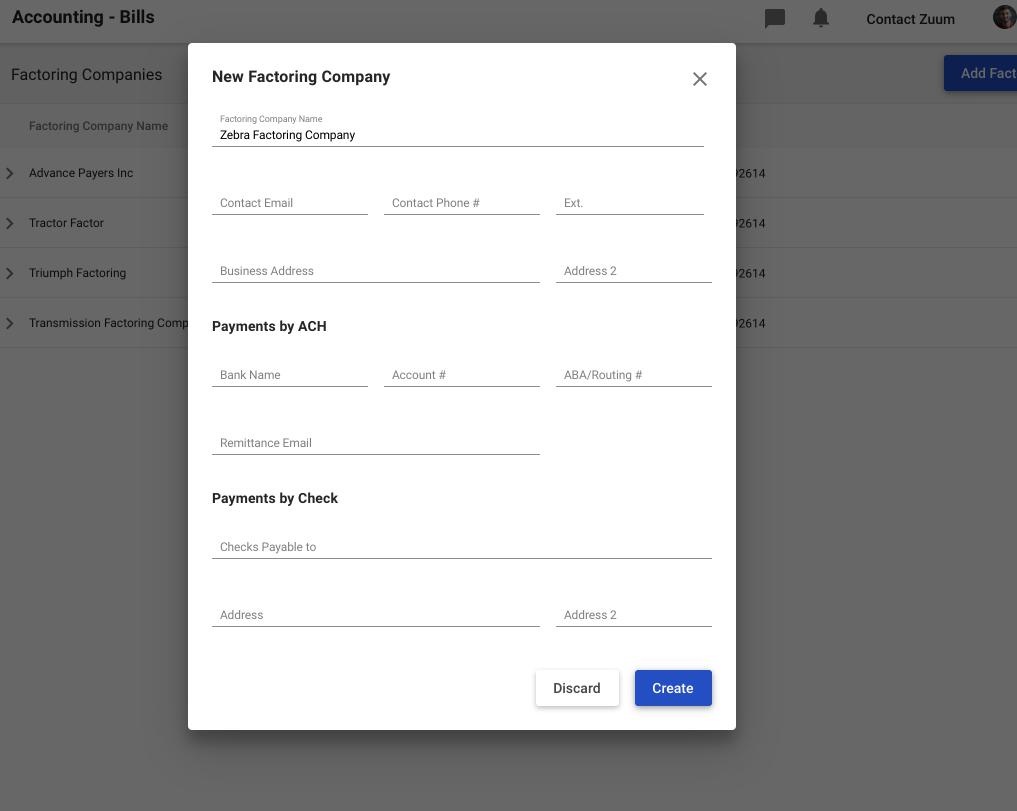
This form has 3 sections:
Factoring Company Information
This section is required.
In this section, all fields are required unless it says (optional)
Factoring Company Name
Contact Email (type = email)
Contact Phone # (type = Phone Number)
Ext. (type = Number)
Business Address (use Google API for autocomplete)
Address 2 (optional)
Payments by ACH Information
Bank Name
Bank Account #
Routing #
Remittance Email
Payments by Check
Checks Payable To
Payment Address (use Google API for autocomplete)
Payment Address 2 (optional)
Logic for ACH and Check
The user must complete the ACH section OR the Checks section.
In other words, if the ACH section is complete, the checks section is not required. OR If the Checks section is complete, then the ACH section is not required.
The user can complete both sections if desired.
Completing Factoring Company Setup
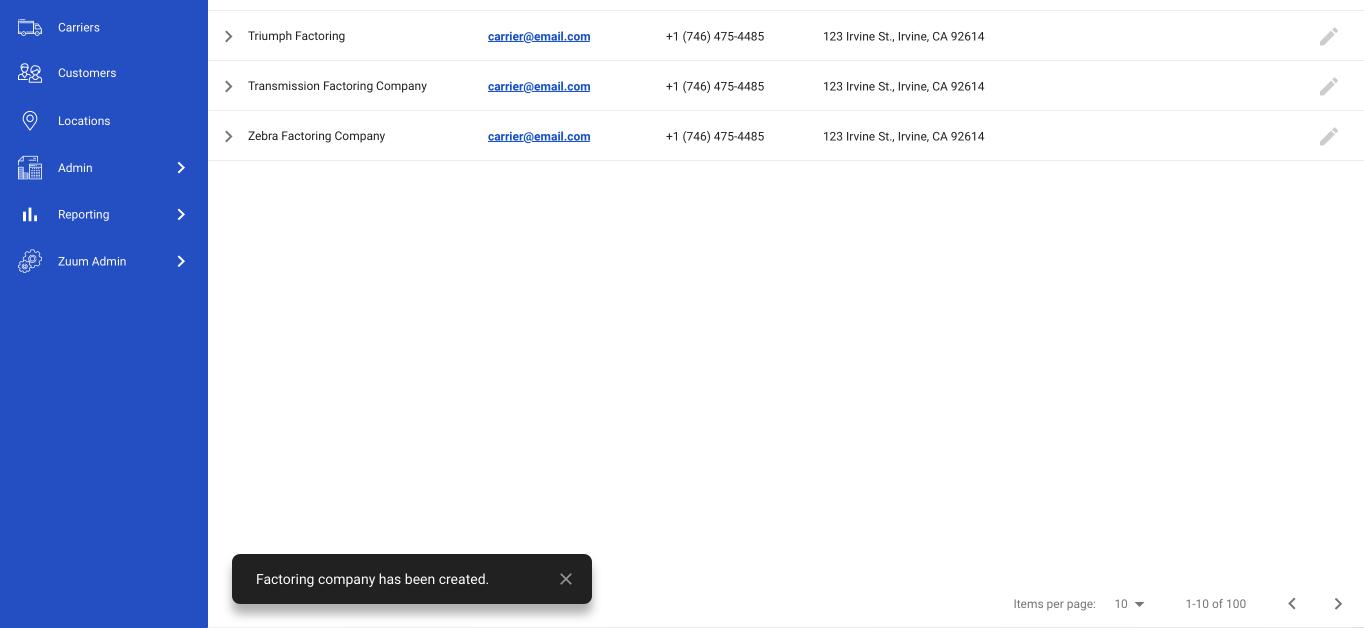
When the user has filled out all of the required information, the “Create” button should become enabled, and the user can click it to create the factoring company in the database.
After a Factoring Company has been successfully created, there should be a snackbar at the bottom of the screen that tells the user that “Factoring company has been created.”
Editing a Factoring Company
The user can edit an existing Factoring Company by clicking on the pencil icon at the end of the Factoring Company’s row in the data table.

This brings up a modal that is just like the “Add a Factoring Company” modal, with the following exceptions:
The Factoring Company’s information is in the form, and can be edited
There is a delete button that allows the user to Delete the factoring company
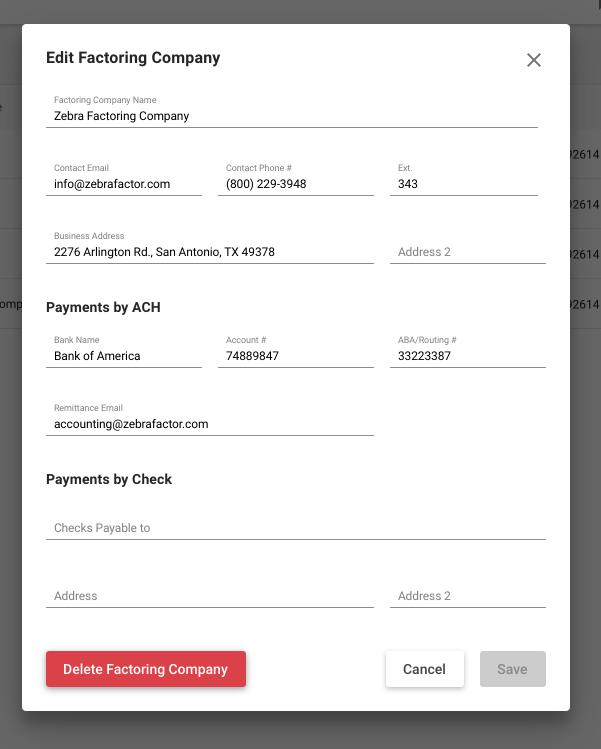
Note that the same form logic applies to edits.
If a user makes changes, the Save button becomes enables, as long as
All required fields are completed and validated
If the user makes changes and successfully updates the factoring company, there should be a snackbar at the bottom of the screen that tells the user that “Factoring company updated.”

Deleting a Factoring Company
The user can delete a factoring company by pressing the “delete factoring company” button in the “edit factoring company” modal.
When the user clicks this button, a confirmation modal pops up that appears as follows:
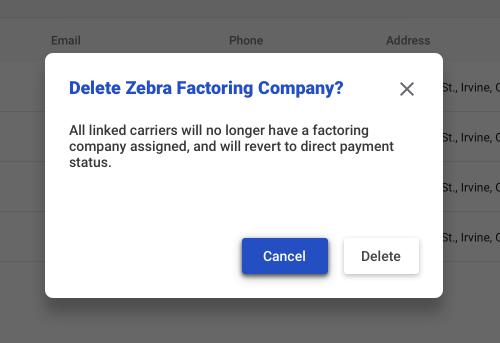
The user can cancel or delete.
If the user deletes the factoring company, then every Carrier who was linked to the factoring company becomes unlinked, and has no Factoring company assigned to it.
Linking a Carrier
A carrier can be linked to a factoring company from the Factoring company database, or from the carrier’s profile.
From Factoring Company List
To link a carrier, the user must expand a factoring company’s row, and click on the “Link a Carrier” button.
This brings up a menu with a list of all carriers within the tenant account’s database.
The user can select one or more carriers from the list by clicking into the checkboxes beside the carrier names.
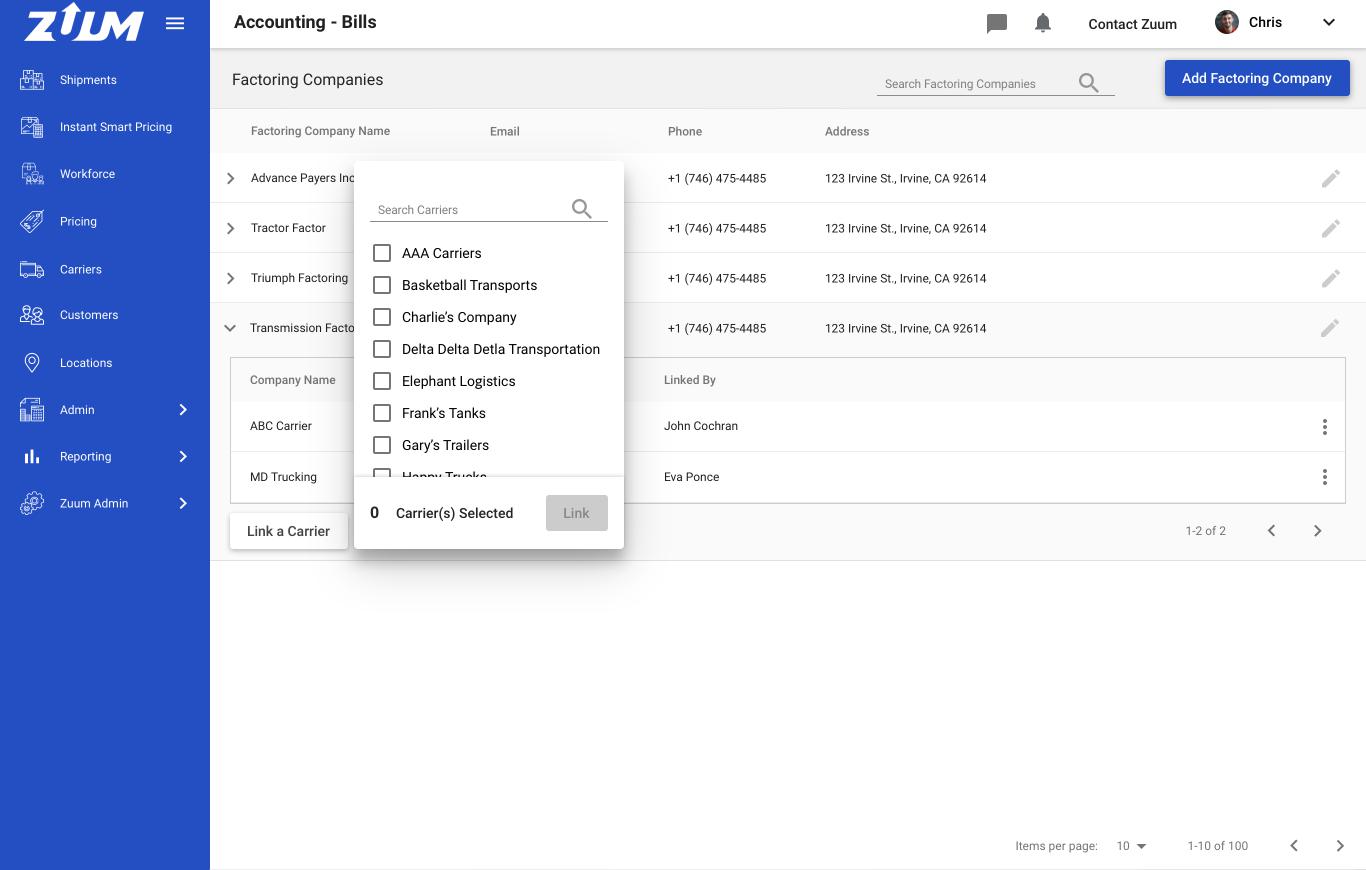
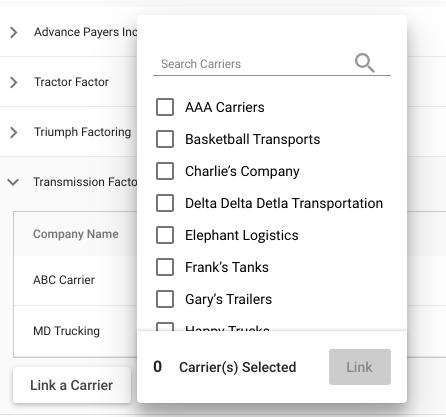
The user can type text into the search field at the top to filter the list and quickly find a carrier. Once selected, the user can “x” out of the search to return to the list, with the selected carrier still selected.
See prototype
At the bottom of the modal, there is a button that says “Link”. The button is initially disabled, and becomes enabled after the user selects one or more carriers from the list.
Next to the button it says “0 Carrier(s) Selected). This number will change based on the number of carriers selected by the user.
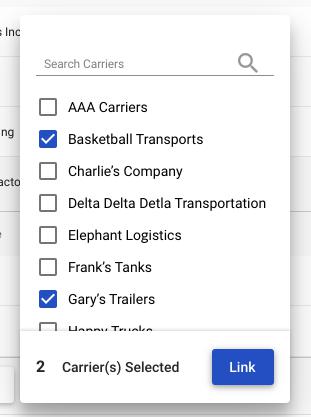
When the user clicks “link”, all of the selected carriers are “linked” to that Factoring Company, and are added to the sub-table within that factoring company’s row.
There should be a snackbar at the bottom, letting the user know that the carriers were linked successfully.
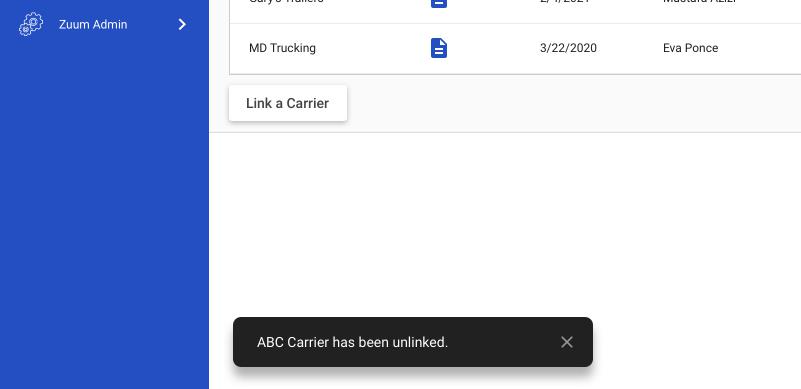
The user can unlink a carrier by clicking on the menu icon (3 dots) at the end of the row and click “Unlink Carrier”.

When the user does this, there is a modal that asks the user if they are sure, and letting the user know that the carrier will go into direct payment status.
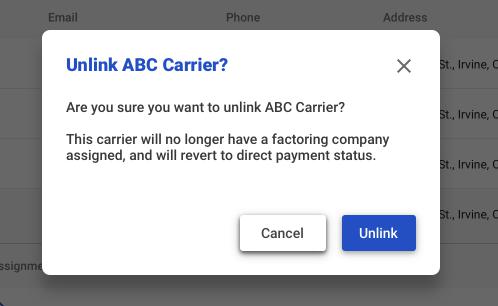
If the user unlinks the carrier, that carrier’s row should dissapear from the sub-table, and there should be a snackbar at the bottom left that tells the user that the carrier has been unlinked.
From Carrier Profile
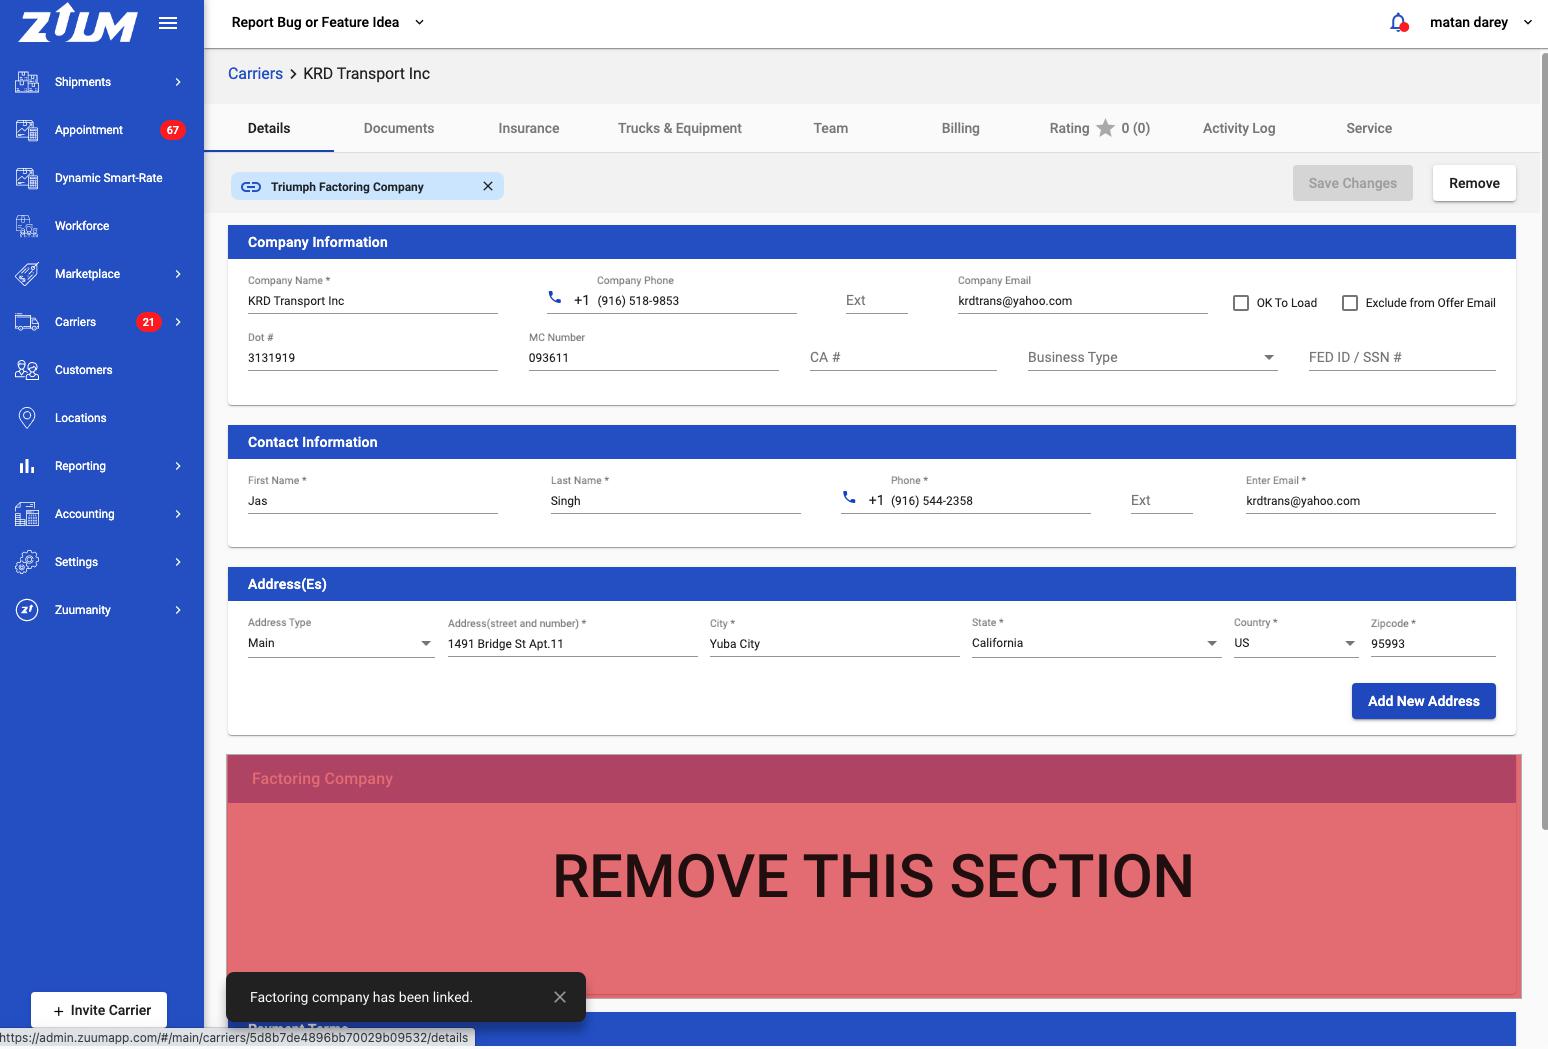
A Factoring company can be linked to a carrier from the Carrier’s profile.
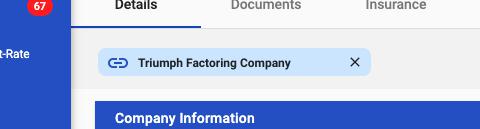
In the Carrier’s profile, there should be a combo-box at the top left that allows the user to “Link a factoring company” by typing its name and:
selecting the factoring company from a dropdown menu; or
Adding a new factoring company
(The user must perform one of these two actions. The user cannot manually enter a factoring company name into this field)
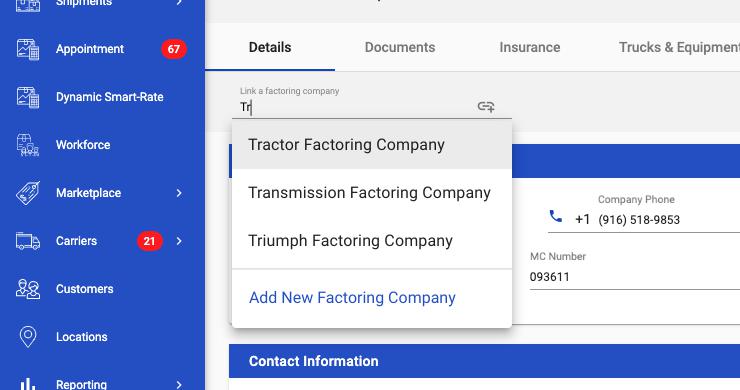
Selecting an existing Factoring Company
If the user selects an existing Factoring Company
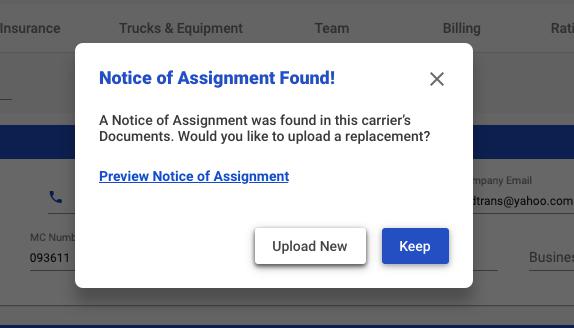
The system should look in the Carrier’s documents for a “Notice of Assignment” document, with the status “Complete”
If one has been uploaded, then a modal should pop up that gives the user the option to use this “Notice of Assignment” or Upload a new one:
If the user clicks “Preview Notice of Assignment” a document lightbox should appear with the document options. This functionality currently exists in Zuum Fleet Manager (Carrier TMS) when a user views a document.
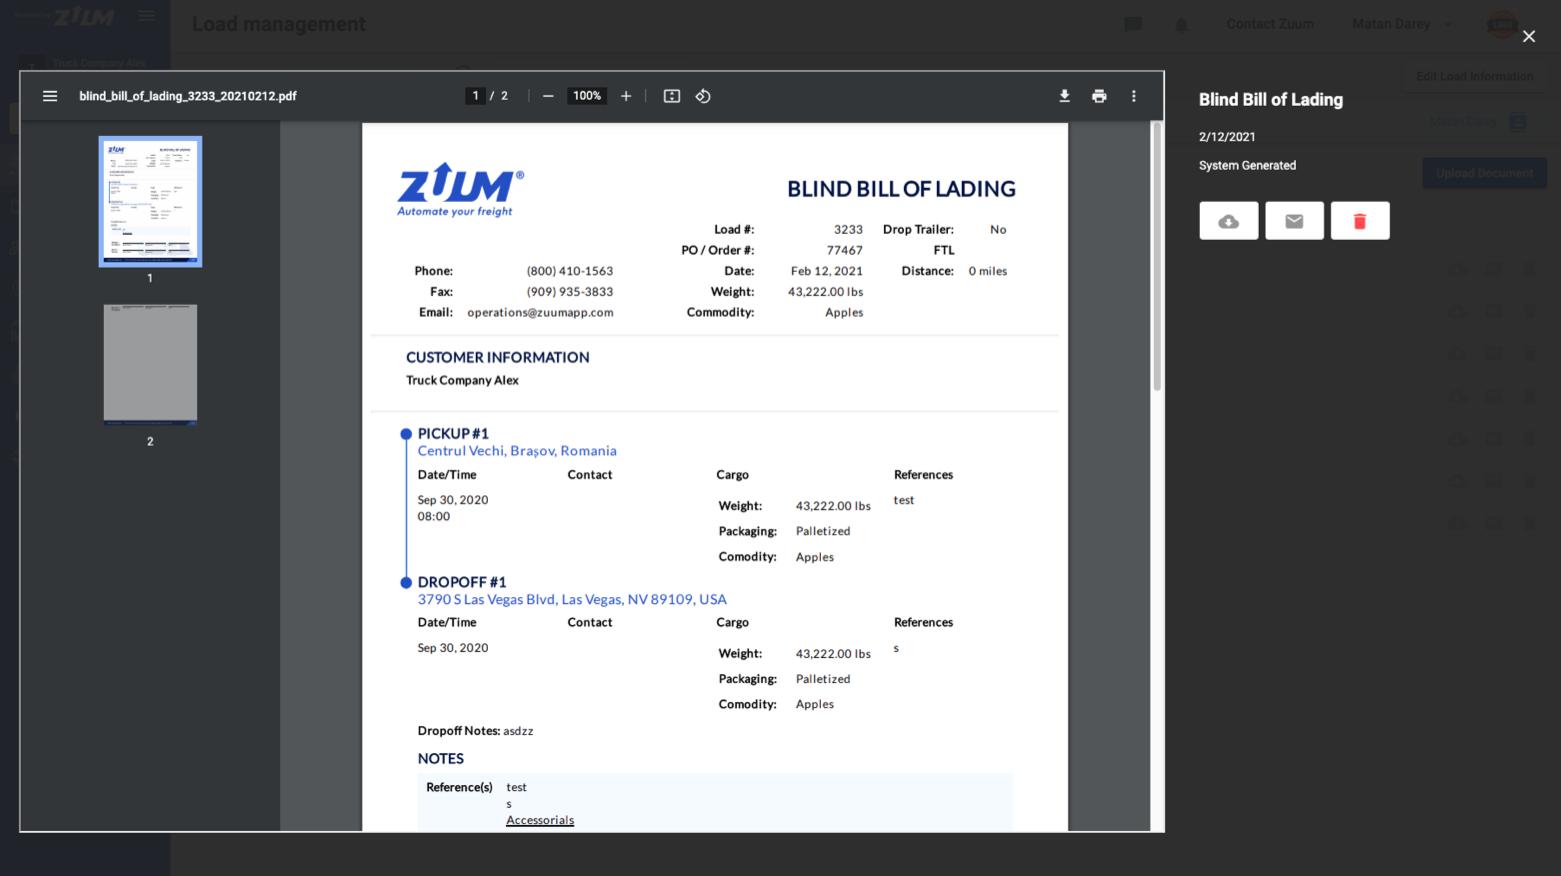
Note: The document title, date, and source should reflect the actual data (in this example, instead of “Blind Bill of Lading” it should say “Carrier Invoice”
If the user selects “Keep”, then the process is complete, and the Factoring Company is now linked to that carrier. A snackbar should appear at the bottom letting the user know that the factoring company has been linked.
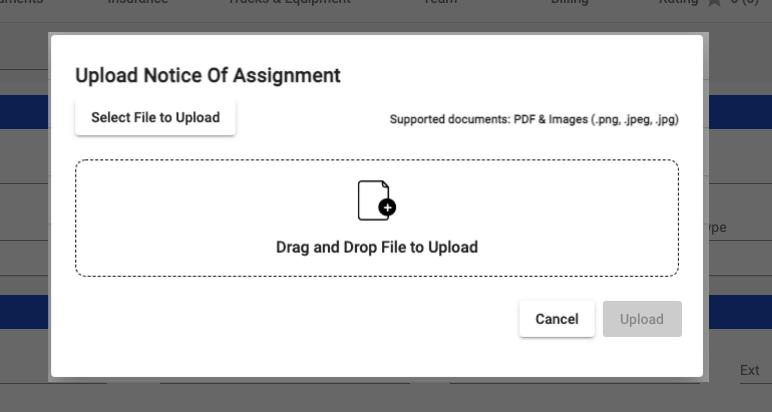
If no Notice of Assignment was found in the Carrier’s documents, or if the user chooses to Upload a New Notice of Assignment, then the “upload Notice of Assignment” modal should appear.
Once uploaded, the Notice of Assignment should be stored in the Carrier’s documents, and the Factoring Company should be linked as described above.
Link Input States on Carrier Details Page
Unlinked

Linked
Necessary Changes
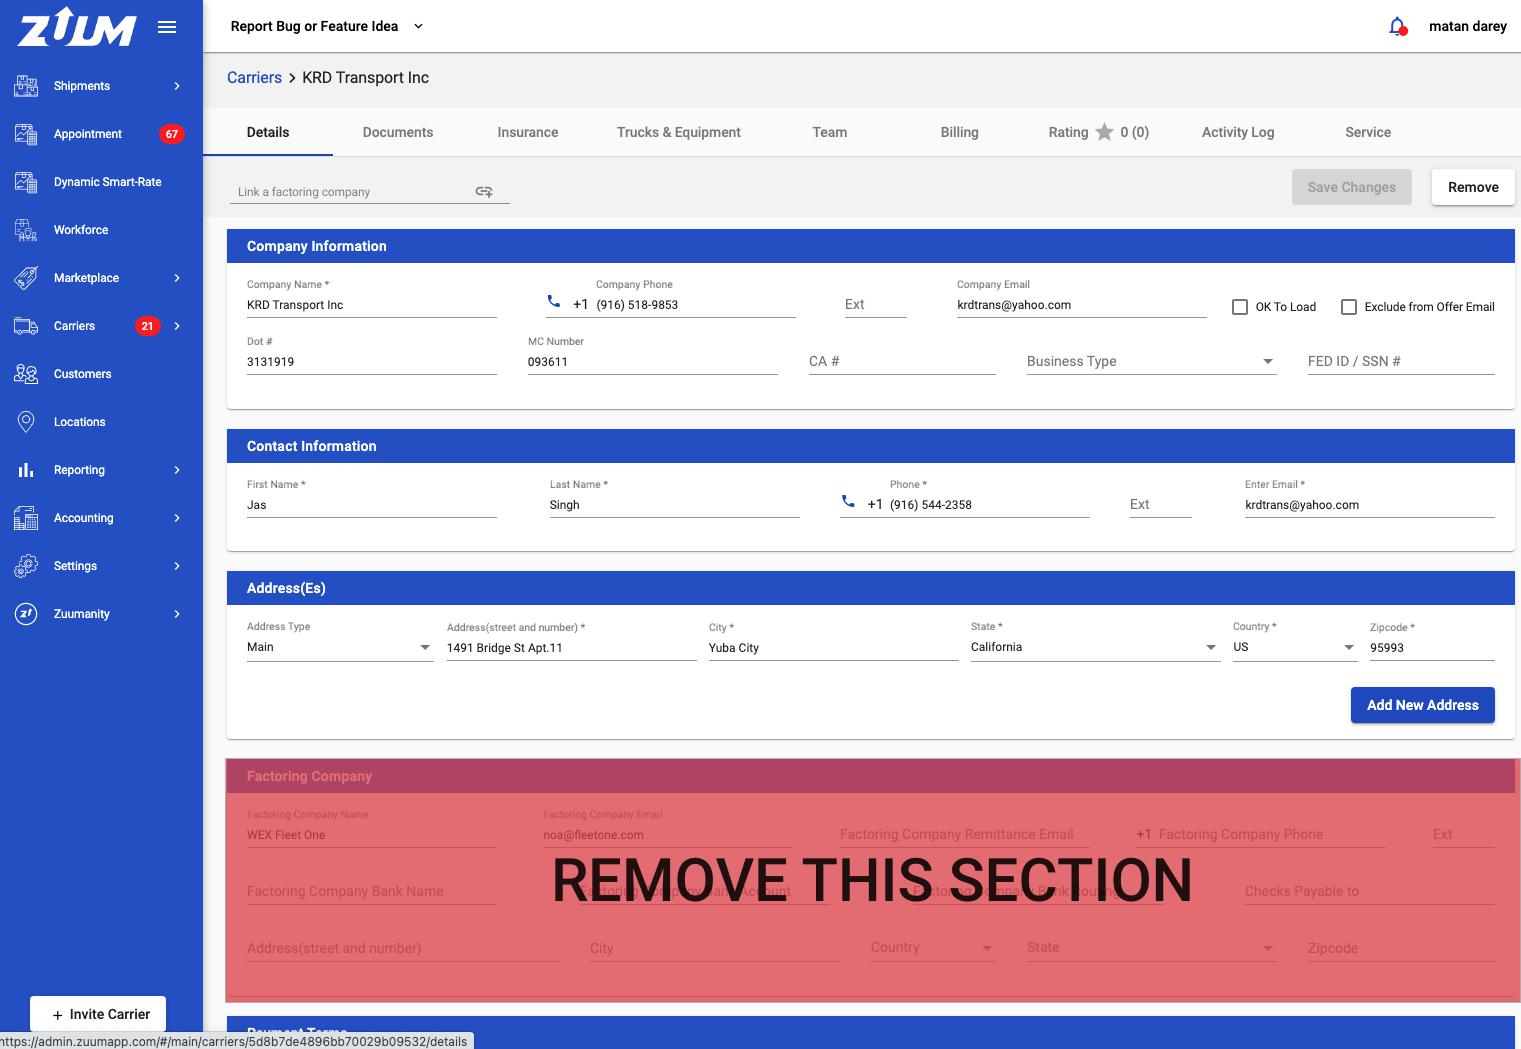
Remove Factoring Company Section from Carrier Details Page
The Carrier Details page has a section called “Factoring Company”.
This section should be removed.
Accounting changes - Carrier “Paid to”
Currently carriers have a “Paid to” property, that only contains data if Factoring company information has been entered into a Carrier’s profile.
Here is a screenshot of the “Bills” page that demonstrates this:
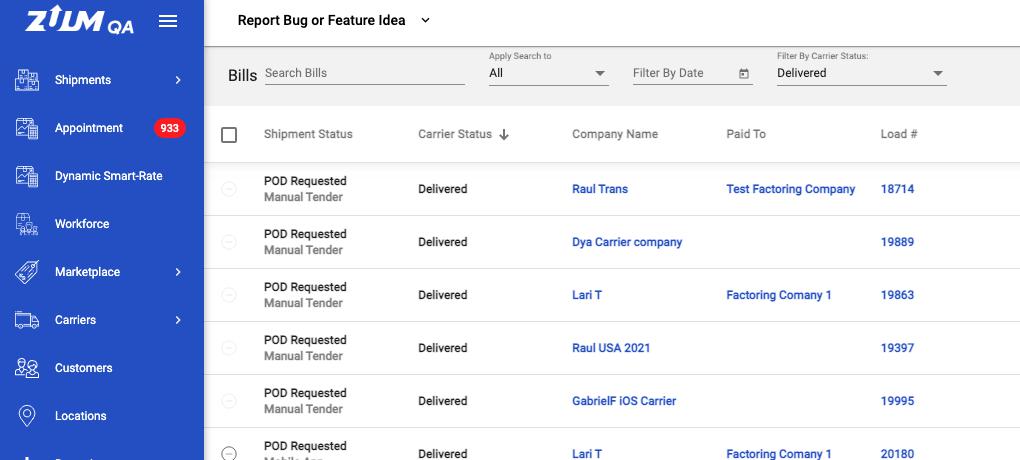
The following changes must be made to this:
Change “Paid to” to “Payee”
Every Carrier should be assigned as its own “Payee”
Example: In the second row of the data table above, Company Name = Dya Carrier Company; Payee = Dya Carrier Company
→ This means the Carrier is its own Payee, and will collect payments directly from Zuum; Except
When a Carrier is linked to a Factoring Company, then the Factoring company is the Payee of the linked carrier
→ This means that the Factoring Company will collect payments from Zuum
Please Note: A Carrier that is linked to a Factoring company, and then becomes Unlinked, the Carrier automatically becomes it’s own Payee again.