


[BR] In Validation
- Purpose:
- Source:
- Use Case #1: Carriers invited through a link
- Use Case #2: Carriers created manually
- Use Case #3: Carriers created via CSV
- Use Case #4: Expired Insurance
- Use Case #5: Requested to recheck the MC number
- Step 1: MC Check Required
- Step 2: Awaiting Carrier Documents
- Step 3: OK to Load or Do Not Use
- Pop-up Modal
- Filter the list
- Use Case #6: Website Onboarding
- Use Case #7: Accepting or Rejecting Ok-to-Load Request
Document Status | APPROVED BY MOE |
|---|---|
Last updated | |
Document Owner | |
Designer | |
Developer |
|
Design |
Purpose:
This is a filter to see all the carriers who need validation
Source:
These are the use cases of how the carriers appear here:
Invited through a link
Created manually
Created through CSV
Expired Insurance
Requested to MC Checked again
Website onboarding
Coming from an open funnel NOT MVP
Coming from connection NOT MVP
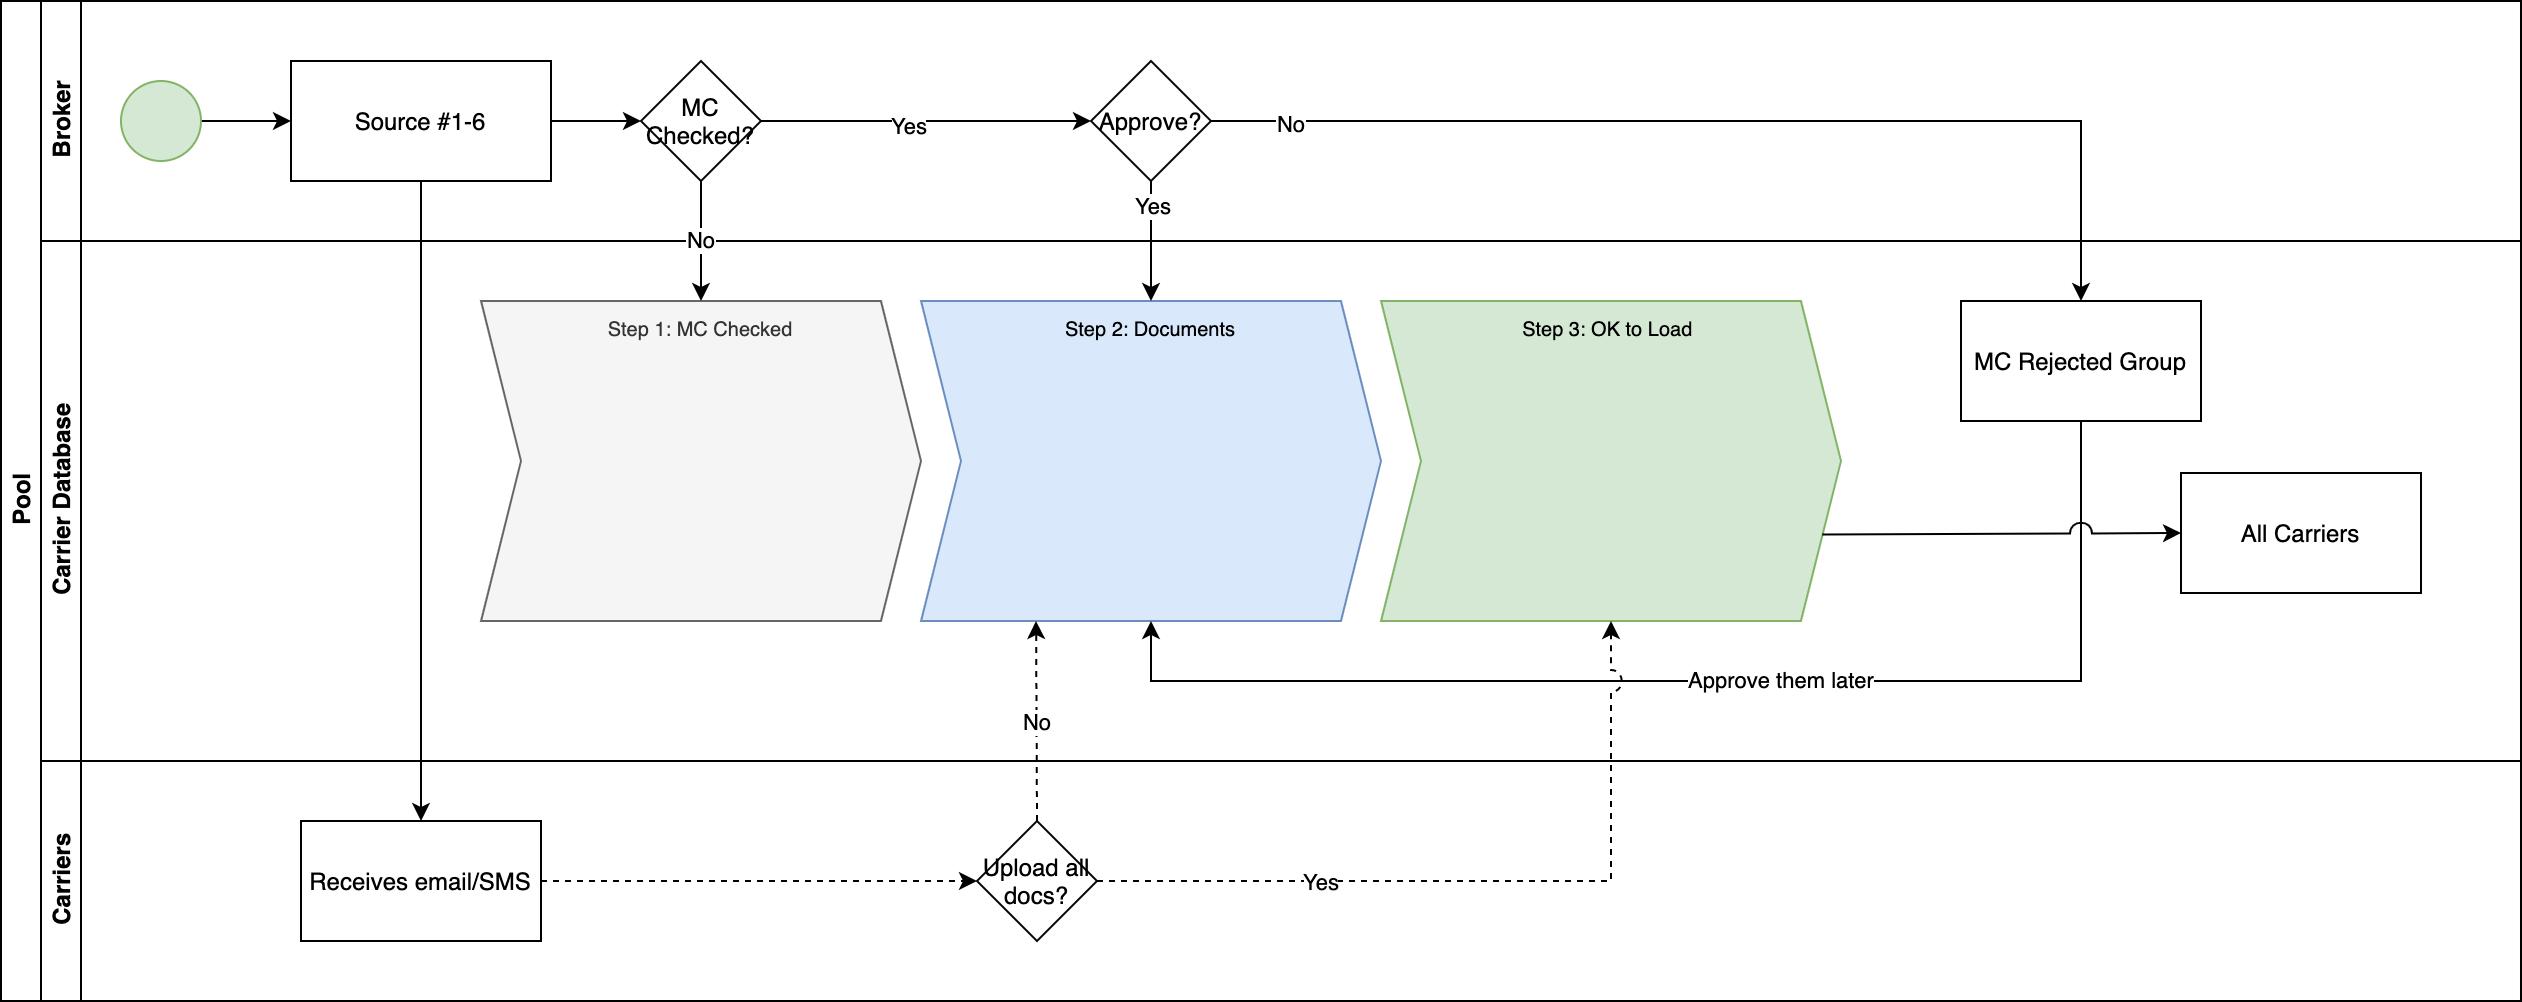
Use Case #1: Carriers invited through a link

New fields added
Established date
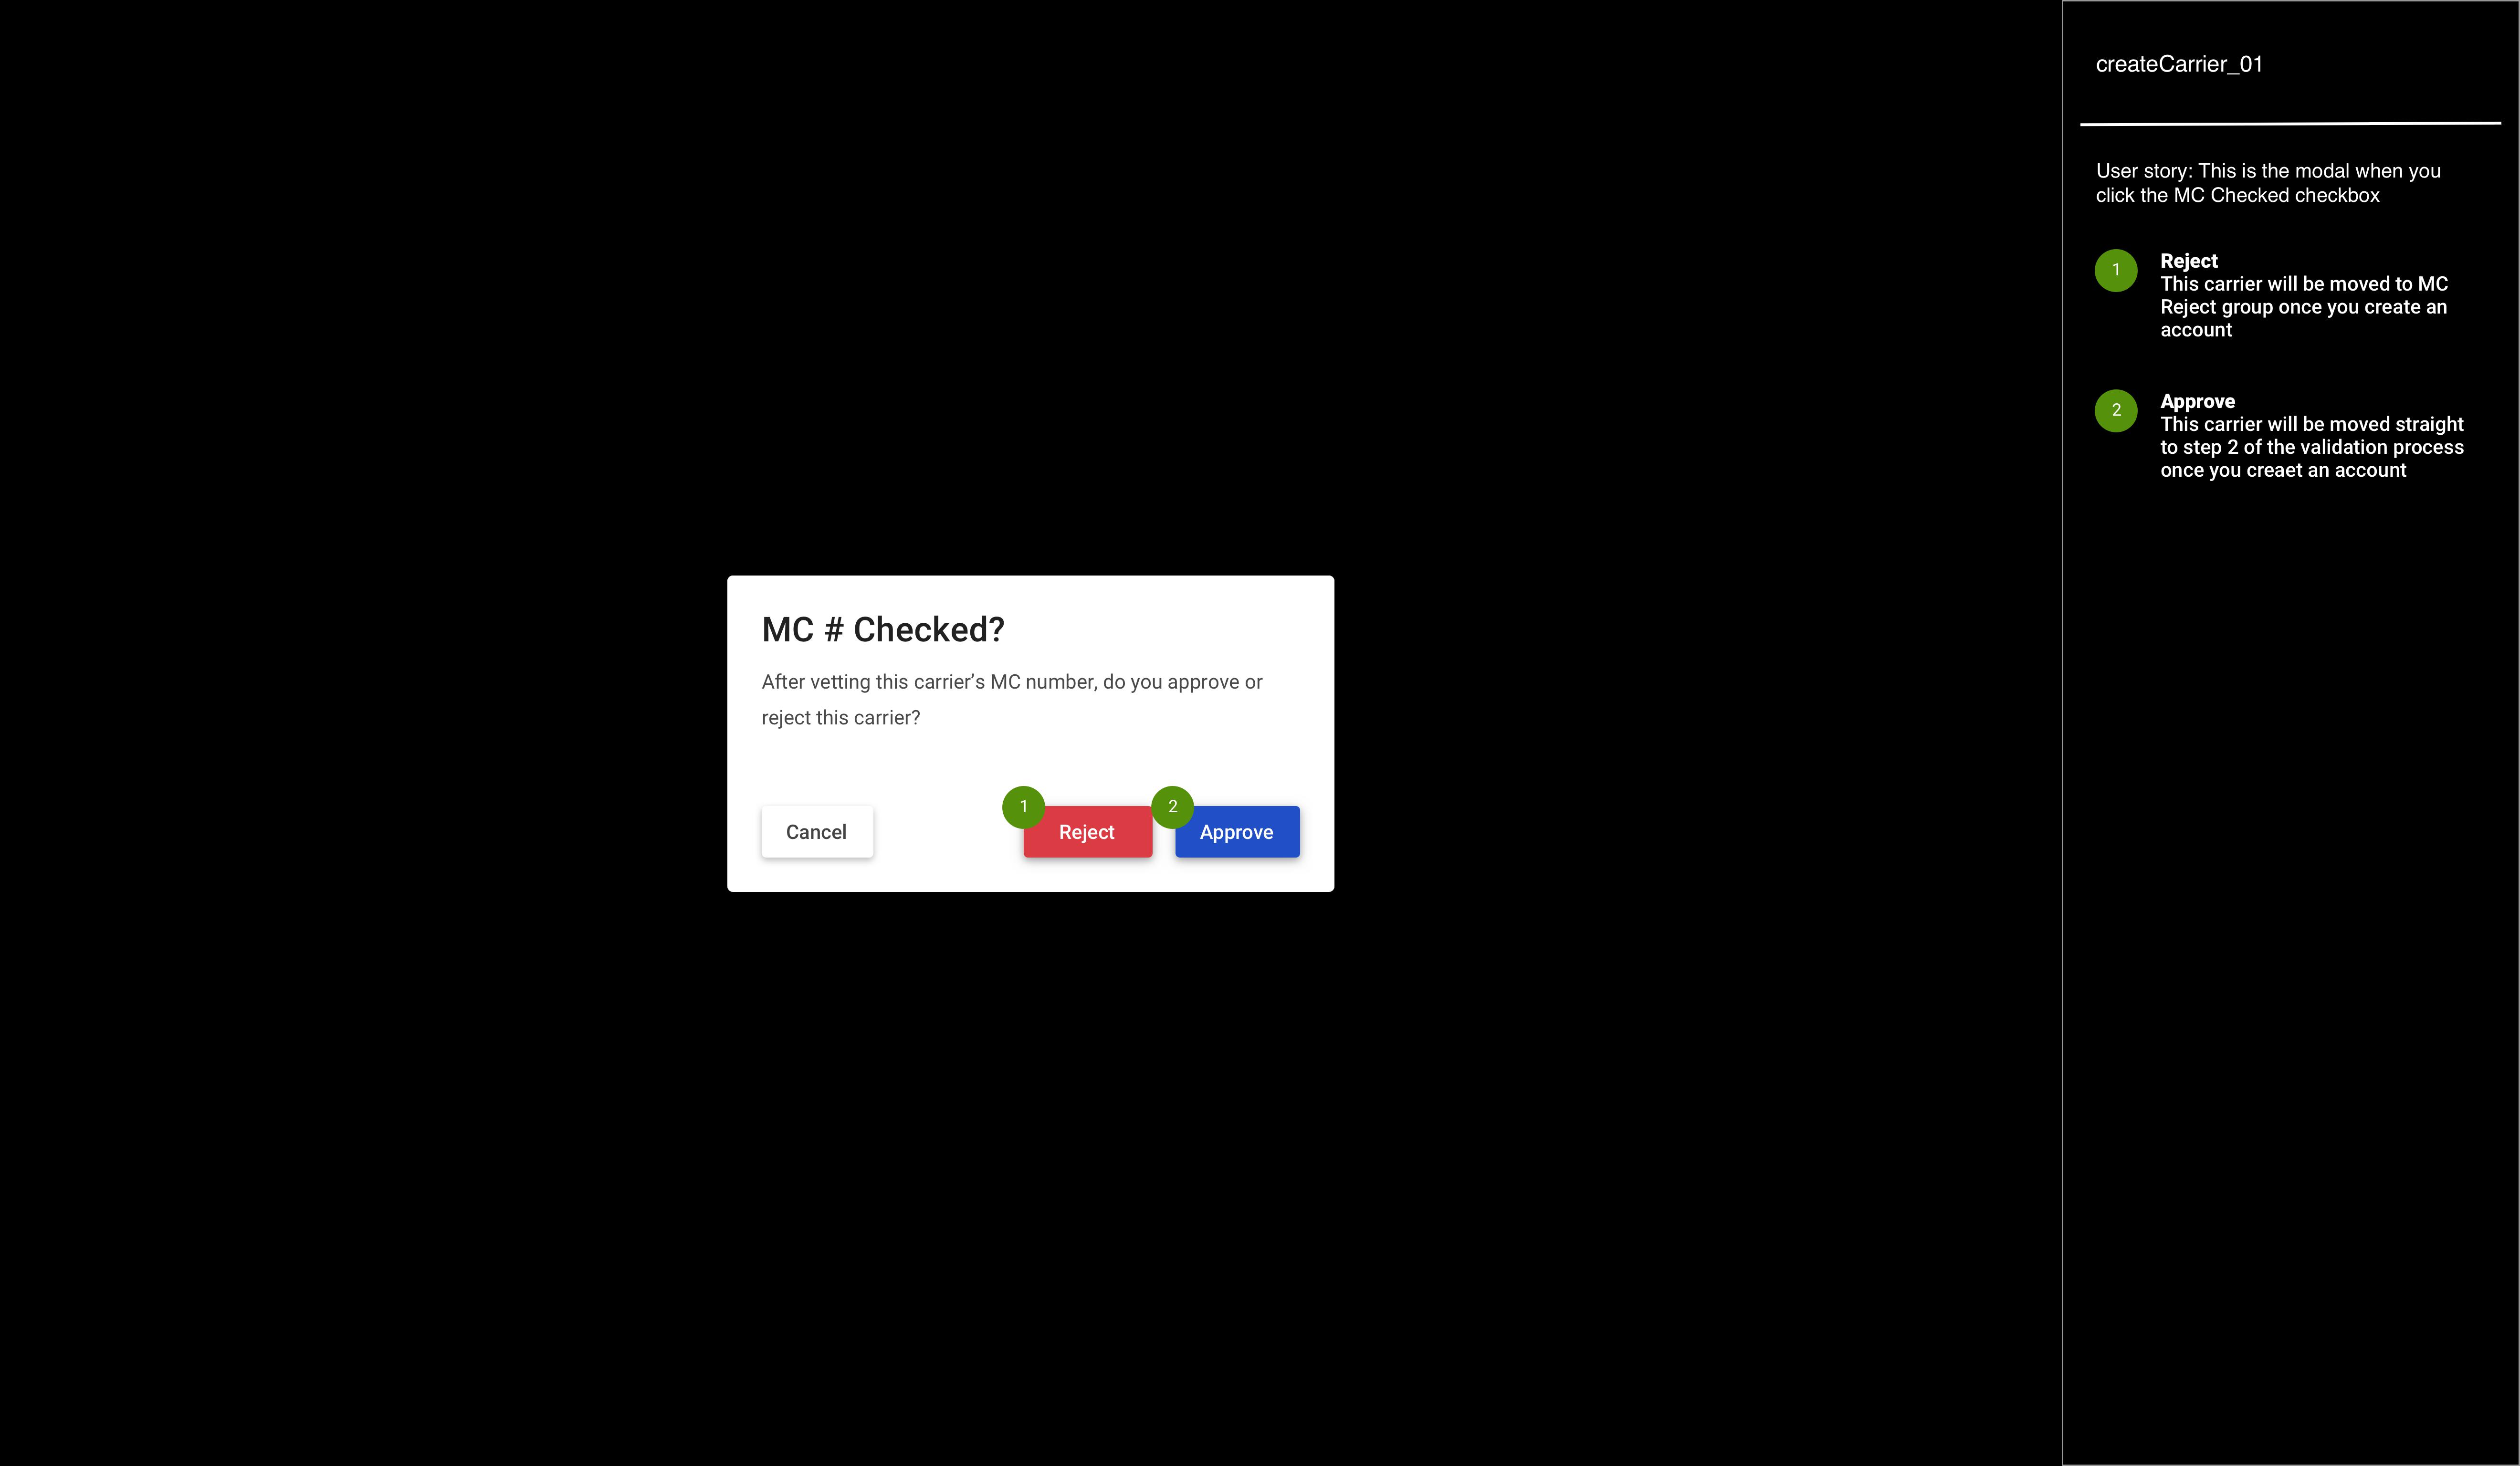
Approve/Reject
If the MC checked is “NO”
This carrier goes to Step #1
If the MC checked is “YES” & “Approved”
This carrier goes to Step #2
Use Case #2: Carriers created manually
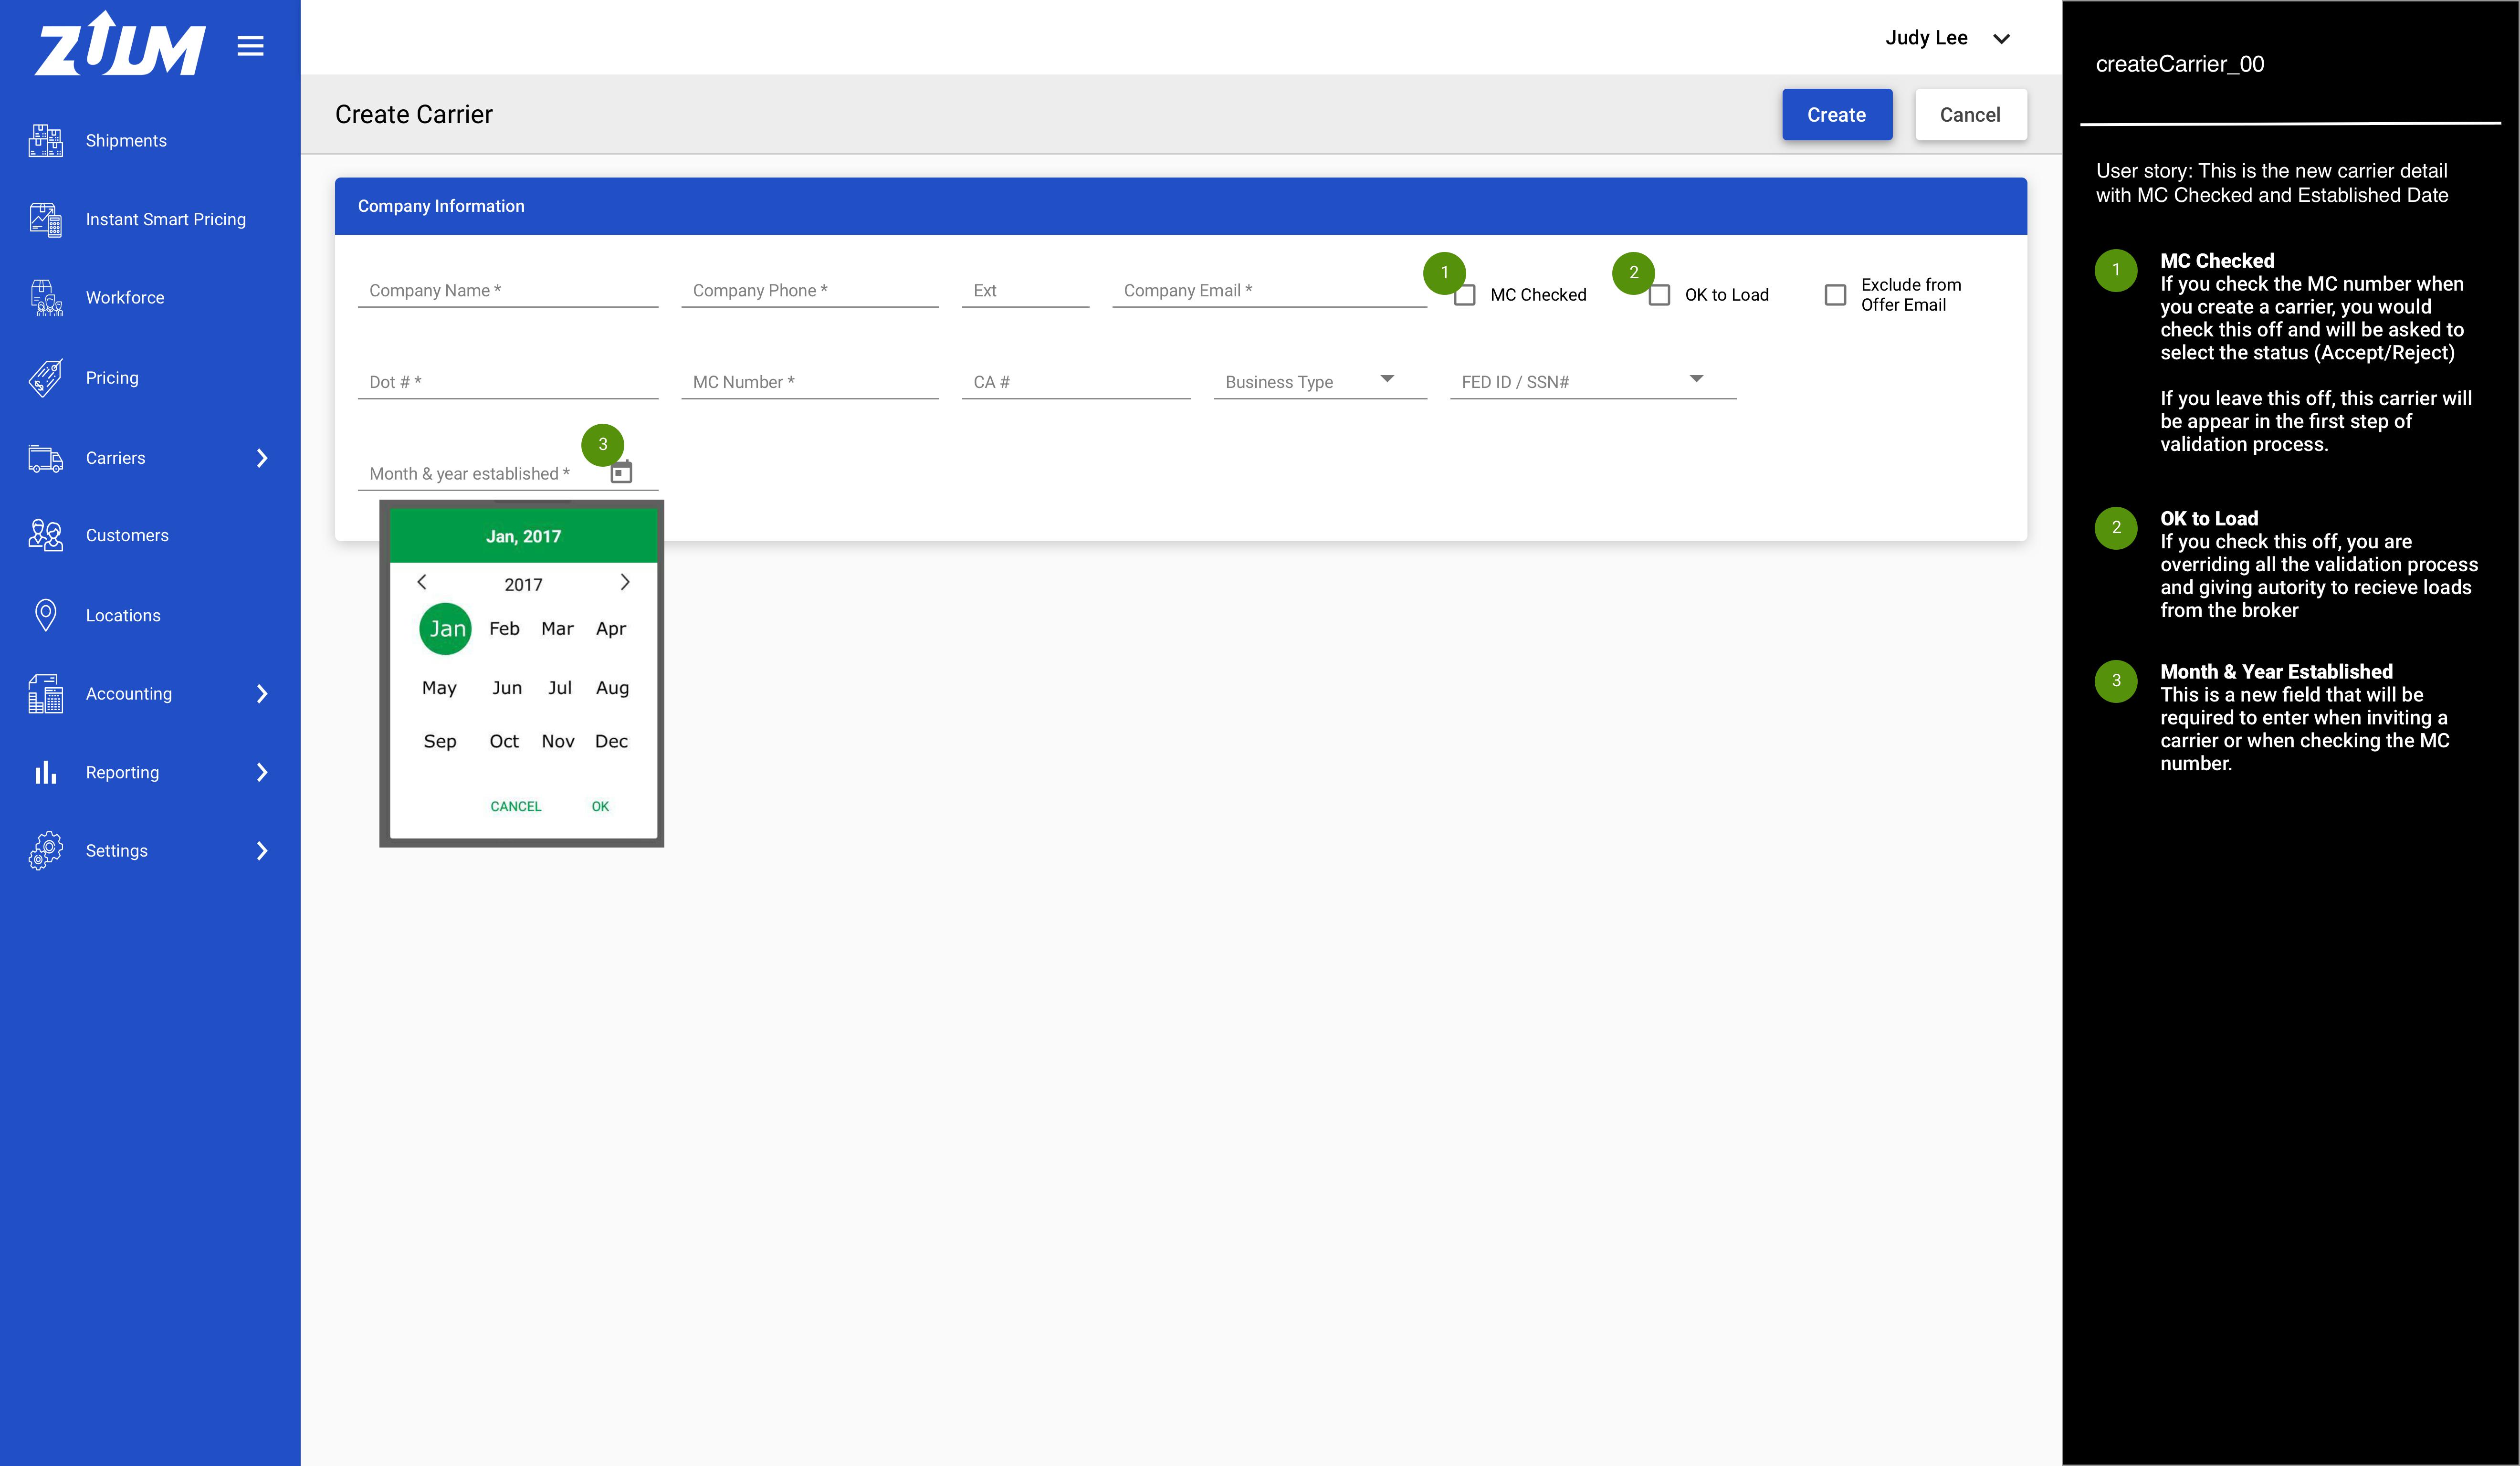
Step #1: carrierOnboard_01
Design: IMG | SPEC Aciton: Clicks the MC Checked
Use Case #3: Carriers created via CSV
New Template: Here
Use Case #4: Expired Insurance
Please see requirements here
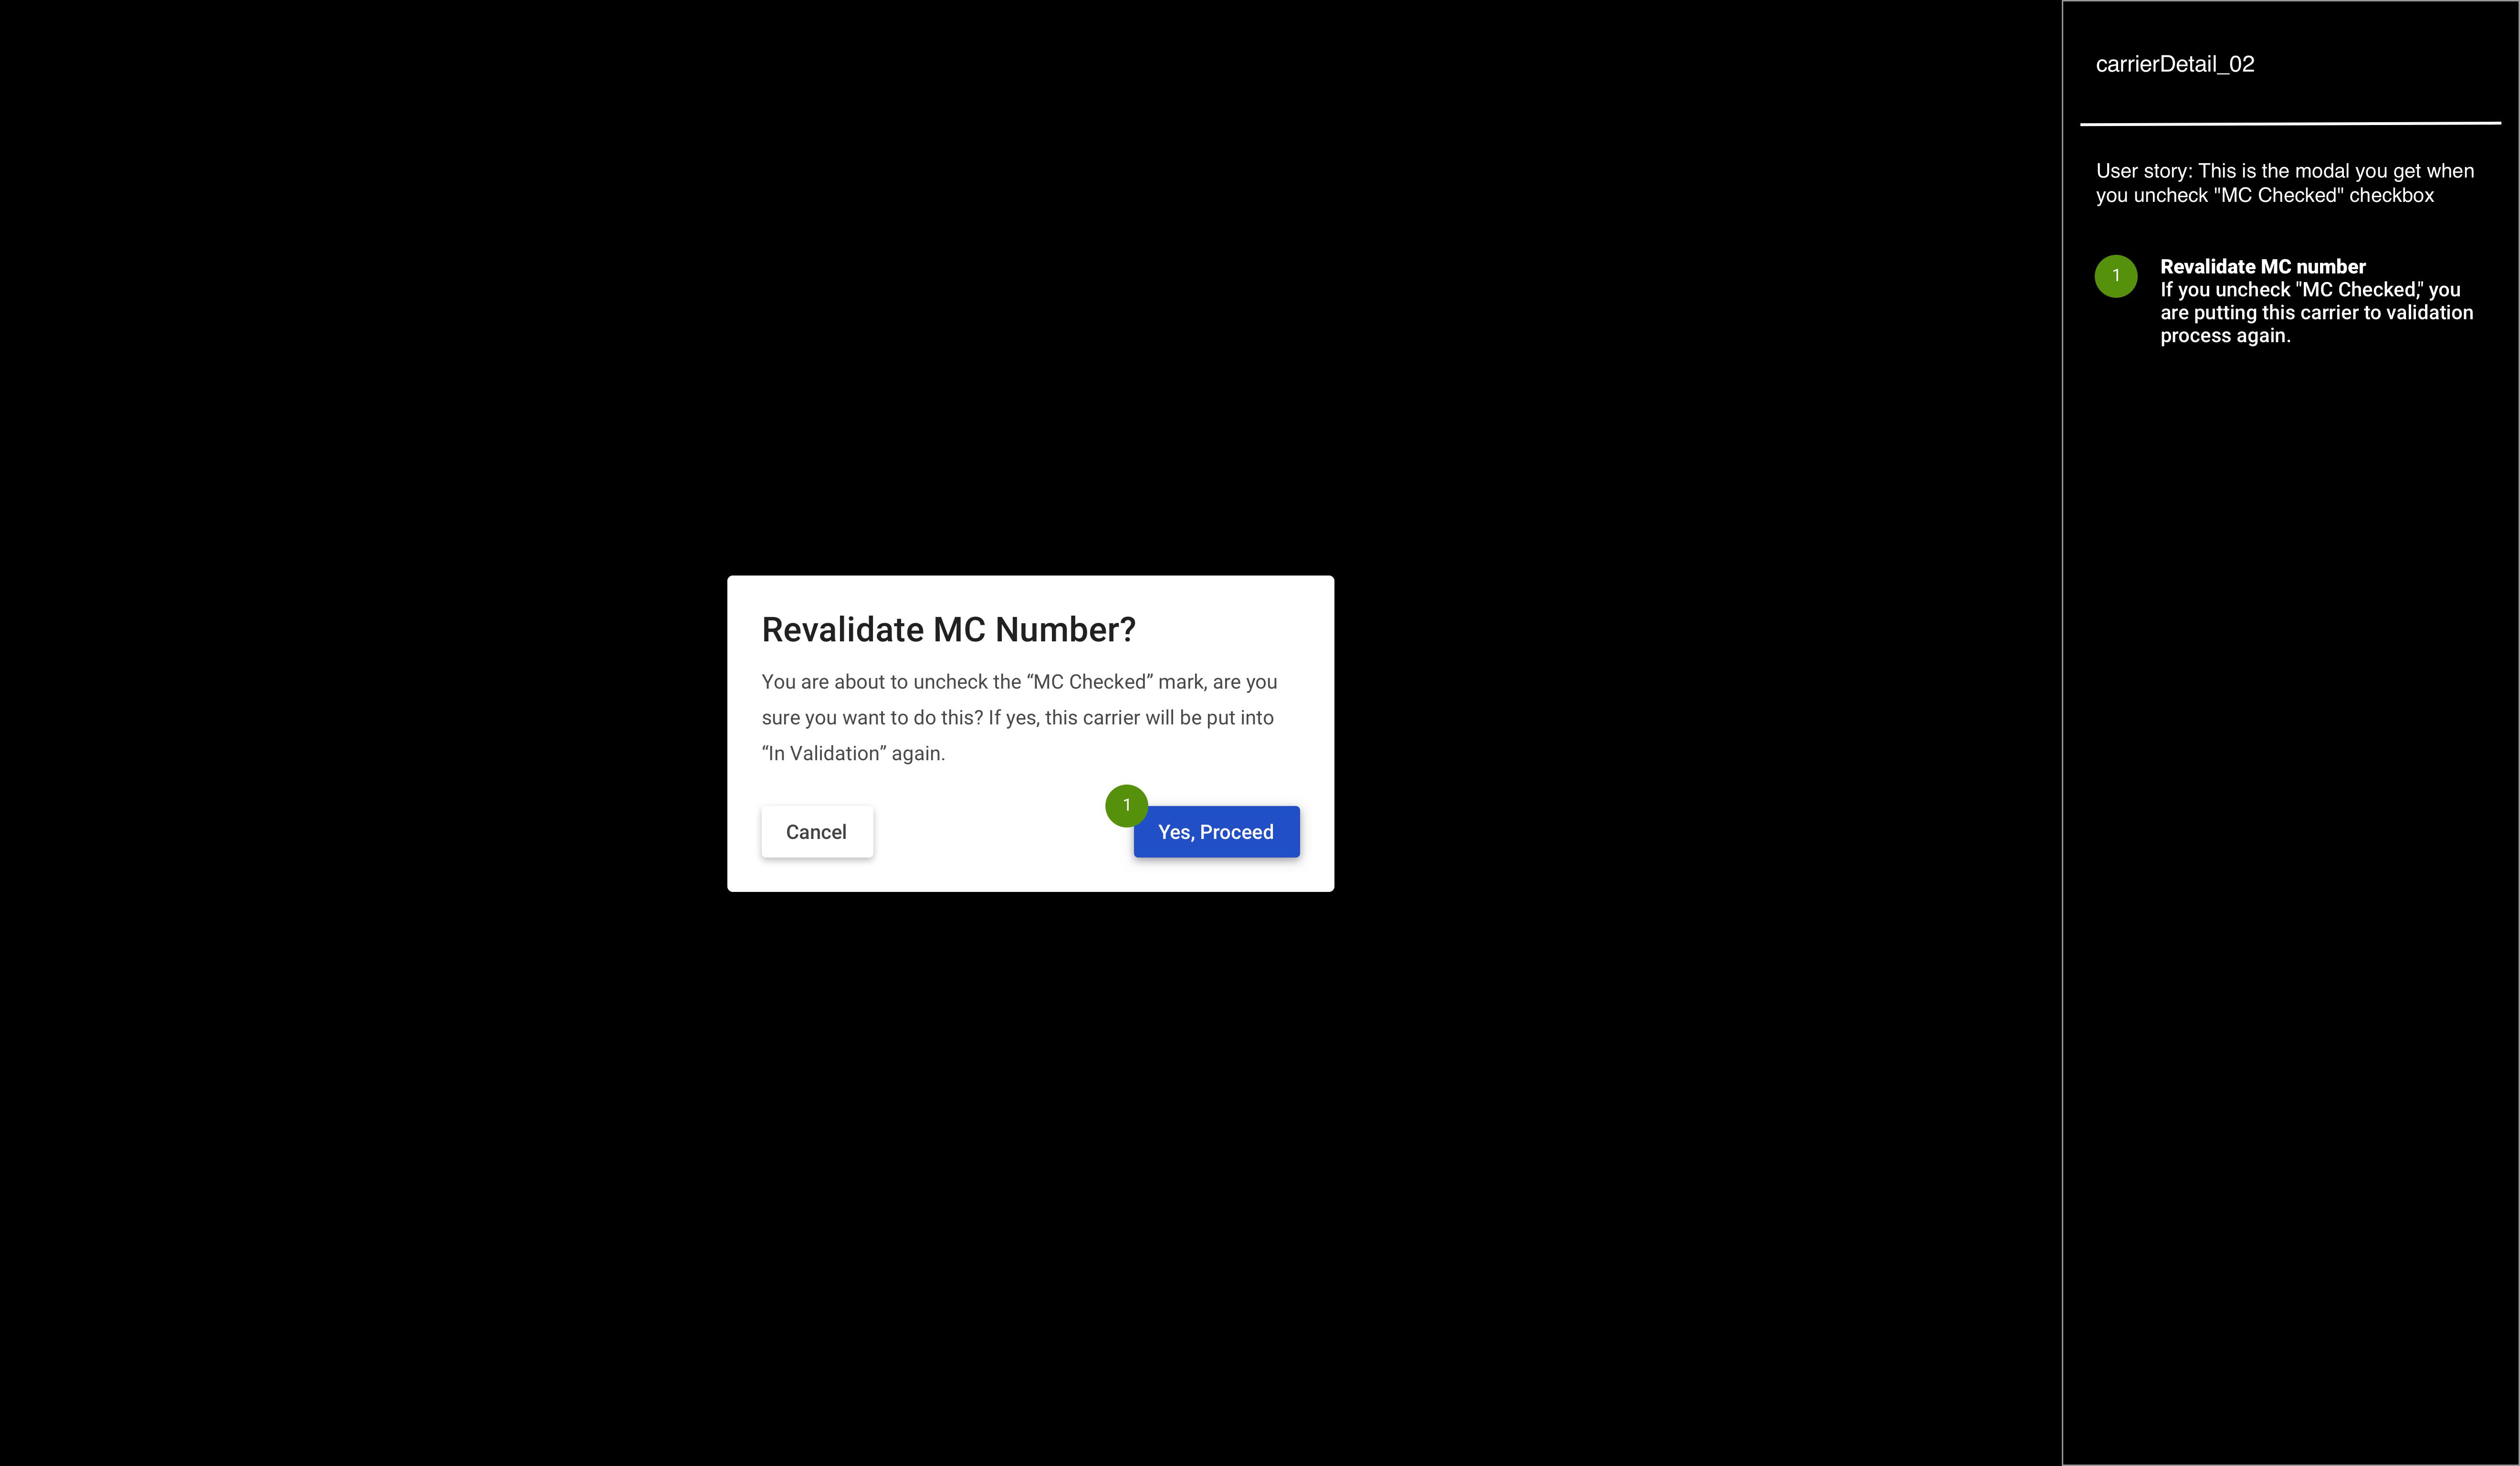
Use Case #5: Requested to recheck the MC number
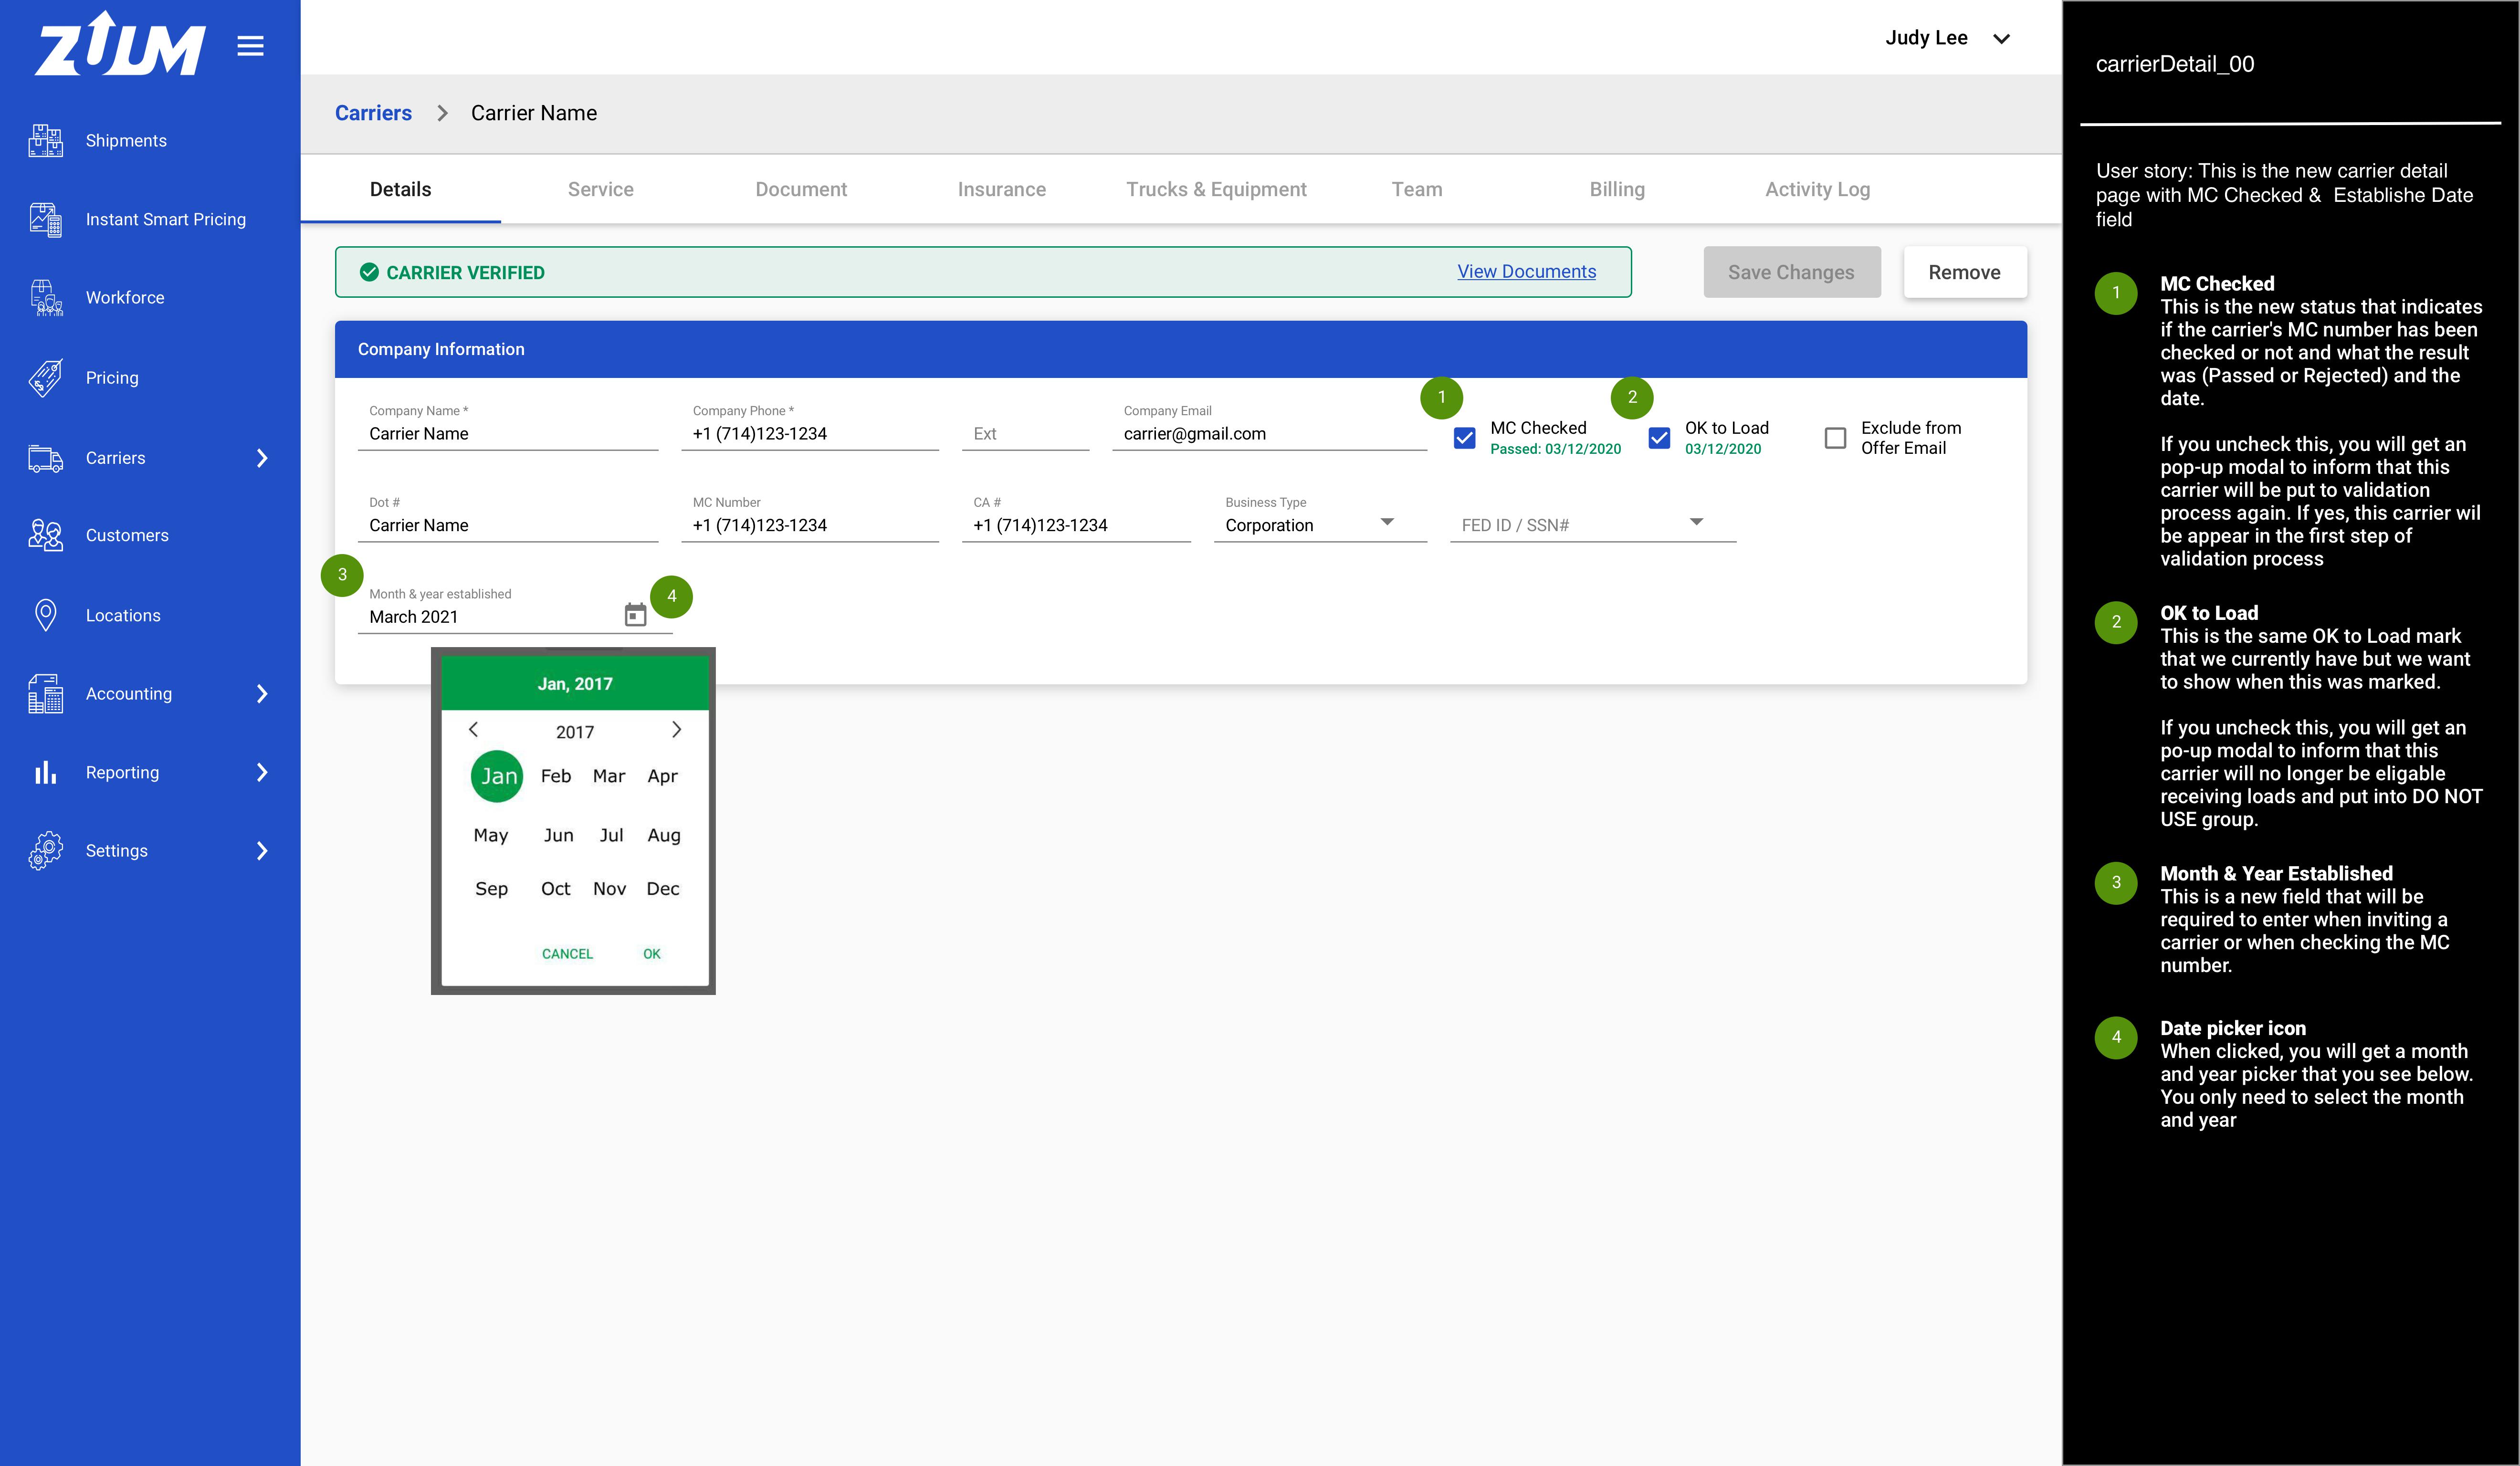
Step #1: carrierDetail_02
Design: IMG | SPEC Aciton: Uncheck the MC Checked
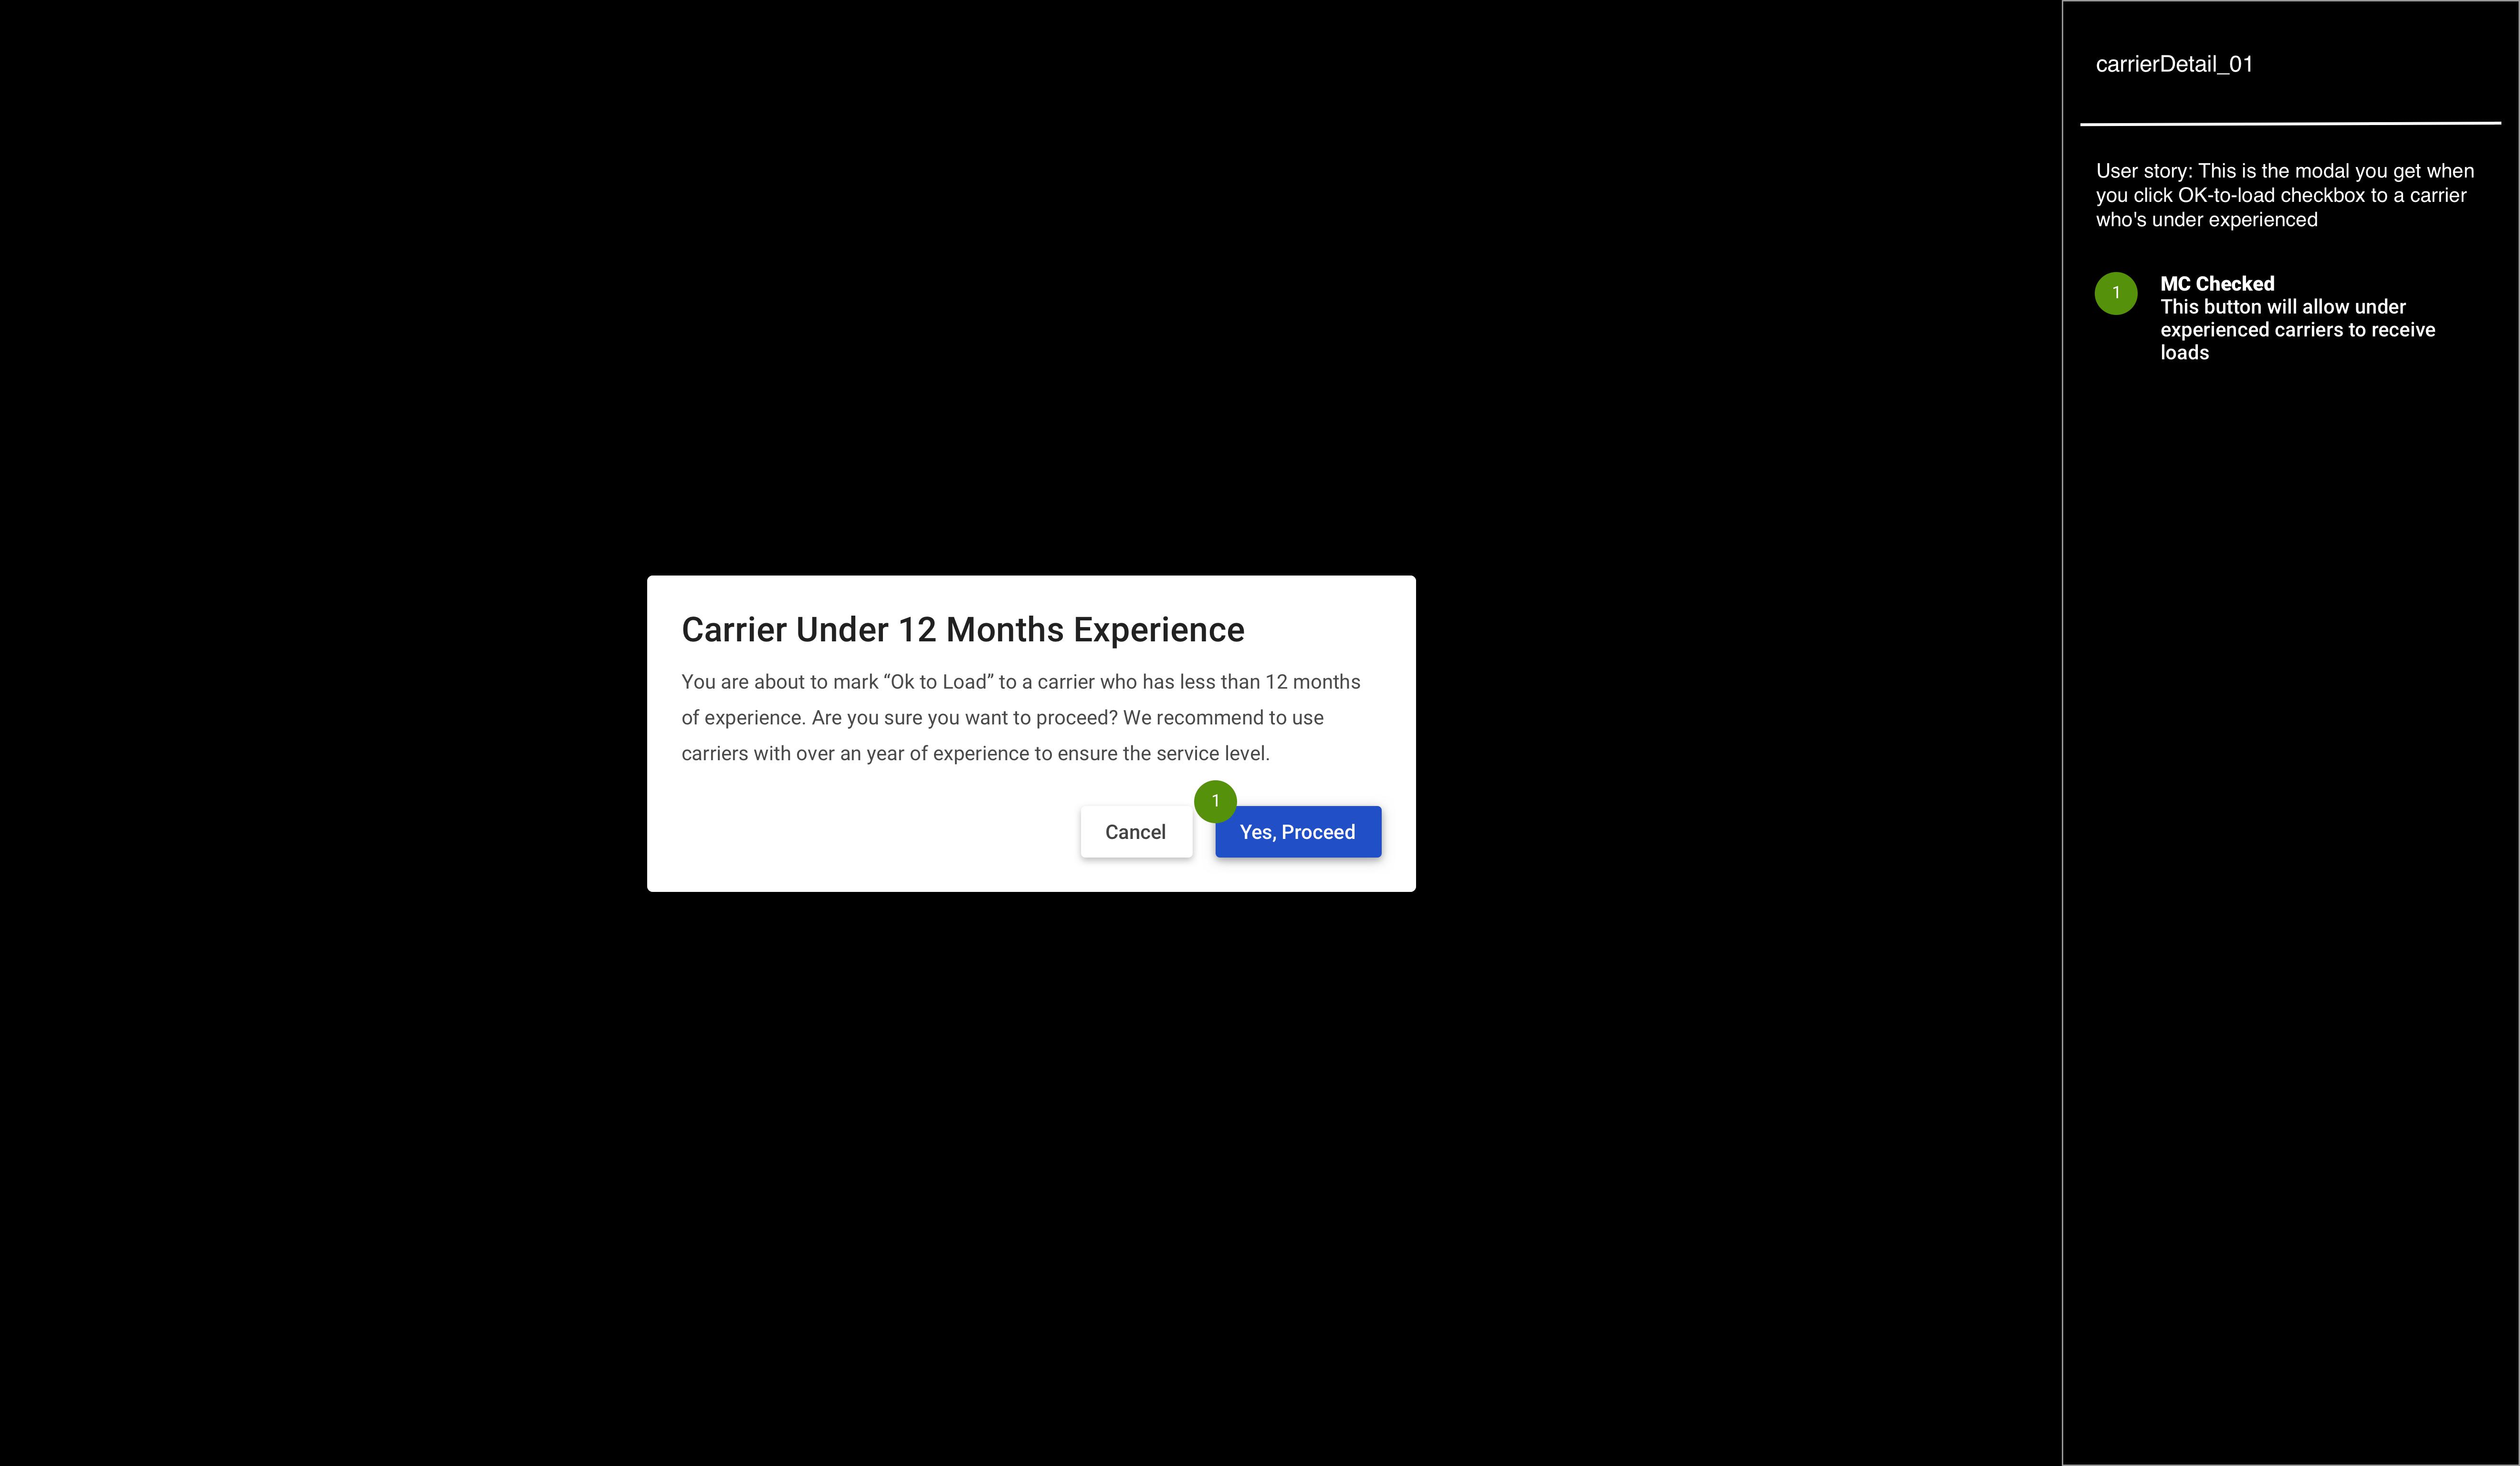
Step #2: carrierDetail_01
Design: IMG | SPEC Aciton: Check the OK to Load to a carrier who’s under experienced
Step 1: MC Check Required
Here is how you mark “Approve” or “Reject”
Step #1: carrierOnboarding_01
Design: IMG | SPEC Aciton: Click Save Changes

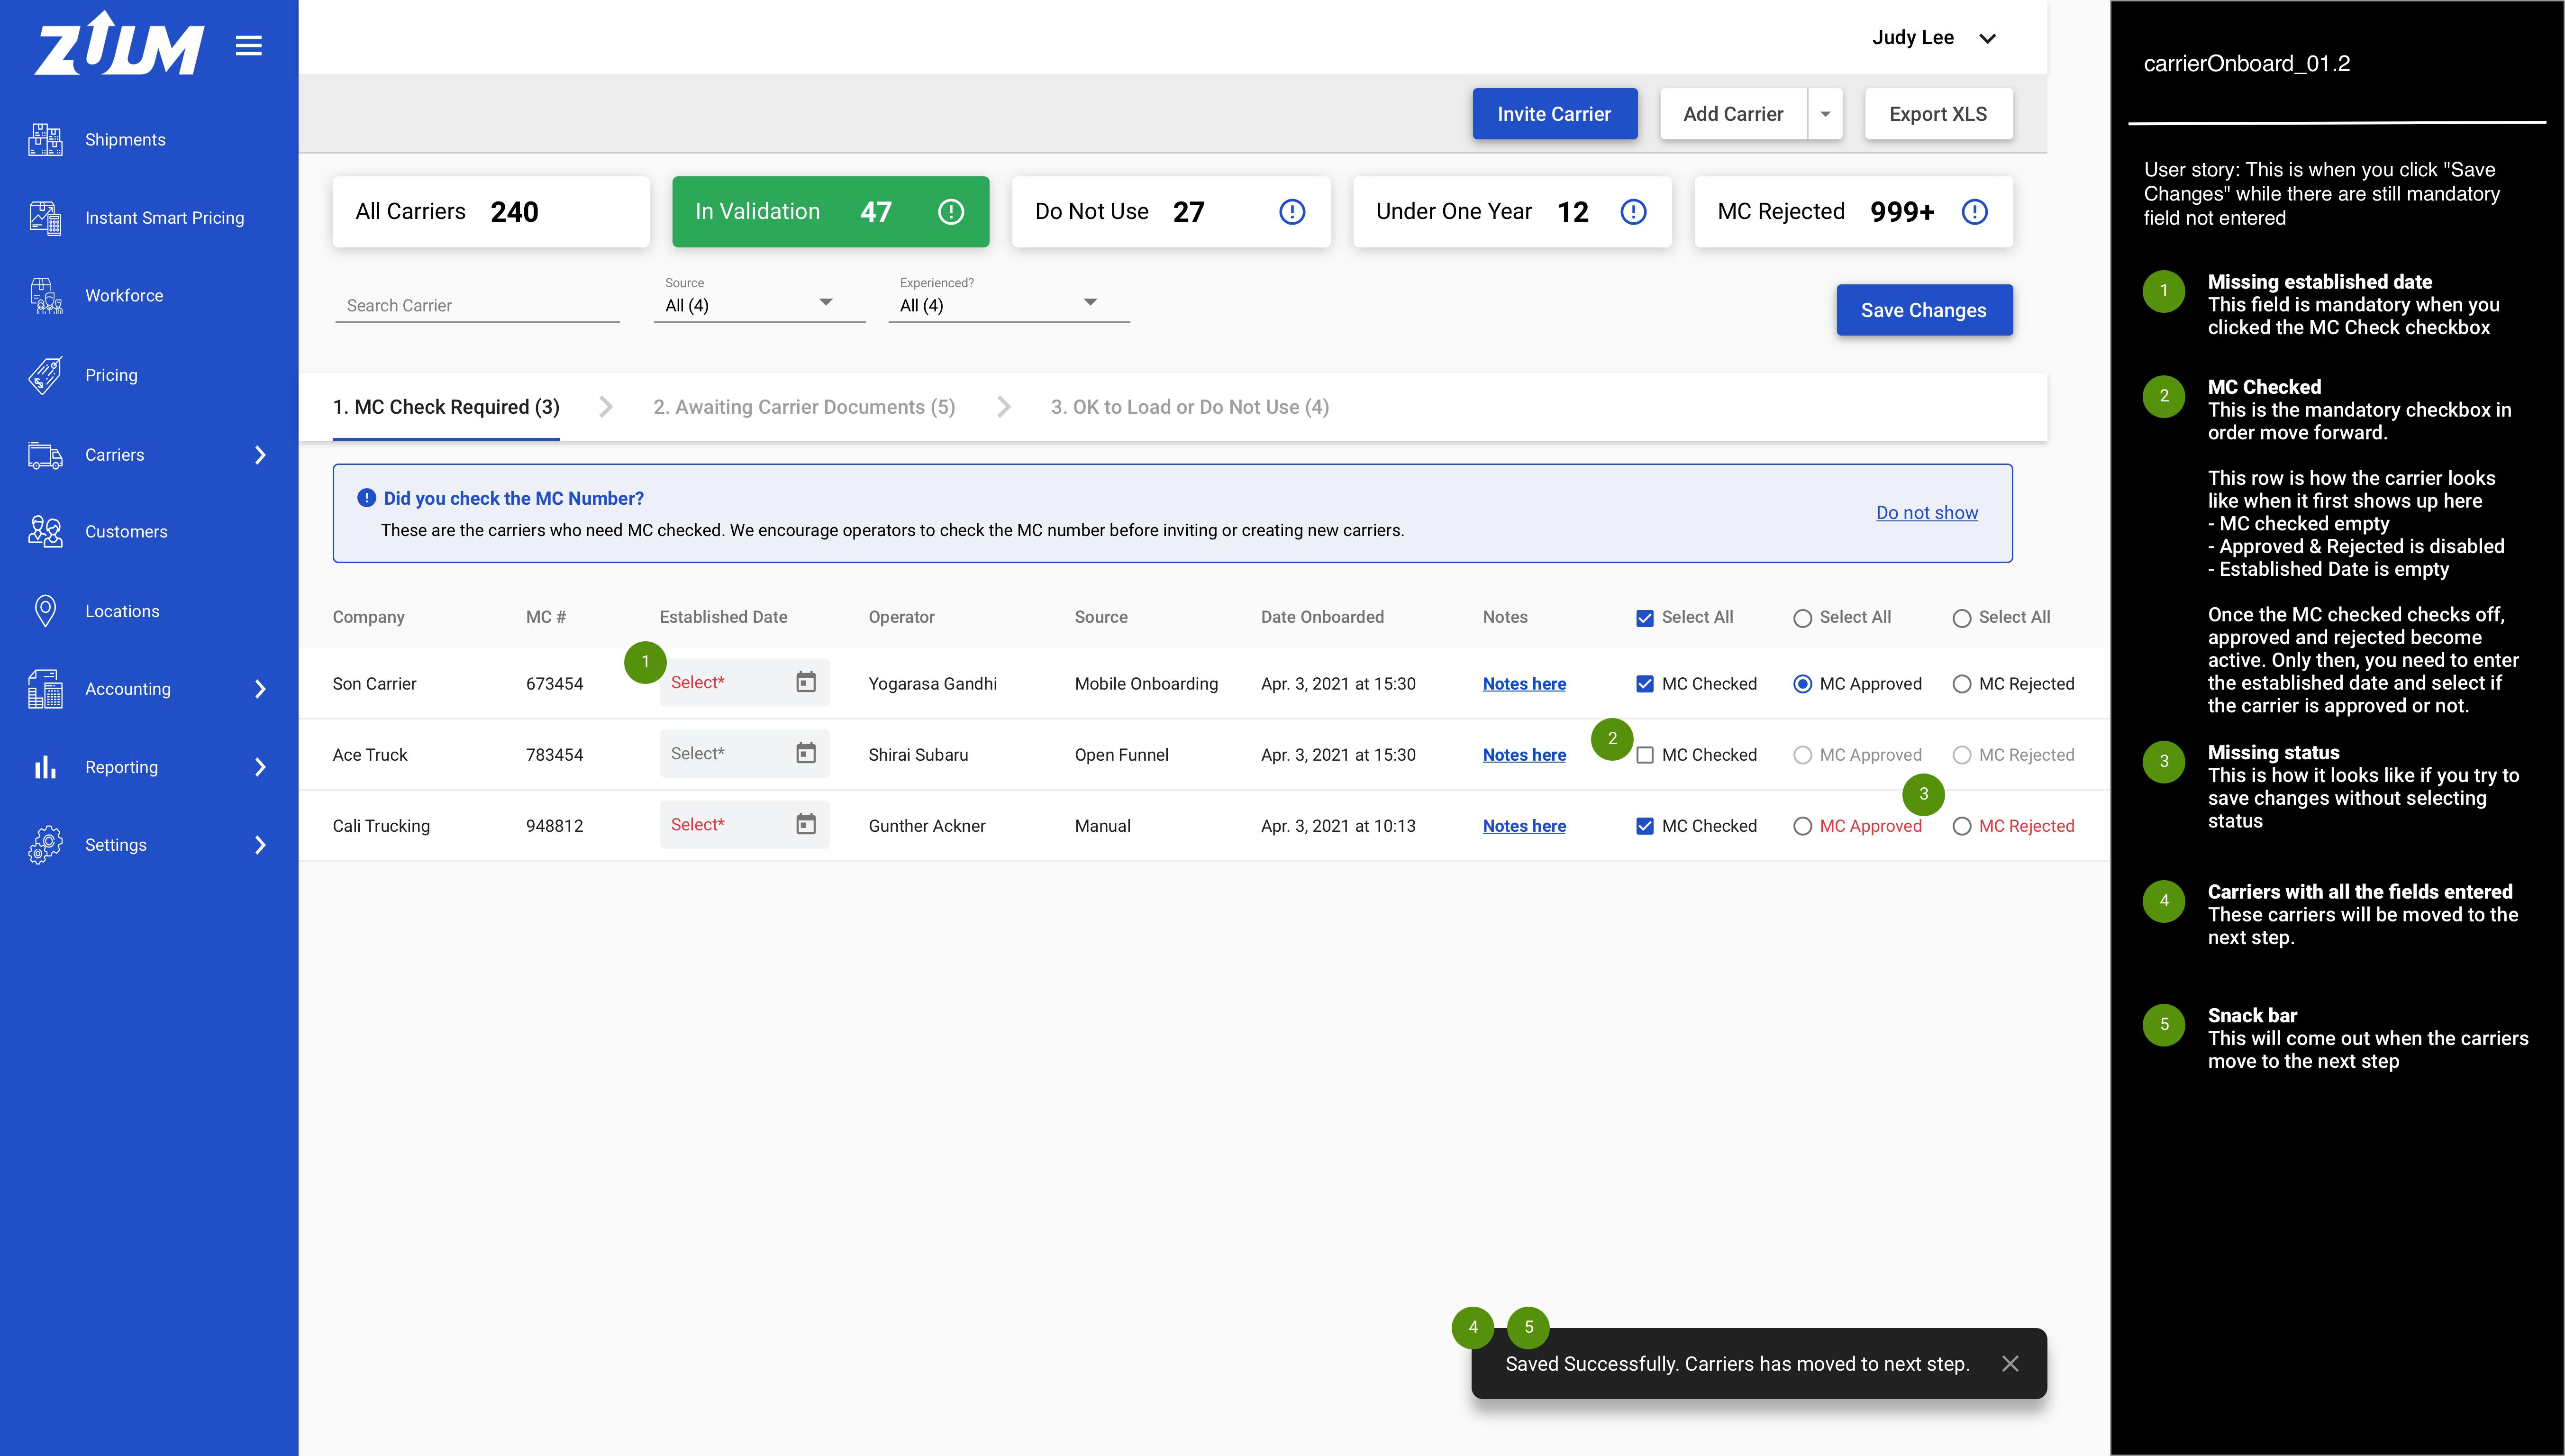
Step #2: carrierOnboarding_01.2
Design: IMG | SPEC Aciton: Enter required fields
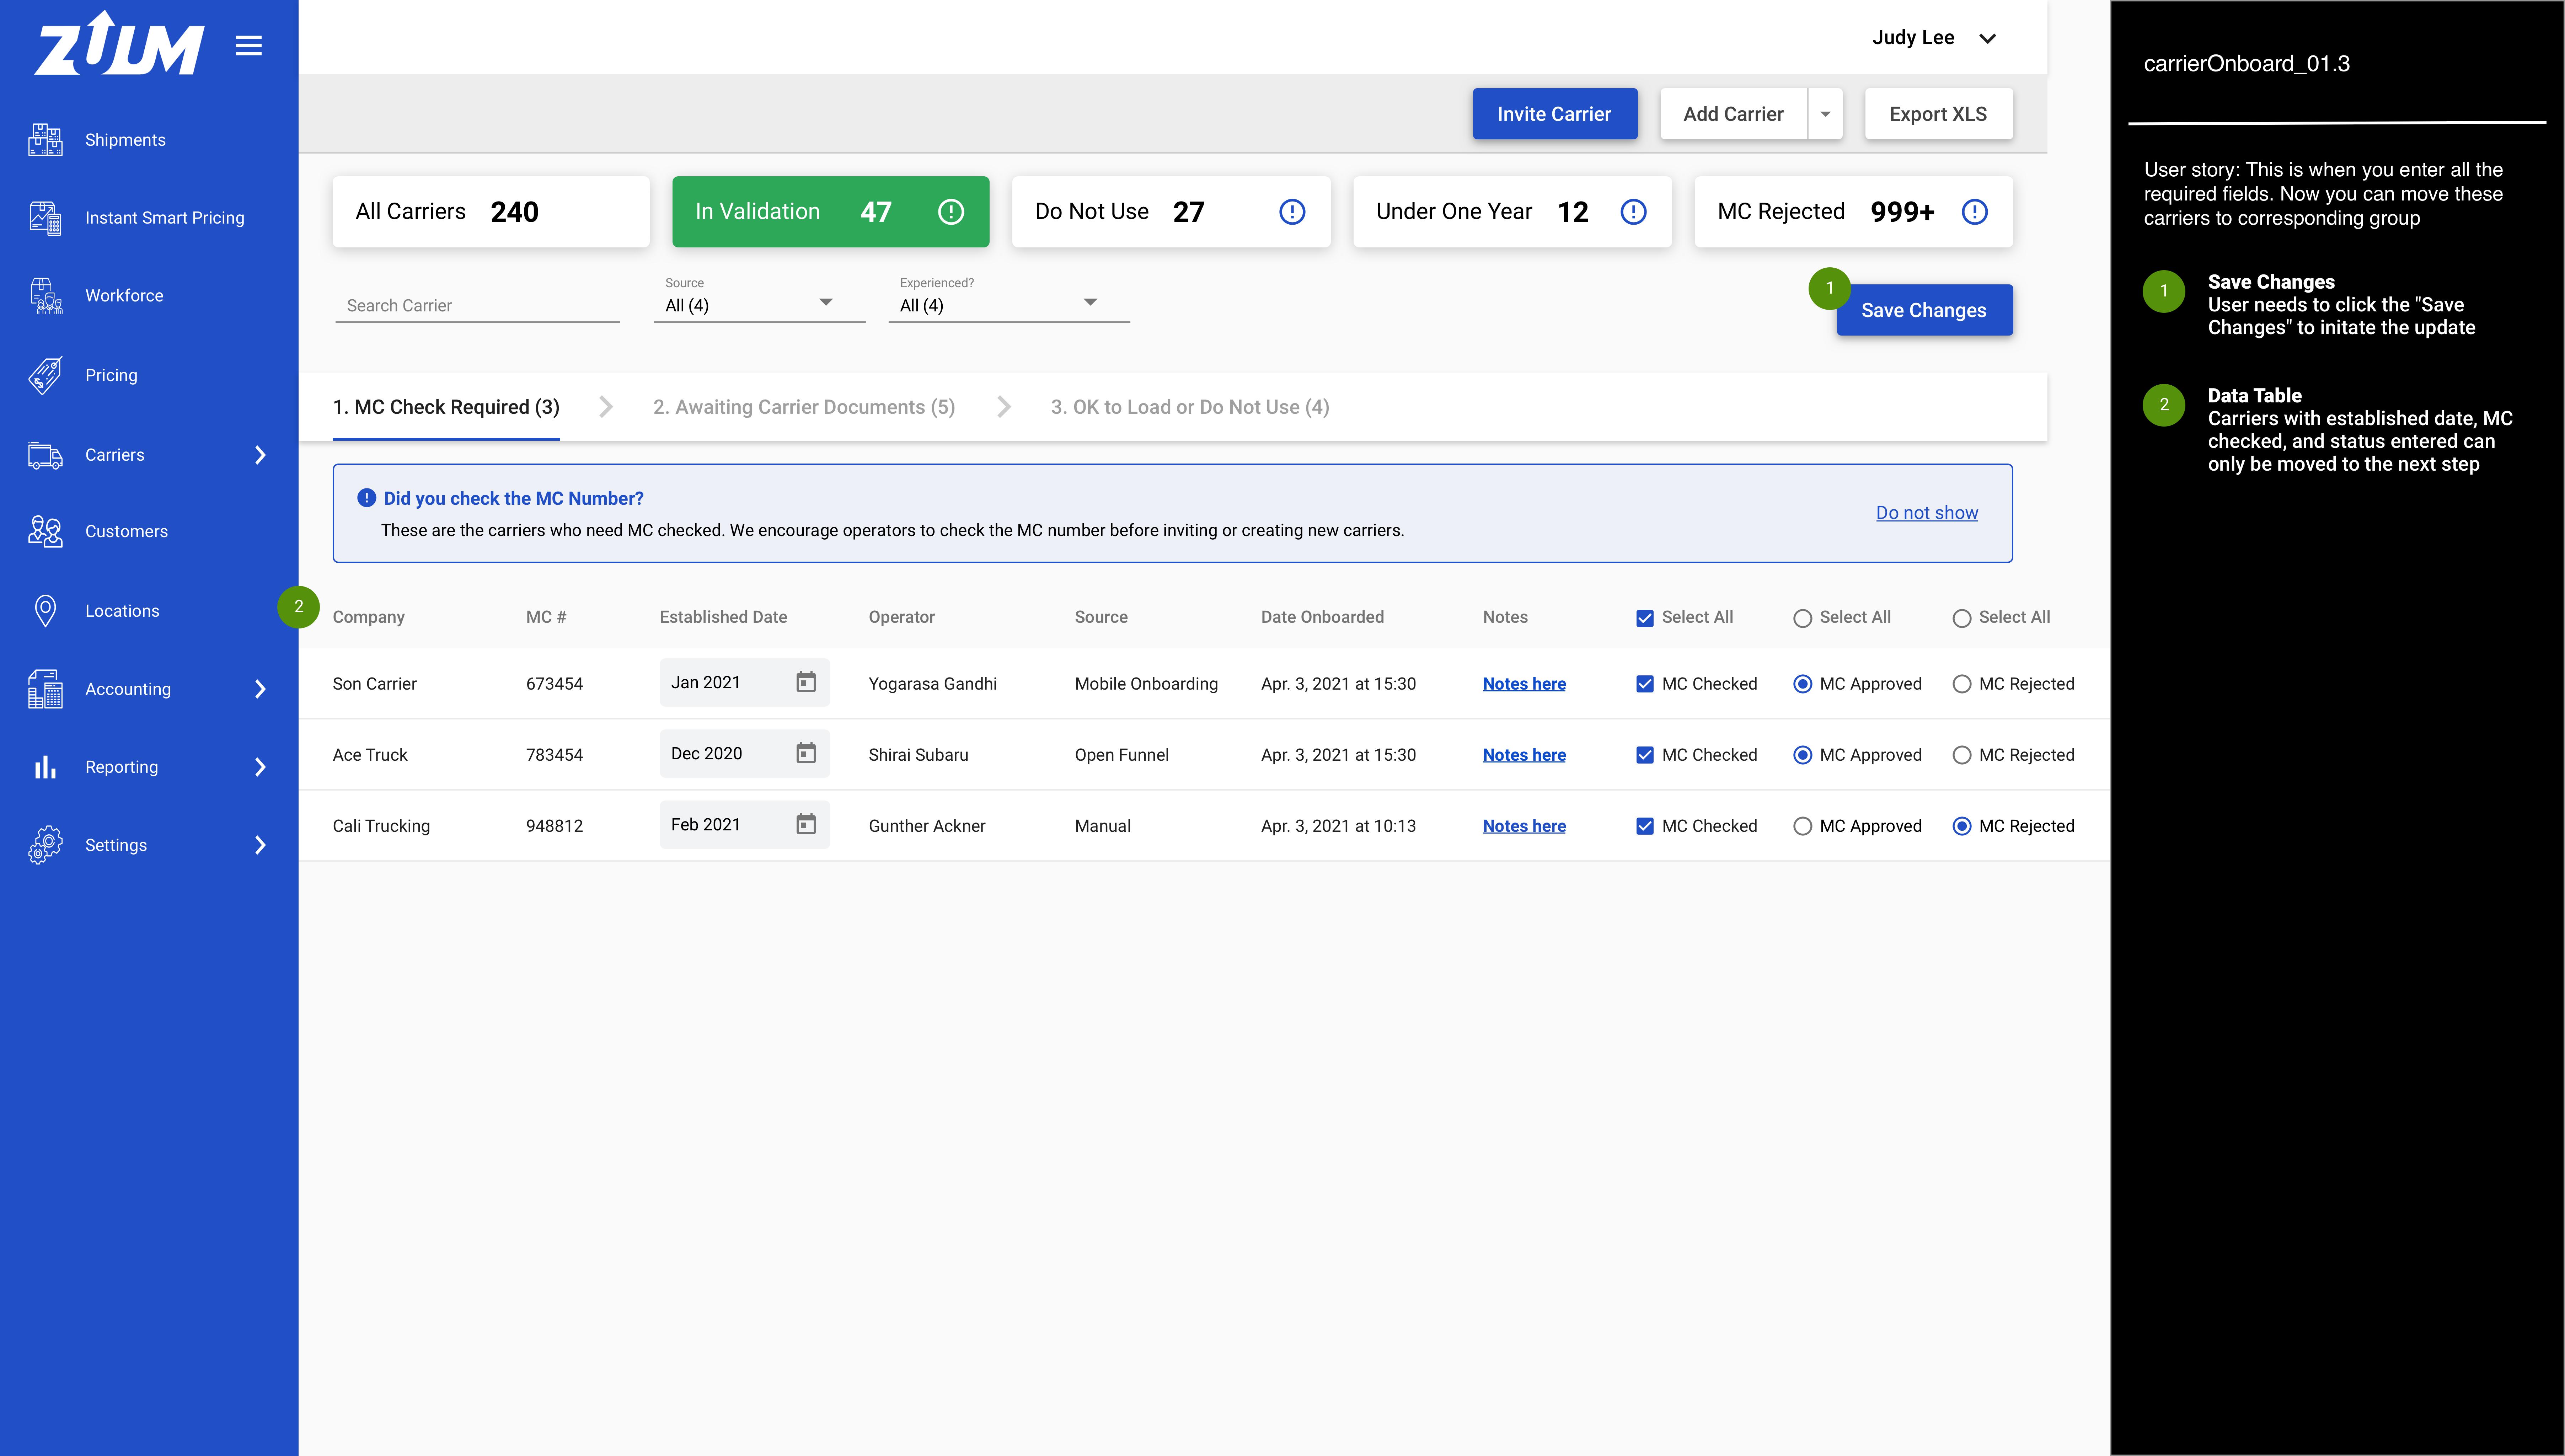
Step #3: carrierOnboarding_01.3
Design: IMG | SPEC Aciton: Enter Save Changes
Step #4: carrierOnboarding_01.4
Design: IMG | SPEC Action: Click 2. Awaiting Carrier Document tab
Step 2: Awaiting Carrier Documents
You can see the upload status for each carrier
Step 3: OK to Load or Do Not Use
This is the last step of the validation process
Pop-up Modal
Filter the list
Design: IMG | SPEC Action: Click on the Experienced filter
Use Case #6: Website Onboarding
When carriers onboarding themselves from our website
Requirements
Since they are onboarding themselves, we need to validate the MC/DOT # first. Place them on the MC/DOT Check Required tab even if they uploaded all the docs
But once the MC/DOT # is approved, take them the corresponding steps based on their document upload
Use Case #7: Accepting or Rejecting Ok-to-Load Request
Design: IMG
For non-managerial users or users without the Ok-to-Load capability, they send request to OK-to-load carriers to managers. Once requested, the carriers will be shown up on the In Validation > Ok to Load or Do Not Use section
Request Queue
According to Eva, Ok to Load and Do Not Use request must be reviewed by managers first before they handle other things below
When operators or any users without the Ok to Load capability send a request to Ok to Load a carrier, that carrier will show up on the Request Queue
Once all the request has been reviewed and taken action, this queue will disappear
List the request by ascending order
Search
You can search by any value from this data table
Request Type
This will filter the request queue below
When clicked you will get options like the below:
All (# of carriers under this category)
Ok to Load (# of carriers under this category)
Do Not Use (# of carriers under this category)
Company
Display the carrier company name
MC #
Display the MC # here
Requested by
Person who requested
Time Requested
Displays when it was requested
Request Type
Display if the request to Ok to Load or Do Not Use a carrier
Comment
Display comments that the person who requested has entered
Rejecting Request for Ok to Load
Will give you a confirmation pop-up with the option to leave a comment
Once you click “Yes, Reject,” the row will be cleared with the toast message saying:
Text: Ok to Load request rejected
Accepting Request for Ok to Load
Click this will clear the row and will give you a toast message
Text: Ok to Load request accepted
Rejecting Request for Do Not Use
Will give you a confirmation pop-up with a mandatary comment field
Once you click “Yes, Reject,” the row will be cleared with the toast message saying:
Text: Do Not Use request rejected
Accepting Request for Do Not Use
Will give you a confirmation pop-up with a mandatary comment field
Once you click “Yes, Accept,” the row will be cleared with the toast message saying:
Text: Do Not Use request accepted