


[BR] Message Center
- Objective
- Three channels to send and receive messages
- Two ways to create a chatroom
- Places to open the messaging center
- Main Messaging Center
- Chat Interfaces
- Use Case #1: Creating a new message via name MVP
- Use Case #2.1: Creating a new message via load number
- Use Case #2.2: Joining existing chat via load number
- Use Case #3: Add users to the chatroom MVP
- Use Case #4: Linking messages to load number
- Use Case #5: Transfer inquiry to another representative
Document Status | COMPLETE APPROVED BY MO |
|---|---|
Last updated | |
Monday Ticket |
|
Document Owner | |
Designer | |
Developer | |
QA |
|
Technology |
|
Design | https://zuum.invisionapp.com/console/share/RQ1LUSM1BE/482726539 |
Objective
Integrate messaging in the admin so the broker can easily communicate with the internal team, carriers, shippers, and website visitors in our platform
As an MVP , we want to start with two features:
Communicate with Driver through SMS
Communicate with internal admin users
For the future:
Communicate with Carriers
Communicate with Shippers
Communicate with the visitors from the website
Three channels to send and receive messages
In-app Chat
Internal admin users MVP
Carriers
Fleet Manager & Dispatcher
Driver
Shipper
Website visitors
SMS with Driver MVP
Email
Two ways to create a chatroom
Create chatroom flow will be discussed in detail later
Via Name MVP
Normal chat between you and other person or people
Other people don’t have access to it.
Only way for other people to join is to get invited by user who is already in it. (Think of Slack Chat and Slack Group Chat)
Via Load Number (Load Chat)
Chatroom is created under a specific load number
Anyone can join the meeting if you are Zuum members
Carriers are not allowed to see Shipper chatroom and visa versa
Any conversation you are having in that chatroom will be seen by anyone who joins the meeting
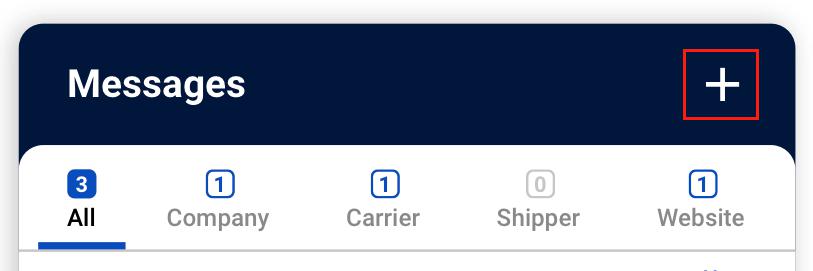
Places to open the messaging center
There are 4 places to open the messaging center:
A) Universal messaging button MVP
Design: Here
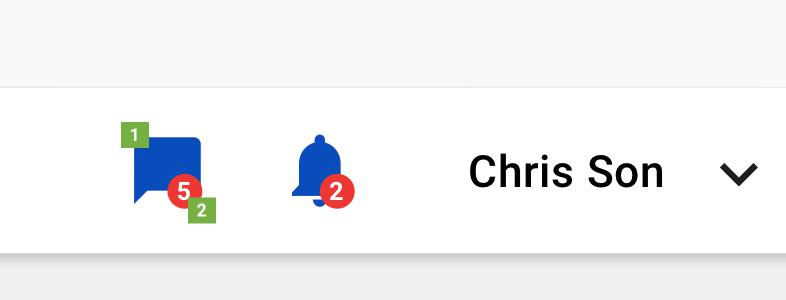
Messaging Button
This button will be placed next to the notification button on the main header
When click, the messaging center will slide up from the bottom right corner
Different States:
When there are no unread messages
Gray color: #757575
When there are unread messages
Blue color: #204FC6
Alert Badge
This displays the number of unread messages
B) Shipment Detail MVP
Design: Here
Details Tab

“Contact” Button
When clicked, you will get a dropdown:
Operator MVP
This will open up the chat with the operator who is in charge of this shipment
Driver MVP
This will open up the chat with the assigned driver
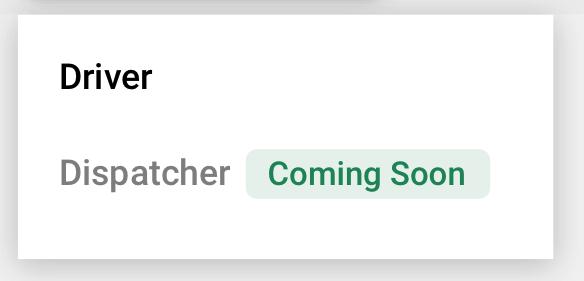
Dispatcher (coming soon)
Shipper (coming soon)
Customers Tab

This will open up the chat with the customer contact person
Carriers Tab

When click, you will get a dropdown:
Driver MVP
This will open up the chat with the assigned driver
Dispatcher (coming soon)
Tracking Tab (Design)
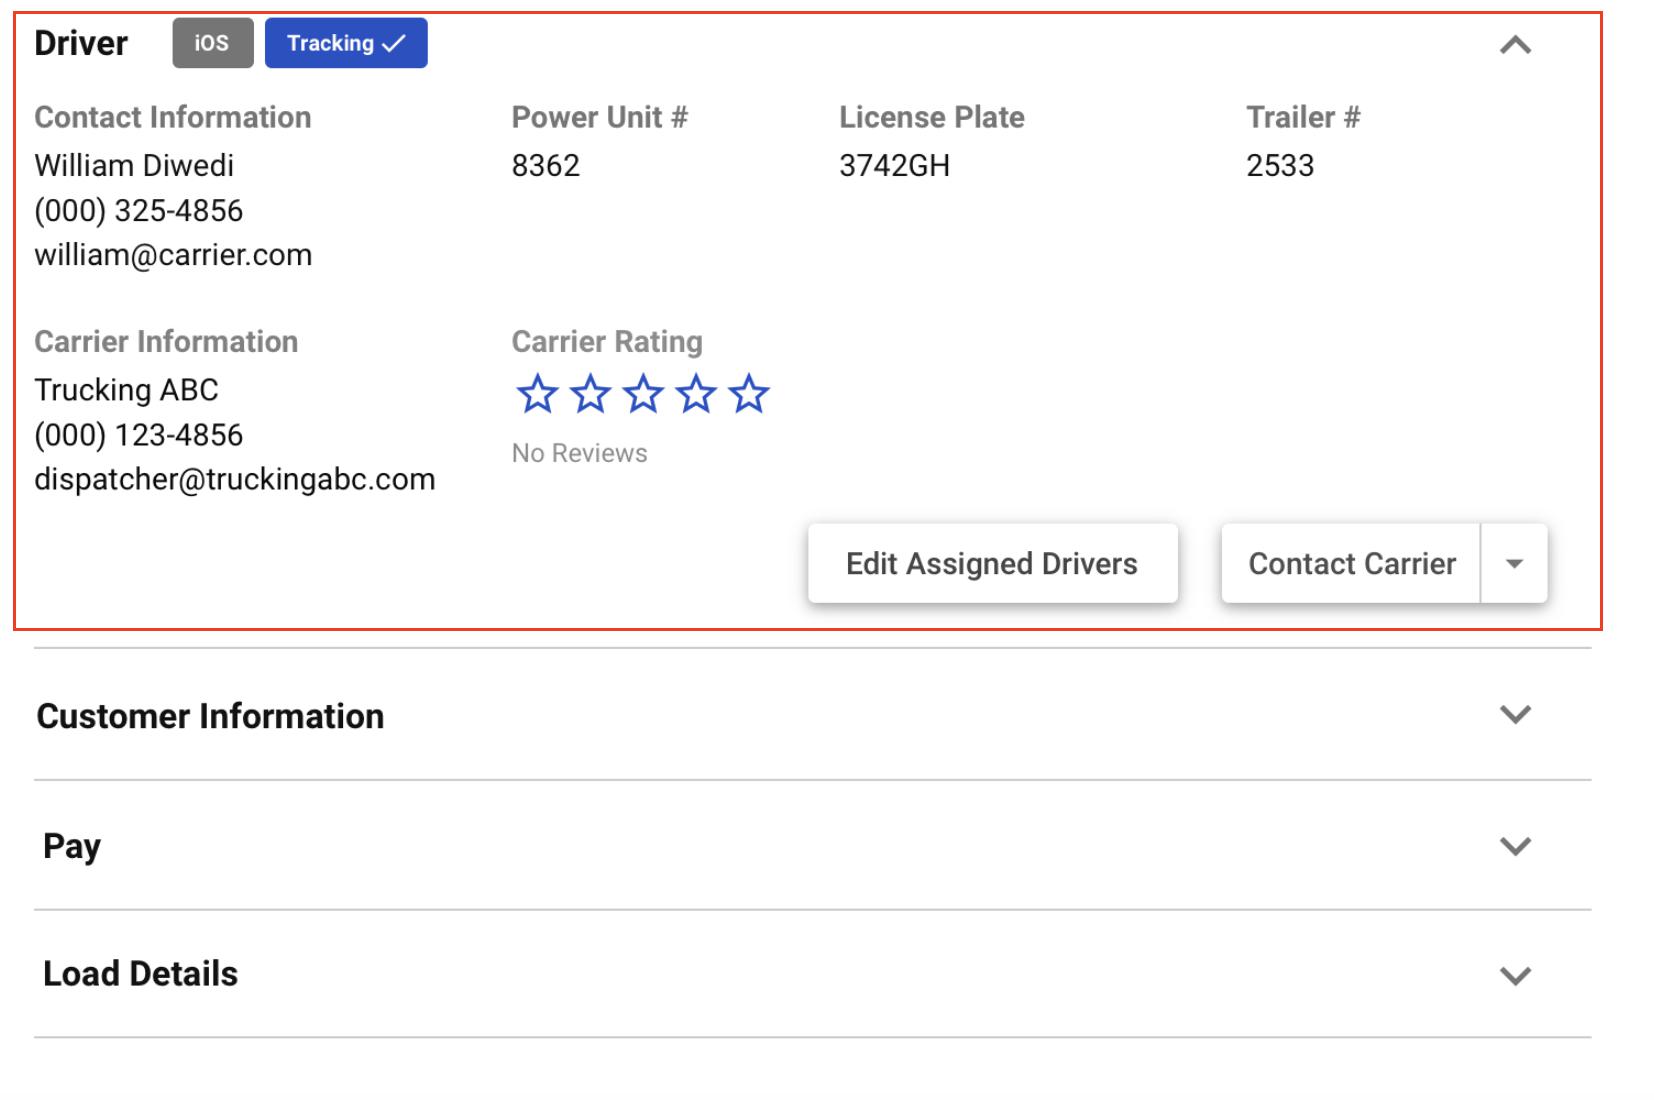
Right below the tracking map, there are four accordion elements: Driver, Customer Information, Pay, Load Details.
On the driver section, we have “Contact Carrier” MVP
This will give you the same dropdown as the carrier contact tab
On the customer information section, we have “Contact Customer”
C) Carrier Database MVP
Design: Here

Carrier List
Place the message icon next to the “call” button
This will give you the same dropdown as the other “contact carrier”
Carrier Detail
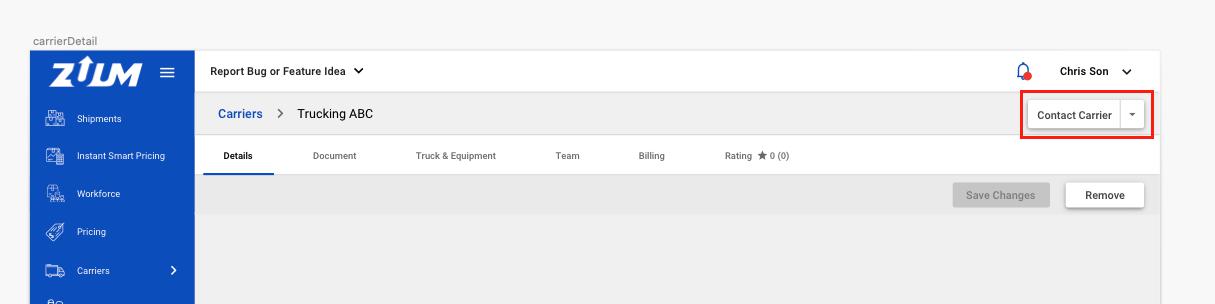
If you click the carrier from the carrier database, it takes you to the carrier detail page and the “Carrier Contact” will be placed on the top right corner
This will give you the same dropdown as the other “contact carrier”
D) Customer
I will provide the design once MVP is completed
Main Messaging Center
Design: Here
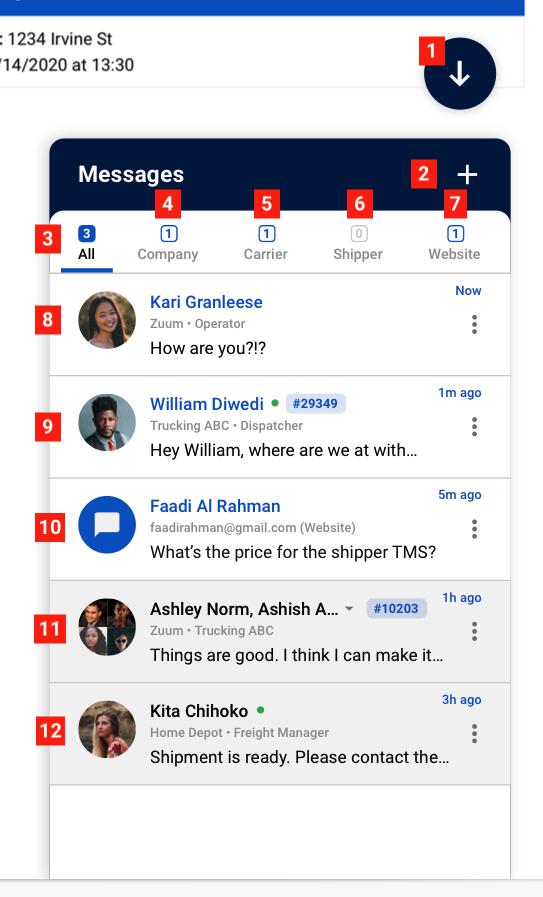
Collapse Floating Button MVP
When click, the messaging center will slide down and disappear from the screen.
Create Message MVP
This will take you to create a message flow below.
All Tab MVP
This is a place where the user can see all messages
Display “All Tab” as a default
Tab will turn into the active mode
Company Tab MVP
This is where all the chat with internal users will live
Carrier Tab MVP
This is where all the chat with carriers will live
Shipper Tab
This is where all the chat with shippers will live
Website Tab
This is where all the website chat inquiries will queue
When the visitor requests to chat with the admin, the inquiry will be seen by every admin until someone starts chatting, then it will disappear from everyone else’s.
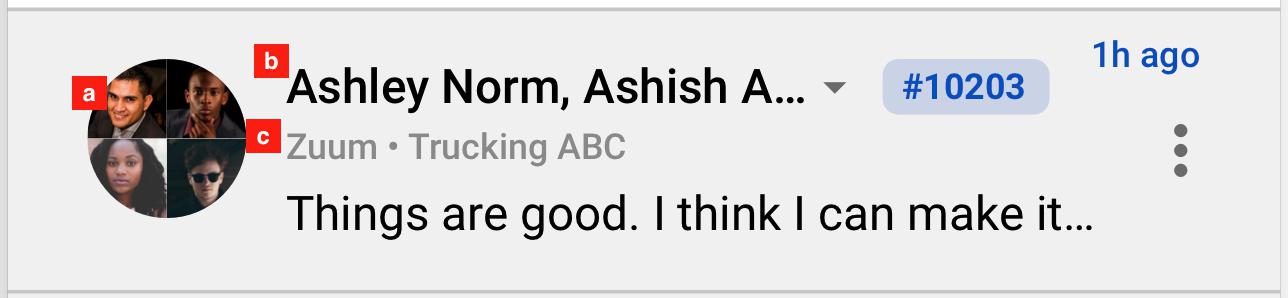
Company Chat List MVP - This is what it looks like when we receive the message from the internal users.
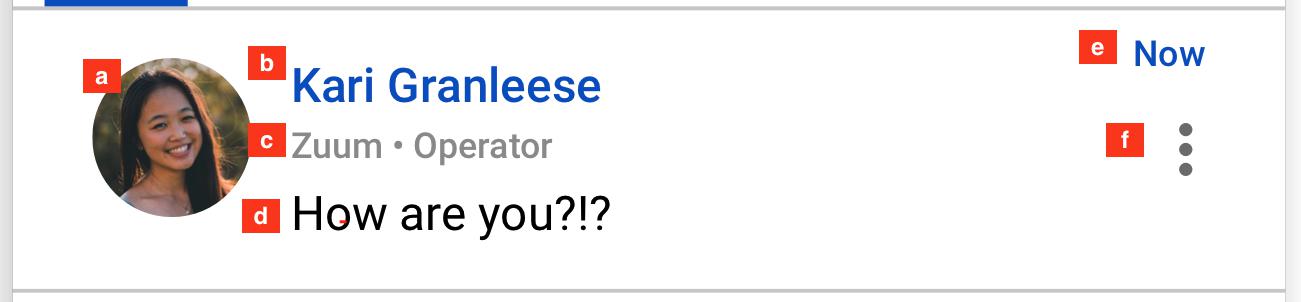
Profile picture
User Name
The color will be blue when you didn’t read it
FYI- The color is black and the background is gray when you read it
User Description
Company Name • Role
Message Preview
Timestamp
Option
When click, it will give you a dropdown to select from the options below:
Mark as Read for unread messages
Mark as Unread for read messages
Remove from the list
Make it a group chat
Carrier/Shipper Chat List
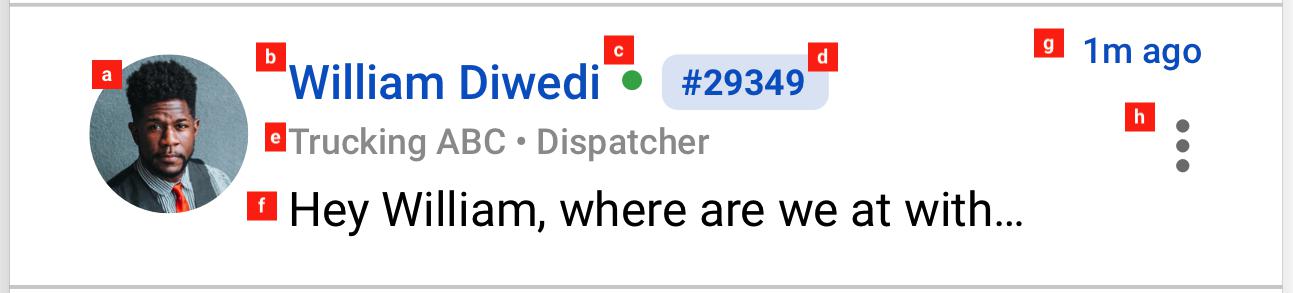
Profile Picture
User Name
App Status
Tells you about the app accessibility
Green means
For Driver - They have downloaded the app and is able to receive a message
For MVP, just show green if they downloaded the app
For Fleet Manager/Dispatcher - They are using Zuum Carrier platform and have Zuum Messaging Center
For Shipper - They are using Zuum Shipper platform and have Zuum Messaging Center
Red means
For Driver - They haven’t downloaded the app and can only be reached through SMS. App will send out the message as SMS
For MVP, just show red if they don’t have the app installed
For Fleet Manager/Dispatcher - They are not using Zuum Carrier platform. App will send out the message via email
For Shipper - They are not using Zuum Carrier platform. App will send out the message via email
Load Number
Display the load number if the chat is linked to the specific load
You will be able to see how the message can be linked to the load # later on.
User Description
Chat Preview
Timestamp
Option
*For group chat, you can add anyone from the internal users and anyone from the same carrier but not SHIPPER.*
Website Chat List
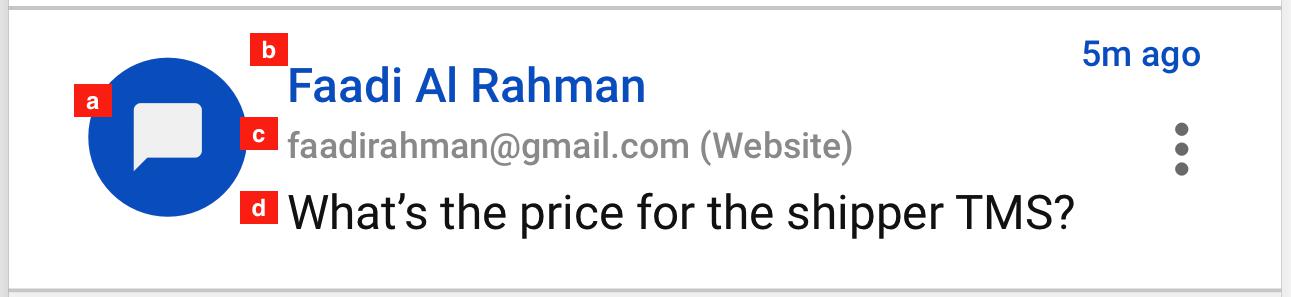
Dedicated profile image for the website visitors
Visitor Name
Visitor’s Email Address
Chat Preview
The rest is the same
Group Chat List MVP
Group profile image
When it’s a group chat, we want to combine users' profile images into one.
Max to 4 images
Name of everyone who is in the chat
Admin or whoever creates the chat can edit the name of the group
But as a default, it will just display everyone in the chat room.
Company names whom they are from
The rest is the same
Shipper Chat List
Please see item 9
Chat Interfaces
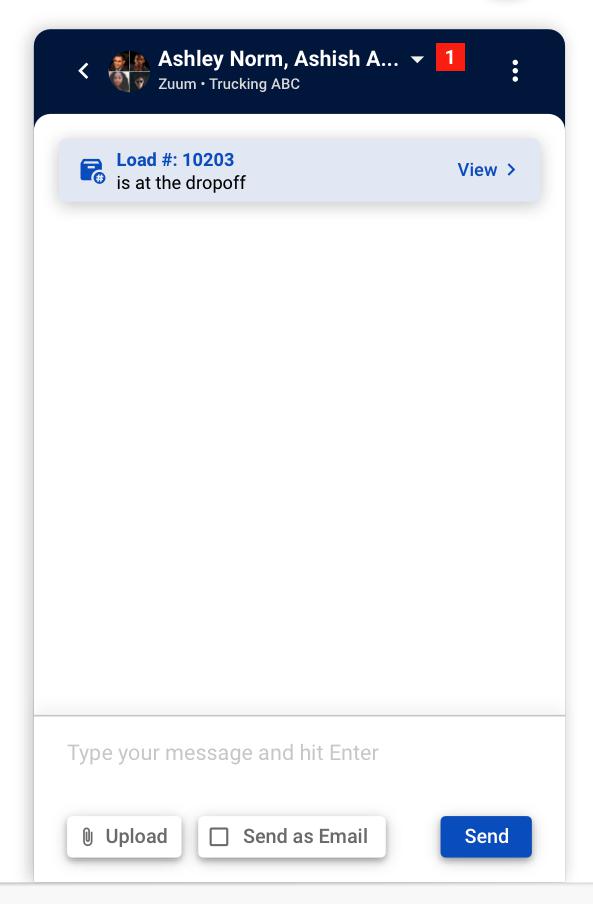
Normal 1-on-1 Chat MVP
Design here
This applies to any chat between you and internal user, carrier, driver, or shipper.
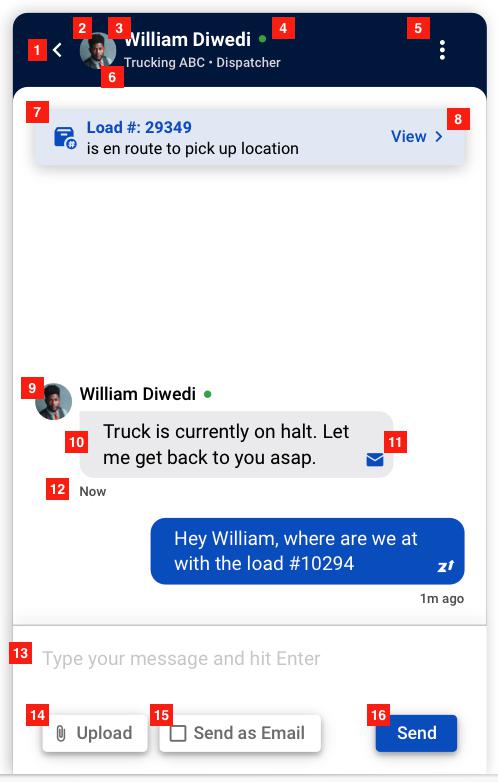
Back button MVP
Takes to back to the message list
Profile image MVP
Displays other person’s image
User Name MVP
App Status MVP
Please see [Main Message Center > Item 9 > letter C]
Option Button MVP
This will give you two options:
Remove from the list
Make it a group chat
Company & Role MVP
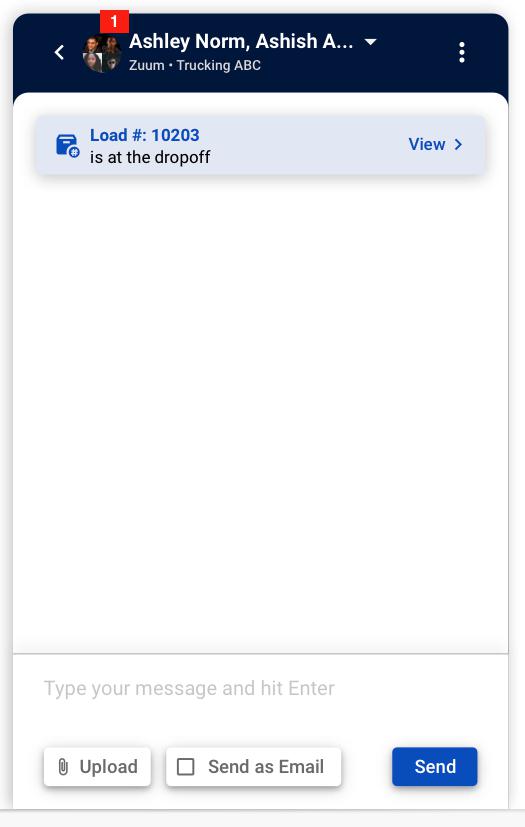
Load ID Banner
This will only appear when the chatroom is linked to a specific load number.
As I addressed, I will discuss how the chatroom gets linked to a load number
View Button
This button takes you to that load detail page
Chat-User Profile MVP
To identify who is chatting, place a profile picture next to it
Message Bubble MVP
Channel Icons MVP
This indicates how the message is sent.
Zuum icon = via Zuum Messaging Center
Letter = Email
Phone = SMS
Timestamp MVP
Chat Input Box MVP
Upload Icon MVP
Send as Email
When the checkbox is checked off, whatever the message you send will be sent as an email
As a recipient,
if they DO NOT have Zuum platform, they will only receive an email
If they DO have Zuum platform, they will both receive an email with CTA button to open the app to respond and Letter-icon-marked (see item 11 > item a) Zuum Message
Send Button MVP
Group Chat MVP
Design here
For group chat, you can add anyone from the internal users and anyone from the same carrier or shipper. SHIPPER & CARRIER CAN’T BE IN THE SAME CHATROOM.
Name of everyone who is in the chat
Admin or whoever creates the chat can edit the name of the group by clicking here
I will discuss the flow later on
But as a default, it will just display everyone in the chat room.
The rest is the same as above
Website Visitor Inquiries
Design here
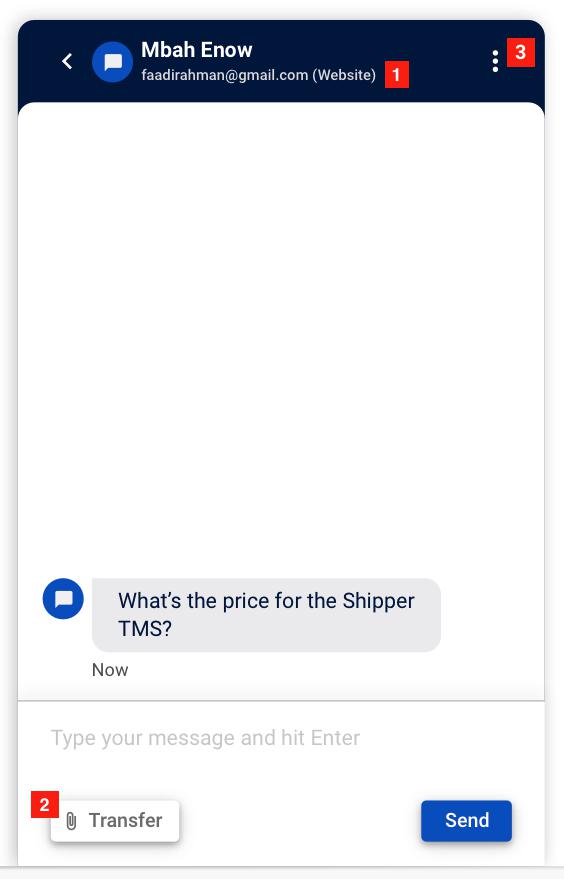
Email Address
I am assuming the person who is inquiring will need to enter their email address to start the chatting
Transfer to another representative
In case you are not the right person to talk to, you can transfer this person to a more appropriate agent.
Transfer flow will be discussed later on
Option button
Will give you options below
Send email
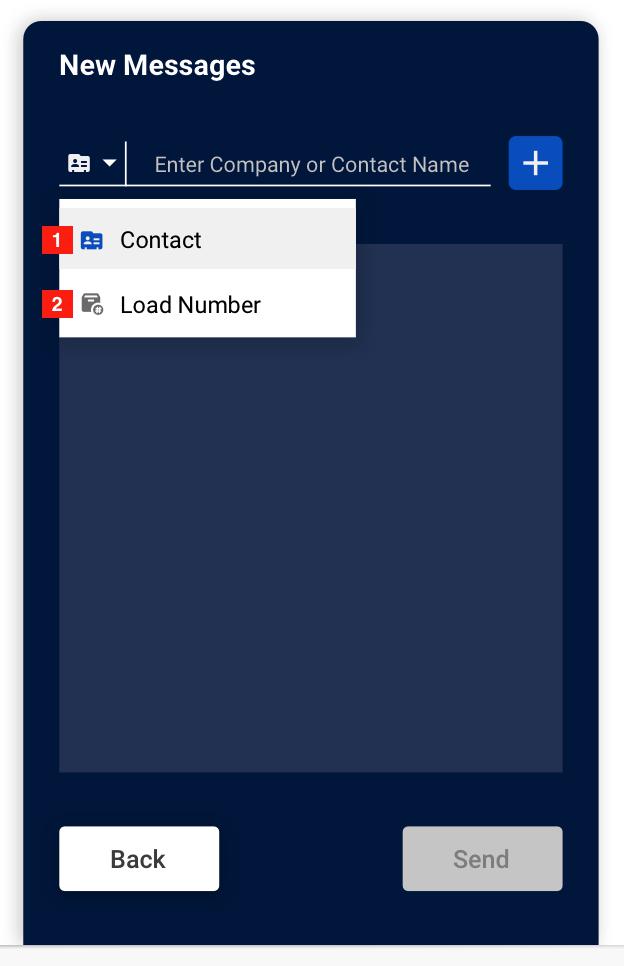
Use Case #1: Creating a new message via name MVP
Design here
.jpg?api=v2)
Step #1: messageCenter_01
Action: Click “New Message” button
Step #2: messageCenter_name_01
Action: Enter company name or user name
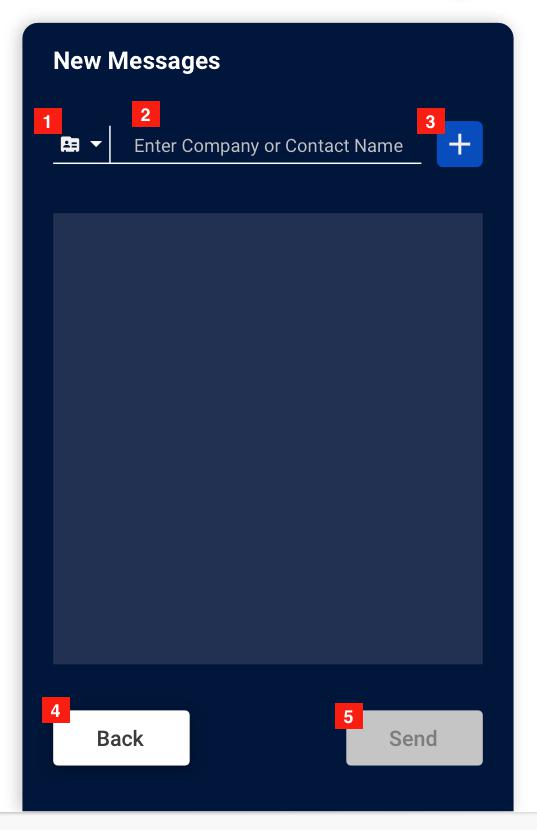
Create Type
This is “By Name” icon
As a default, this icon will be selected
When click, it will give you the option to choose from “By Name” or “By Load Number”
Name Input Field
Here you can either enter name of the company or user’s fully name
As you type, you will get an autocomplete dropdown like below
There are three ways to initiate:
Select the autocompleted name
Press enter
Click on the on “add button' on the right
Add Button
Entering will enter the name you type
Back
Takes you back to the message list
Inactive Send Button
Since no recipient has been selected, it will be in active mode
Step #3: messageCenter_name_02
Action: Select the name you wish to talk to
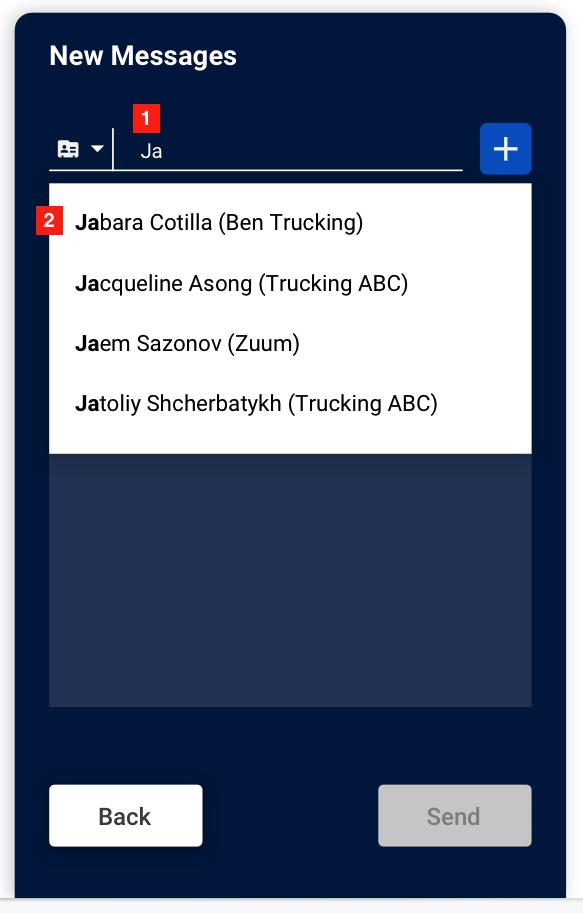
Name input field
Autocomplete Dropdown
As the user types in the letter, autocomplete will display that matches with the letter you have written
Matched letters will be in BOLD
Step #4: messageCenter_name_03
Action: Either you add more users or enter to start chatting
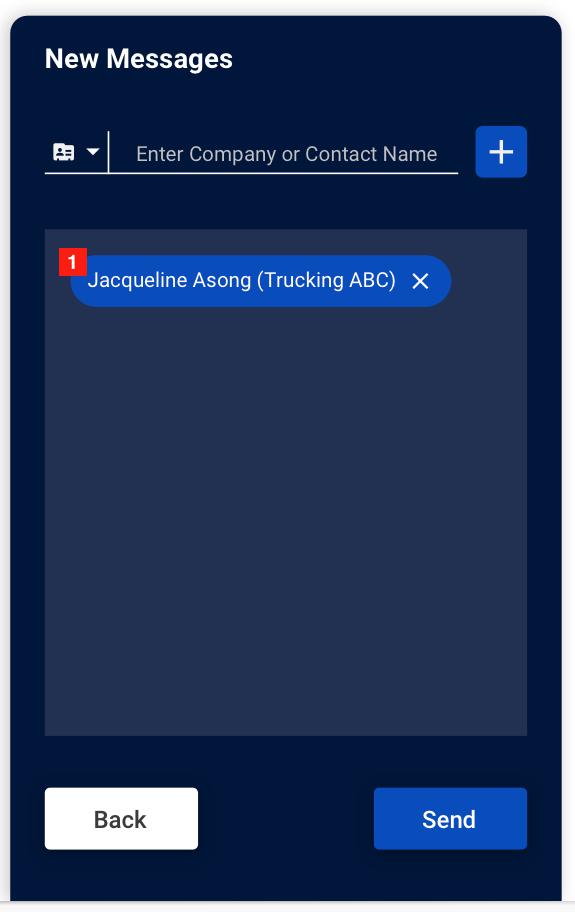
Recipient Queue
When you select the name, it will appear in the queue.
At this point, you can either add more users to make it a group chat or press send to start talking
Once you enter at least one user, the Send button will become an active mode
Use Case #2.1: Creating a new message via load number
Design here
.jpg?api=v2)
Step #1: messageCenter_name_01
Action: Click the message type button
See [Use Case #1 > Step2 > Item 1] here
Step #2: messageCenter_load_01
Action: Change the type from Name to Load Number
Selected Option
As a default, the Name type will be selected and this is how it looks like
Blue icon/Gray background (Please see invision for the design spec)
Load Number
Select here to change from creating by name to creating by load number
Once clicked, the chatroom that you are about to create will be tied to the load number
Step #3: messageCenter_load_02
Action: Enter the load number
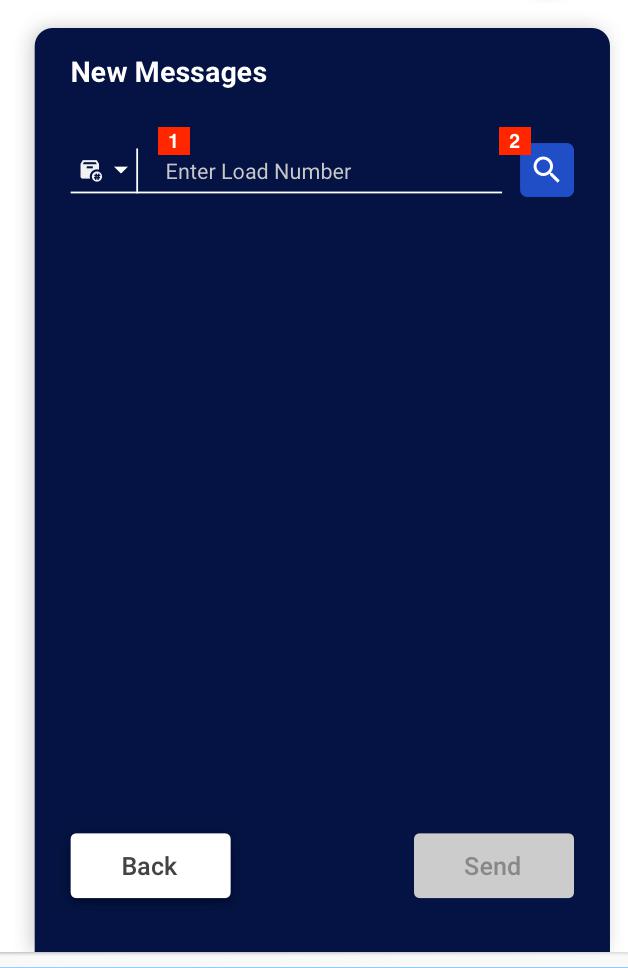
Load Number Input Field
Once you select the Load Number, the description is now changed to “Enter Load Number”
You need to enter the load number not the name
Search Button
You have three ways to enter the load number
Pressing the enter button from the keyboard
Select from the autocomplete which you will see next
Press the search button
Step #4: messageCenter_load_03
Action: Select 12256
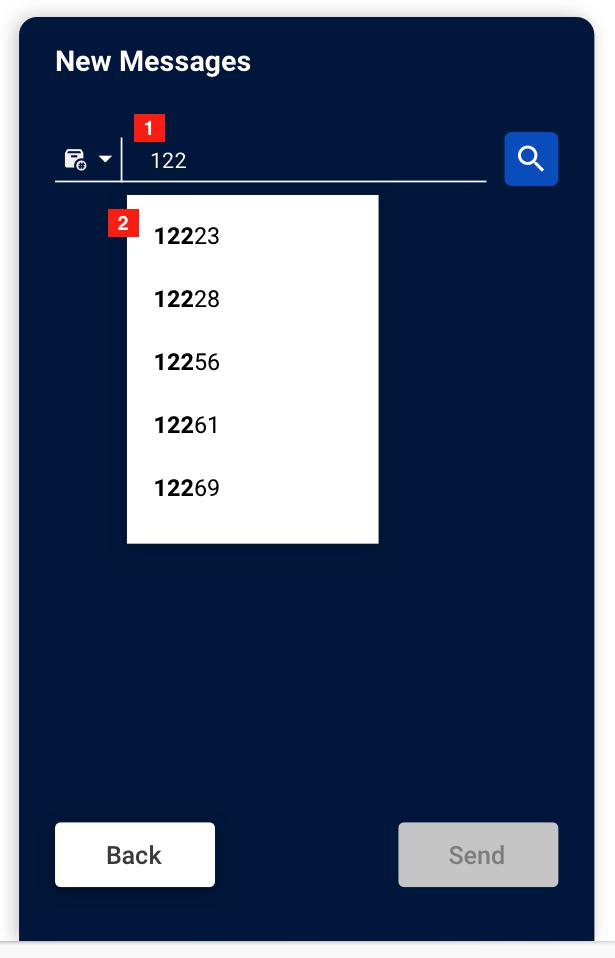
Load Number Input Field
Autocomplete Dropdown
As the user types in the number, autocomplete will display values that match with the number you have written
Matched numbers will be in BOLD
Step #5: messageCenter_new_05
Action: Enter recipient
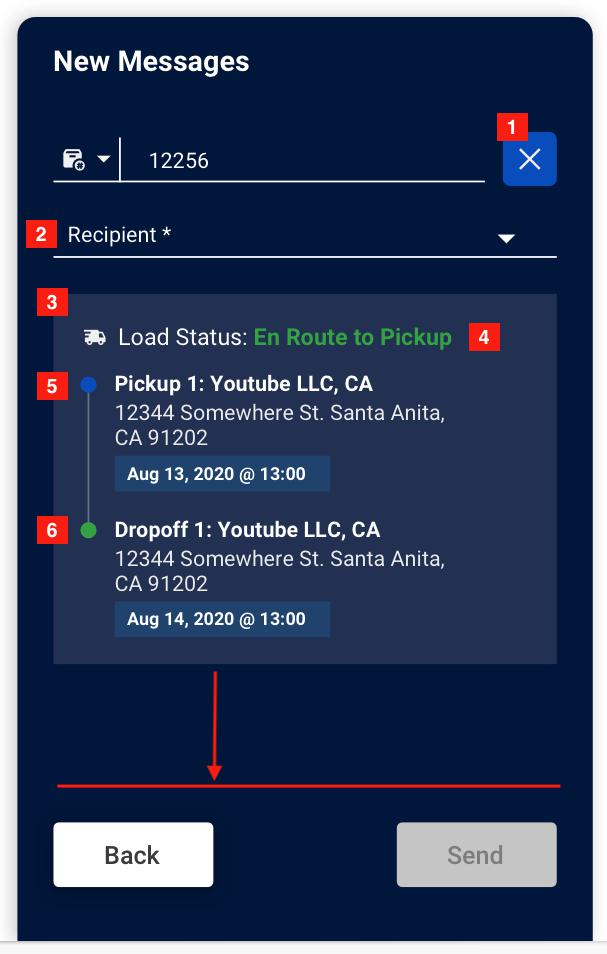
Clear Button
This button will clear the load number you’ve entered
Recipient
By clicking, you will get the list of all the stakeholders that are involved in this load
Operator
Shipper
Carrier
Load Details/Status
The user gets to see the load detail/status
Load Status
Pickup Details
Dropoff Details
If there is more than one pick up or dropoff, the list will get longer
Detail background container can be stretched up the red line and if the contents is longer than that, the user will need to scroll.
Step #6: messageCenter_new_06
Action: Select the users you wish to add to the load chat
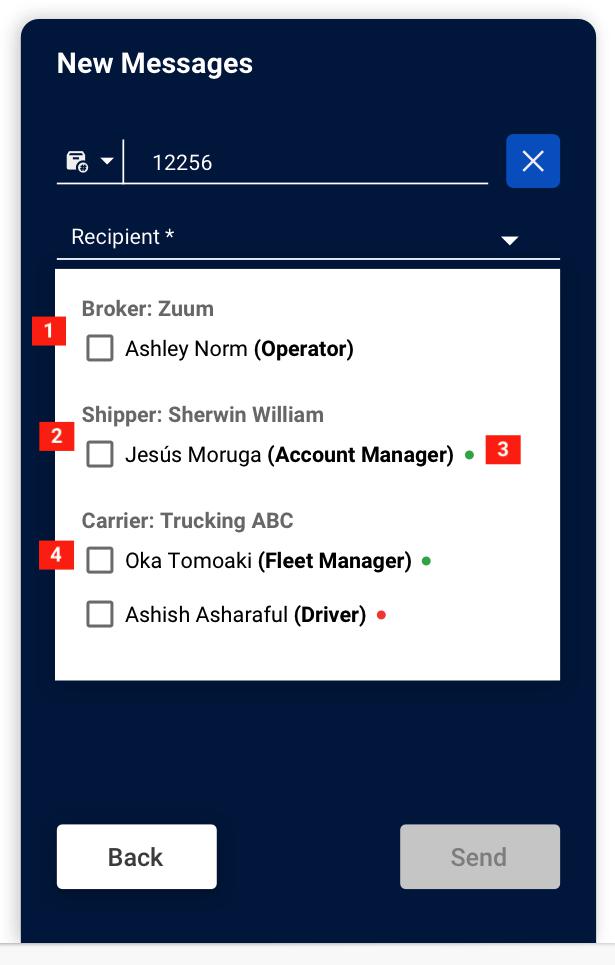
Brokers
List all the brokers who are involved in this load
Shipper
List all the shipper contact people associated with this load
App Status
This will only appear to Shipper and Carrier
Shipper
Green means: They are using Zuum platform and has access to Zuum Chat
Red means: They are not
Carrier Fleet Manager/Dispatcher
Green means: They are using Zuum platform and has access to Zuum Chat
Red means: They are not
Carrier Driver
Green means: They have downloaded the app and has access to Zuum Chat
Red means: They haven’t downloaded app or have issues with it
Carrier
List all the carrier contact people associated with this load
Step #7: messageCenter_new_07
Action: Exit out
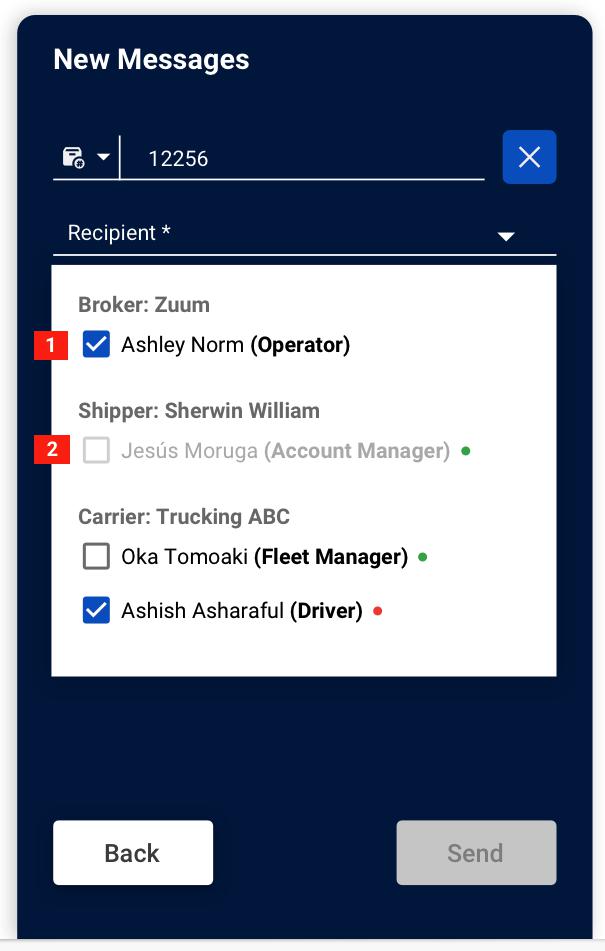
Selected View
This is how it looks like when one is selected
Disable View
Since shipper and carrier can’t be in the same chatroom, when one is selected, the other will be disabled and visa versa.
However, the Operators will be able to join both chatrooms.
Step #8: messageCenter_new_08
Action: Click Send
Once the send button is clicked, it will take the user to [chat interface > group chat] here
Use Case #2.2: Joining existing chat via load number
Design here
.jpg?api=v2)
Step #1 - #4: It will be the same as Use Case #2.1
Action: Click the message type button
See [Use Case #1 > Step2 > Item 1] here
Step #5: messageCenter_joinChat_01
Action: Join Chat
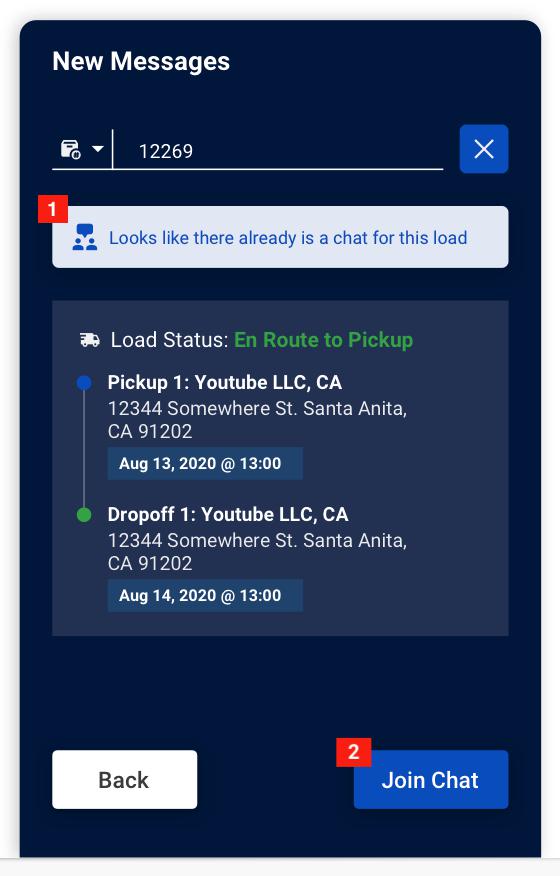
Existing Chat Banner
When someone already created a load chat, we need to display this banner telling them chat is already existed
Join Chat Button
Button will say “Join Chat” instead of Send
Use Case #3: Add users to the chatroom MVP
Design here
.jpg?api=v2)
Step #1: messageCenter_name_09 MVP
Action: Click the name
Names
Displays all the users who are in the chatroom
You can customize the name in the next screen
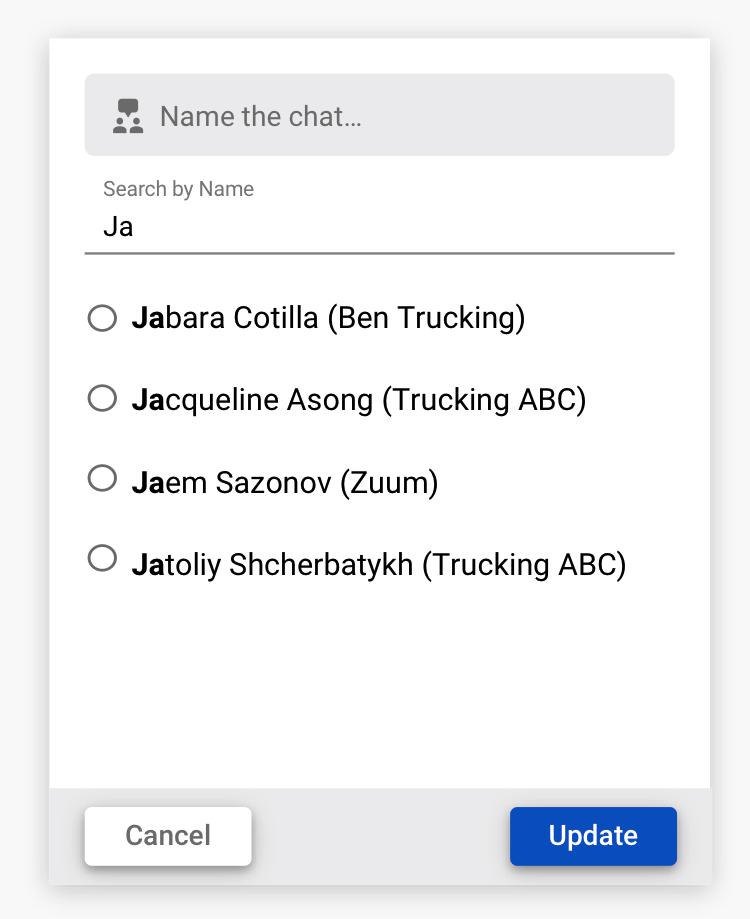
Step #2: messageCenter_name_10 MVP
Action: Search the person you want to add to the chatroom
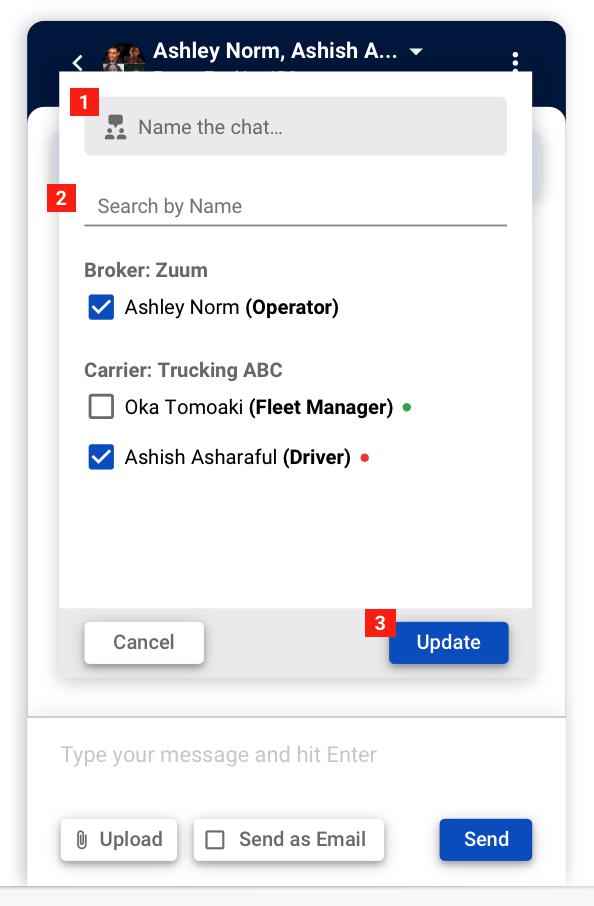
Name the Chat MVP
You can replace the name by entering the unique name you want
Search by Name
Left illustration
This is when you are trying to add someone in the load chat (please see here if you don’t know what load chat is)
As a default, you will only see the people associated with the load but when you start typing letters, autocomplete will start looking for the name
Right illustration MVP
This is when you are trying to add someone to your regular chat
Update
This button will initiate the action
Step #3: messageCenter_name_11 MVP
Action: Select the name and press update
Step #4: messageCenter_name_12 MVP
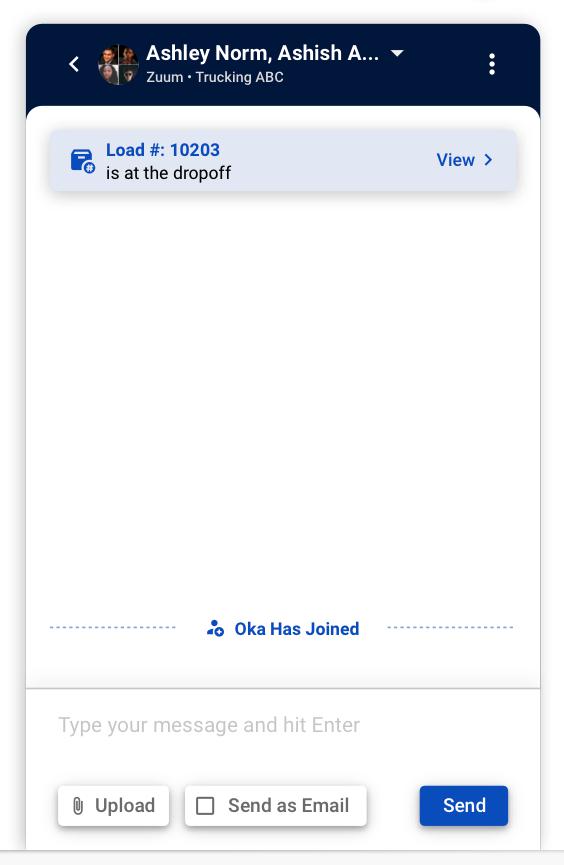
Joined Banner
This is what you get someone join the chat
Use Case #4: Linking messages to load number
Design here
Usecase: As I have addressed before, you can create a chatroom via name or load #. If the chatroom is created by load #, it is linked to that specific load and is now open to everyone in the broker organization which means all the conversation that’s happening is stored in that load chat and whoever joins the chat can see the history.
However, there might be a case when you are casually chatting with the carrier or shipper in a normal chatroom (created via name). But you might end up discussing the shipment that you wish it could be stored in the load chat. If that’s the case, then you can link the chat with the load # and end it when you are done.
.jpg?api=v2)
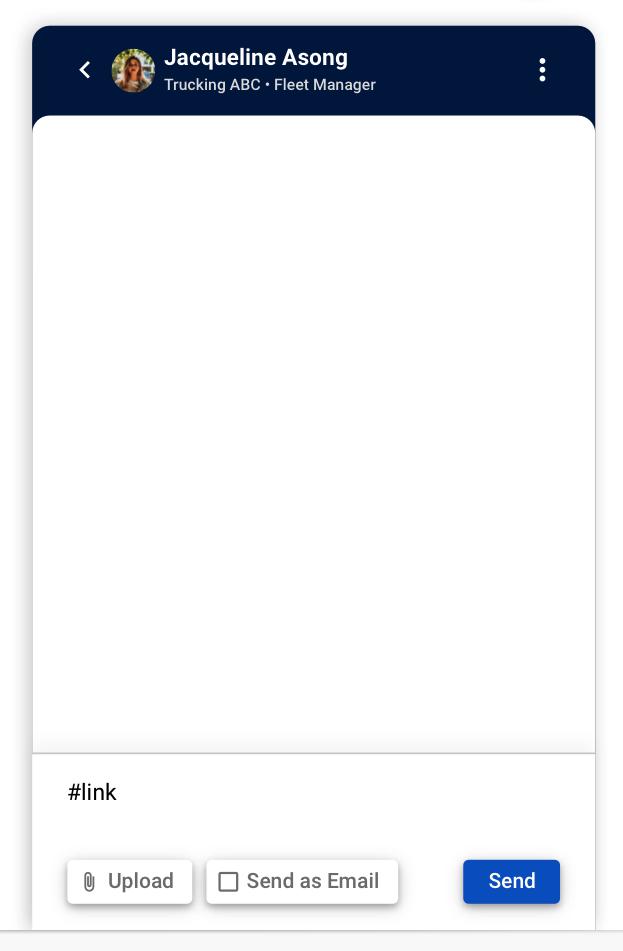
Step #1: messageCenter_name_04
Action: Put in the link tag
There are three “Link Tag”
1. #link
This link tag compiles all the “active” loads assigned to the carrier or shipper and display it
2. #link12030
If you know specific load # you want to discuss with them, you can directly put load number next to the #link
3.#end
If you end the Link Tag, you can do it by entering #end
Step #2: messageCenter_name_05
Action: Press Send
Step #3: messageCenter_name_06
Action: Select Load
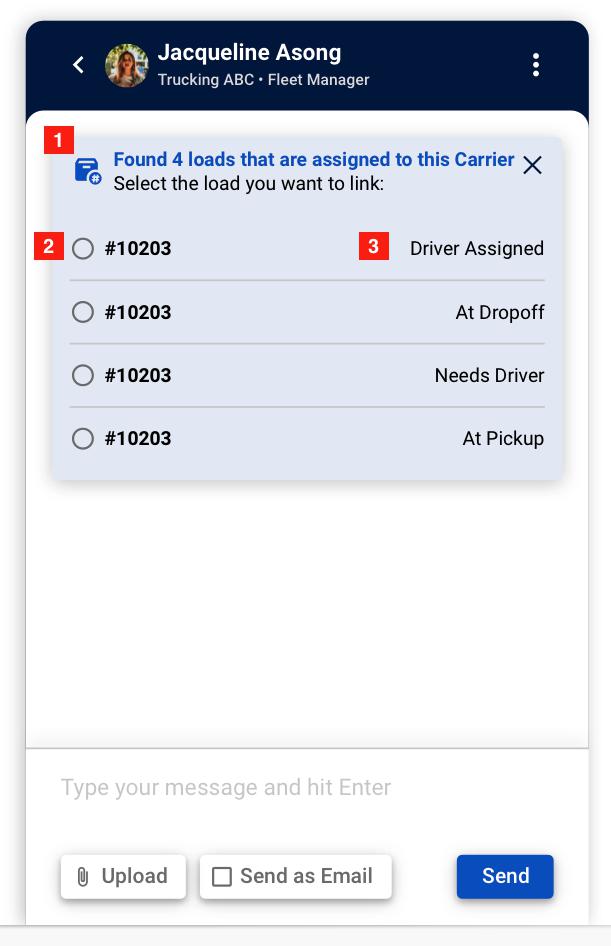
Active shipments are assigned to this carrier
Load Number
Load Status
Step #4: messageCenter_name_07
Action: Enter #end to end the linking
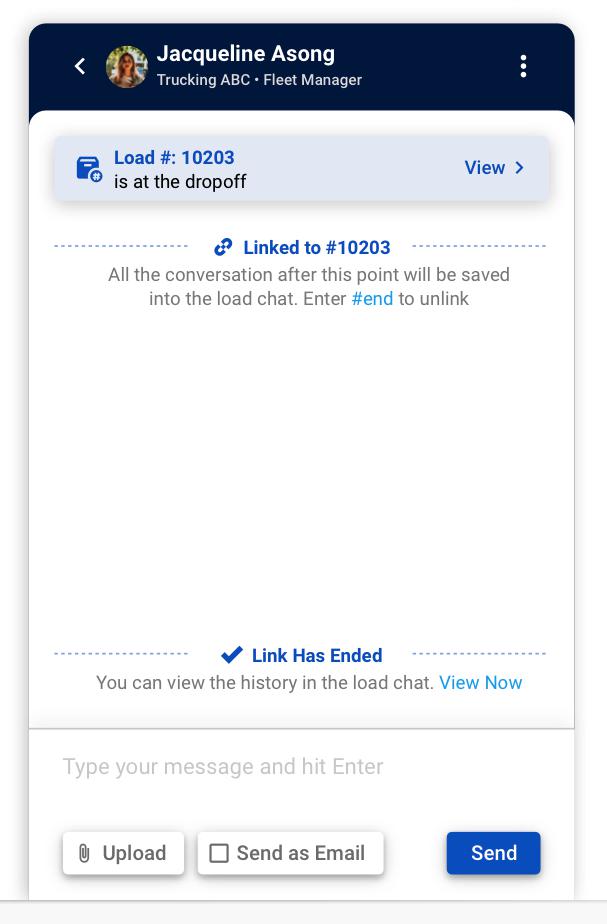
When the linking is initiated successfully, you will get the “Linked to” banner like the first one
When you enter #end, you will get the “Link has ended” banner